Copyright © 1999, William Weiland
These modules record customer order status and interfaces with the Merchant customer management functions.
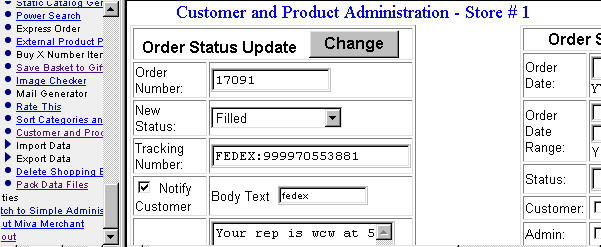
You can change the status of the order and even notify the purchaser of the change with variable styles of update status emails. The status change notice can also include the tracking number if applicable.
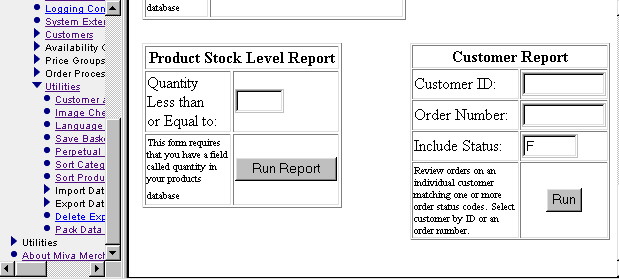
You can run a report for all dates, a range of dates, or a specific date displaying all records or just the records with a specific status, eg Backordered.
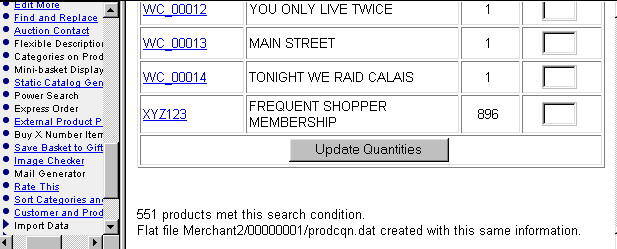
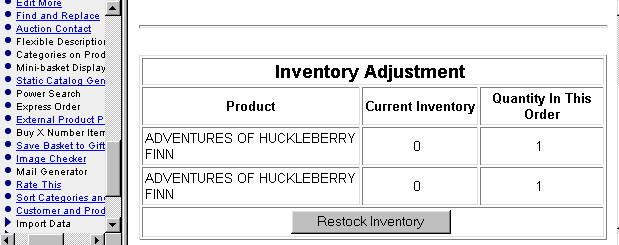
There is also a form which allows you to re-establish inventory levels if you are using the Merchant inventory control system. While the inventory control system will automatically deduct the ordered quantity, it will not replace the quantity if the order is cancelled. Hence, this form was provided to do that. It can also be used to set the inventory level even if not related to an order as it uses the product code to locate the record.
Before using these modules, be sure you have the OpenUI installed in the store. As these modules are installed, they will create hooks into the OpenUI registry.
1) In admin, click Add Modules
2) Click the file upload button
3) Browse to find the customer.mvc file on your hard drive and upload
4) Click Add to add it to the domain
5) Click the image to the left of your store name
6) Click on the Order Fulfillment Configuration link
7) Check the box to the left of Customer Account Management and select Update
8) Click on Add Modules again
9) Click the file upload button
10) Browse to find the custadm.mvc file on your hard drive and upload
11) Click Add to add it to the domain
12) Click the image to the left of your store name
13) Click on the Utilities link
14) Check the box to the left of Customer and Product Administration and select Update
15) Click on Add Modules again
16) Click the file upload button
17) Browse to find the cim_new.mvc file on your hard drive and upload
18) Click Add to add it to the domain
19) Click the image to the left of your store name
20) Click on the System Extension Configuration link
21) Check the box to the left of CIM System Module for New Screens and select Update
22) FTP the ordstat.htm file to modules/ui/ordstat.htm If you want to use different abbreviations you can edit this file. In the admin:stores:fulfillment:Customer Account Management admin screen you can change the List of Status Codes and the Initial Order Status that is assigned.
23) If you want to install the optional product quantity import module (prodquan.mvc), see prodquan.htm for installation notes.
Click on the Customer Account Management tab in the Order Fulfillment Configuration screen
From - Enter the from address of your store for order status emails
Subject - Enter the subject for order status emails
Header - Enter beginning line of all order status emails, irregardless of the rest of the email body template
Default message - When sending an order status email, you will enter a body text template. This is the default (most common) template your store will use and saves a step of having to enter it when updating status, since it is already filled in.
Account creation - If checked, customers will be able to place an order without creating an account
Allow re-order - If checked, customers will be able to re-order from the invoice which is displayed from the order history
Configurable options for the re-order table - modify per your needs
Configurable options for the order history table - modify per your needs
Display History location - for the prompt
Orders not found message - when a customer searches for their history but they have no orders placed when they were logged in
List of Status Codes - list the status descriptions separated with the | character. No two status descriptions can begin with the same letter as the only text stored in the record is the first letter of the description
Initial Order Status - when a new order is placed, this is the code that is initially inserted in the record
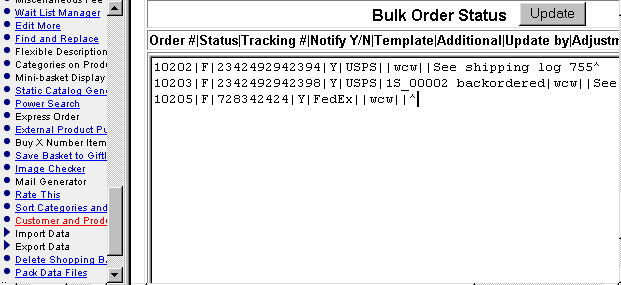
Carrier Tracking Links - Enter the URL links for the carriers your store is using. You will need to get that link from your carrier. Follow the module's onscreen example to enter your new links. This input needs to be filled for your carriers if you want order tracking clickable links in the order history. Then when updating a specific order status fill in the carrier and tracking number as you see in the figure below.
Auto Price Group Inclusion - You can automatically include customers into price groups based on their cumulative order totals. You will use tokens to trigger the totals check and assignment. A good place to put the tokens would be on the customer edit account screen and/or the welcome back returning/new customers. See admin:storename:tokens for the actual token syntax.
Main Screen Admin - when checked, the number of pending orders will be shown when logging in
Customer Viewed Order History - when checked, the module will use the template you have entered in the inputs below it. If not checked, the module will use the default. New users will probably use the default until they get time to customize a template. A sample template is provided. If you want order tracking links in the order history, you will need to use the template. See the sample template note about which token to use for that tracking link vs just a tracking number.
The order history has a clickable link to display the invoice. If you have code in your invoice that has processes you do not want to occur (e.g. affiliate credits) when someone looks up their invoice from the history, you will need to either not use the link to the invoice or write conditional code around that process so it only runs when the Action is AUTH. Affiliate tracking written per the Miva Merchant API does not run the affiliate credits by displaying the invoice screen; instead runs inside the AUTH function via a direct call or a fulfillment module. However, some stores may have taken the easy route and put a link which calls a url at some other site to run affiliate credits. Hence you would wrap that link with the appropriate code to only run it if the g.Action variable was AUTH.
Click on the Customer Account Management (Mail Body) tab in the Order Fulfillment Configuration screen
You can create as many templates for the order status emails that you want. I have provided an example of how to lay out the text email. You can use the tokens listed under "Available tokens" in the mail body admin screen.
You can automatically add customers to price groups by putting tokens in specific locations. For example, below is an example of tokens in the header of the Edit Customer screen. You could do something similar on the welcome page for returning and/or new customers.
%OUI%
%module|customer|F%
Order History:
%VAR(g.CIM_Customer_Total_Orders_Formatted)%
%module|customer|~100%
<BR>
Price Group:
%VAR(g.CIM_PriceGroup_Name)%
This example will sum all of this customer's past orders which have a status of F (filled). It will then display that formatted total. Then the 2nd module token will run the automatic price group inclusion if the sum of the order totals exceeds $100. If they are assigned to a price group, that price group name will then be displayed.
You can put a form anywhere in the store that will let a customer lookup their order by entering their order number and the email address that matches it. The customer does not need to have an account and they do not need to be logged in.
<P>
<P>
<table border="0">
<tr>
<th colspan="2">Previous Order Lookup
</th>
</tr> <form method="POST" action="http://www.YOURDOMAIN.com/Merchant2/merchant.mvc?">
<input type="hidden" name="Screen" value="NEW">
<input type="hidden" name="SubScreen" value="ACCT">
<input type="hidden" name="Action" value="SOLU">
<input type="hidden" name="Store_Code" value="YOURSTORECODE">
<tr>
<td>Order Number:
</td>
<td>
<input type="text" name="myorder" value="">
</td>
</tr>
<tr>
<td>Order Email.:
</td>
<td>
<input type="text" name="myemail" value="">
</td>
</tr>
<tr>
<td colspan="2">
<input type="submit" name="trash" value="Look Up">
</td>
</tr>
</table>
</form>
<br>
<a href="https://www.YOURDOMAIN.com/Merchant2/merchant.mvc?Screen=LOGN&Order=0&Store_Code=YOURSTORECODE">
Login</a> for complete history.
Click on the image to the LEFT of the admin:stores:utilities link. Scroll down to Customer and Product Administration.
There are several forms displayed on the screen. The forms should be self explanatory.