
Copyright © 2000, William Weiland
The purpose of this module is to allow a customer to rate and write a review about products in your store.
Use the Merchant admin upload feature to upload the ratethis.mv(c) module. Once uploaded, click the Add button to add it to the mall/domain.
In admin, under your store, click on the link for Utilities Configuration Screen. Assign the module and Update it to install it in your store.
FTP the two included gif files, whole.gif and half.gif to the graphics/ directory under your Merchant directory. The images are of a heart. If you want to use other images, eg. stars or half stars, simply FTP them to the server and change the URL settings in admin.
Click the link for Rate This to enter the configuration settings from the Utilities Configuration screen.
If you have compiled Merchant and the Rate This module is version 4.62 or higher, you will also need to install or update the cim_log.mvc (CIM Activity Log). cim_log.mvc is a central library file that several of my modules use. If you already have it installed, then update it. If not, then add it as new. After installing, make sure it is "Assigned" under the Logging Configuration screen.
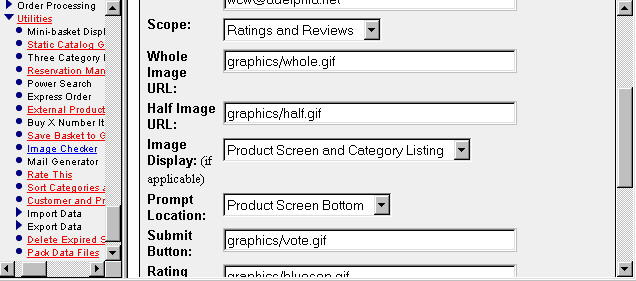
In admin, under the store, select the Utilities link. Then select the link for Rate This so that you can configure your rating system.
Email
Email address to send ratings to: If you do not want to be notified
every time a rating is made, leave this blank.
Scope
Select which system you want to use and display in your store.
Whole Image URL
The URL should be virtual under your Merchant store.
Half Image URL
The URL should be virtual under your Merchant store.
Image Display
When using the ratings image display (hearts, stars, etc) they will display
at the bottom of each product's screen. This setting allows you to also
display the ratings on the category listing screen.
Prompt Location
The submission prompt can either be in the category tree or at the bottom
of the product screen.
Button
You can change the rating/review submission button to a graphic button by
including a virtual URL.
Separator
If you include a virtual URL for a line image, it will appear between each
customer's review.
Footer
You can include a footer message under the rating/review prompts.
Not logged in message
If the customer is not logged in, you can provide a brief message to tell
them that they must login before rating a product. You can even use a
token for a link to login. After login, the customer will be forwarded back
to the product page instead of the typical storefront. This will be ok IF
you do not have images on your product pages with full url. Virtual paths
to images are ok. If you do have full url to images on your product pages,
then you will need to make the not logged in message just text, no link.
Templates
You have more control over the layout of the prompt and display for ratings
and reviews if you use the templates. You will need to know some html if you
do replace the default layouts with the templates.
If you are using the Miva Merchant User Interface (mmui) you will need to make some very simple edits to the core files. Be sure to do that with a text editor (NO WYSIWYG editors) such as Programmer's File Editor (PFE) so as not to damage the mv files. ALWAYS BACKUP your unmodified mv files in case you make a mistake.
1) In the mmui.mv file you insert the following line in the
MMUI_Begin_Screen function. It is inserted on the line immediately before
the last </TABLE> tag. It goes between the lines marked with * below.
*</TD></TR>
<MvDO FILE = "{g.Module_Root$'modules/util/ratethis.mv'}" NAME = "l.ratee" VALUE = "{RateThis_Prompt()}">
*</TABLE>
Note: the rate this prompt will not display unless a customer is logged in.
2) In the mmui.mv file you insert the following line in the
MMUI_ProductDisplay function. It is inserted on the line immediately before
the </TABLE> tag which follows the cell which contains
<MvEVAL EXPR = "{ Products.d.desc }"> The code goes between the lines
marked with * below.
*</TD></TR>
<MvDO FILE = "{g.Module_Root$'modules/util/ratethis.mv'}" NAME = "l.rating" VALUE = "{RateThis_Get_Rating(Products.d.code)}">
*</TABLE>
Alternatively, you can include the first insert above immediately
after the second. This would put the rater input below the rater display
and on the product screen vs the category column.
3) If you want to also include the graphic image rating display on the
category listing of products (in addition to the product screen), add the
following line just below the product description (desc) cell in the
mmui.mv Display_Product_ScreenExpand function. Many people have already
modified their category display screen, so you may find it necessary to
change slightly the table cells surrounding the line below for better
alignment. That can be done by editing the RateThis_Short_Rating function
within the ratethis.mv file.
<MvDO FILE = "{g.Module_Root$'modules/util/ratethis.mv'}" NAME = "l.rating" VALUE = "{RateThis_Short_Rating(Products.d.code)}">
Note: If you are using Merchant 4.14 or newer, the file name in the inserted code is ratethis.mvc. Also, after editing the mmui.mv, you will need to re-compile it to create the mmui.mvc. For this reason, it is highly recommended that you use the OpenUI to avoid the editing requirements.
Q: The prompt to enter the ratings and reviews is not showing up at the product screen.
A: Consider
1) The customer must be logged in before they see the prompt. This discourages mischievous ratings.
2) If you are using the Miva Merchant look and feel, there are edits of the mmui.mv required. If your Merchant version is 4.14 or newer see the note above about editing and 4.14 or newer.
Still have a question?