
Copyright © 2001, William Weiland
Display all open baskets in a table format. This report includes active and expired baskets. As a store owner you are able to see how many people come to your store and abandon baskets, even after placing items in the basket. In some cases, customers get to checkout and then abandon baskets and you can determine that too. As baskets are converted to orders, they disappear from this listing. Likewise, when expired baskets are deleted in Admin, they also disappear from this listing.
1) In admin, click Add Modules
2) Click the file upload button
3) Browse to find the showbask file on your hard drive and upload
4) Click Add to add it to the domain
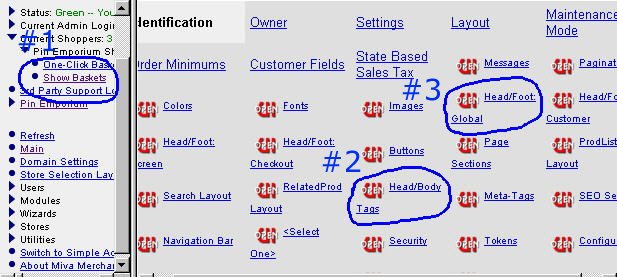
5) Then in admin click on Stores
6) Click the image to the left of your store name
7) Click on Utilities
8) Check the box next to the Show Baskets
9) Click Update
1) In admin, click on Stores
2) Click the image to the left of your store name
3) Click the image to the left of Utilities under your store
4) Click the link to the Show Baskets
5) Click the Show Baskets button
6) Alternate access when using OpenUI version 4.935 or higher, see location #1 in the image below
7) In Show Baskets version 4.59 (compiled) or higher you have the ability to open an admin side popup by clicking on the basket ID
a) Delete - you can delete any basket by clicking the link
b) Clear Chat - if you are running chat (Talk Back module required), you can clear all of the dialog in the displayed chat session. This is useful if you are approaching the chat session character limit.
c) Send Chat - if you want a record of the chat session (Talk Back module required), you can click the send chat and it will email the dialog to the email address listed in the show baskets module's admin
1) You have Show Baskets version 4.59 or newer and Merchant 4.14 or newer AND
2) You licensed the optional Talk Back module AND
3) You have installed the OpenUI
The Talk Back module allows the store to interface with the Show Baskets module and conduct live chat sessions with customers. Both Show Baskets and Talk Back must be installed in the store before using the chat and other customer notification features. If the Talk Back module is not installed, you will still be able to use the Show Baskets features described in the Overview above.
1) In admin, click Add Modules
2) Click the file upload button
3) Browse to find the talkback file on your hard drive and upload
4) Click Add to add it to the domain
5) Then in admin click on Stores
6) Click the image to the left of your store name
7) Click on System Extension Configuration
8) Check the box next to Talk Back
9) Click Update
1) If you have installed the optional Talk Back module, then fill in the configuration settings in admin:stores:utilities Show Baskets module
2) Alert message - when you initiate a session or want to alert a customer to open a chat window, you can enter the text/link that you want to display
3) Paging text - the text to place on the storefront for the customer to be able to page store staff that he/she wants to chat
4) Paging image - ame as the above text but you can use a virtual link to an image
5) You can display the paging link or not. Some stores do not want the customer to initiate the chat.
6) Paging Link Alert - message the customer sees if you allow them to page the store staff
7) Expires - number of minutes a chat session remains live if there is no activity
8) Visitor - visitor name if they do not furnish it
9) Close window text/image - text or image for closing chat window
10) Send message text/image - text of image for posting the message to the session
11) Number of seconds to refresh the chat portion of the window
12) Maximum length - limit the length of the session to prevent pranksters from data flooding
13) Store email - email address to send paging message to and for optionally sending the session history
14) You can include a sound (.wav format) file that will run when a message has been entered by the opposite party to alert the user. Enter the full url of the wav file.
15) Some browsers are not supported for chatting. You can have a brief message which will appear in the popup box. The MAC IE and Camino are the only non-supported browsers we are aware of.
16) You can compare the session ID of the store with the popup as a security measure. If your secure and non-secure URLs have a different domain (i.e. shared certificate), you will need to leave this unchecked.
17) Purge expired message - periodically purge old messages
1) Use the token %module|talkback|1% in the head tag section of Miva Merchant. This inserts the required javascript popup. Insert token at location #2.
2) Use the token %module|talkback|2% where you want the alert message to appear for the customer to see they have a message waiting. You'll probably insert the token at location #3.
3) Use the token %module|talkback|3% where you want the chat request button to appear for the customer to flag the store staff. You'll probably insert the token at location #3.
* When using tokens in the OpenUI input areas, e.g. in headers, do not forget that %OUI% must be at the very beginning of that input area or OpenUI will not run the token converter to actually process it. There is more info about using tokens in the OpenUI at openui.org. We are not going to duplicate that information in this Show Baskets/Talk Back install doc.
1) When the customer pages the store owner using the Paging Link, a chat dialog opens on the customer's screen, showing the optional text in Paging Link Alert. TalkBack optionally sends an email to the address in Store Email and places a ? next to the basket ID in the Show Baskets list.
2) The store owner can respond to a customer's page or initiate a chat session by clicking on the customer's basket ID number in the Show Baskets list. Enter the message and press Send.
3) The chat session doesn't start until the admin presses Send. After the session has been initiated the ? in the Show Baskets list is replaced by the login name of the store employee engaged in a chat with this customer. This helps prevent more than one employee from responding to the same customer.
4) When you press Send the Alert Message appears on the customer's screen the next time he/she navigates to a page that contains the Alert Message token %module|talkback|2%, eg in one of the main headers. If the customer has the chat dialog open then your message will appear in his/her dialog immediately. Otherwise, your message will appear in the chat dialog the next time the customer opens it using either the Paging link or the Alert Message.
5) The Paging Link and Alert Message are both optional, but you must have at least one in your store so the customer can open the chat dialog. Add the Paging Link if you want the customer to be able to initiate a chat. Add the Alert Message to let the customer know that you have initiated a chat or responded to his/her page.