Copyright © 2000, William Weiland
This module will prevent the sales tax from being applied if a business customer enters a tax exemption/blanket resale ID. This module writes abbreviated order information plus the tax ID to a flat file for historical retrieval. That file is located in your store's data directory under the b2bnotax subdirectory, which is created when installed to the store.
The authors, programmers or distributors of this module will not be held liable for uncollected tax or failure of this module to perform without failure. The store owner is solely responsible for verifying the credibility of a customer's claim for tax exemption. You agree to these terms prior to use of this module.
1) In admin, click Add Modules link (fig 2)
2) Click the file upload button
3) Browse to find the b2bnotax.mvc file on your hard drive and upload (fig 3)
4) Click Add to add it to the domain
5) Then in admin click on the plus to the left of Stores
6) Click the plus to the left of your store name
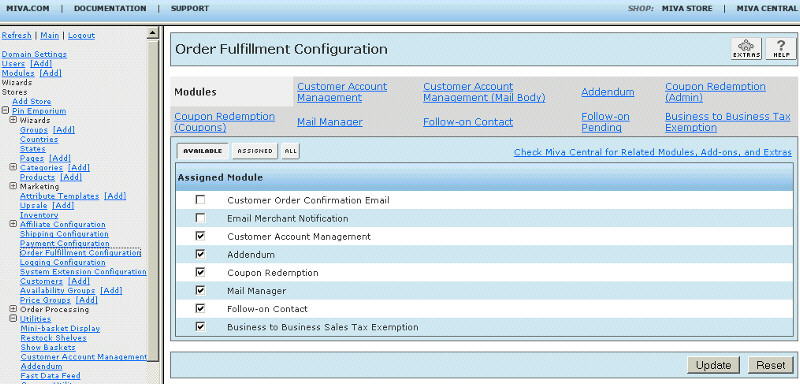
7) Click on Order Fulfillment Configuration link (fig 9)
8) Check the box next to the Business to Business Sales Tax Exemption
9) Click Update
10) Click Pages link to get to the User Interface (fig 4)
11) Click Items link at the top of the User Interface page (fig 5)
12) Click the Add Item button (fig 6)
13) Enter b2bnotax for the code
14) Look up and scroll to the last page of items and Business to Business Sales Tax Exemption should be at the end of the list of items
15) Select Business to Business Sales Tax Exemption (fig 8)
16) Click the Add button to assign the module
17) The CIM Activity Log (cim_log.mvc) may already be in your store as it is used by many of our modules. Check under the Modules link to see if it is already there. If it is there, skip to 26. If not, then go to 18.
Install cim_log.mvc
18) Again, click Add Modules link
19) Click the file upload button
20) Browse to find the cim_log.mvc file on your hard drive and upload
21) Click Add to add it to the domain
22) Click on the Logging Configuration Link
23) Check the box next to the CIM Activity Log
24) Click Update
25) Skip to 31
Update cim_log.mvc
26) Click Modules link
27) Scroll down to CIM Activity Log and click the link
28) Click the file upload button
29) Browse to find the cim_log.mvc file on your hard drive and upload
30) Click Update to update the module
31) Return to the Order Fulfillment Configuration screen and click the link for Business to Business Sales Tax Exemption to enter the configuration settings. If you enter anything in the customer login or availability group inputs, the option to exempt tax will not be shown to customers not in the list or not in the availability group. If they are in the customer list or in the availability group, they will see the prompt and can enter their tax ID. In the case of customer login, the tax ID will be pre-filled in. The availability group customer will need to fill in their tax ID unless you check the box to hide the input if in the availability group.
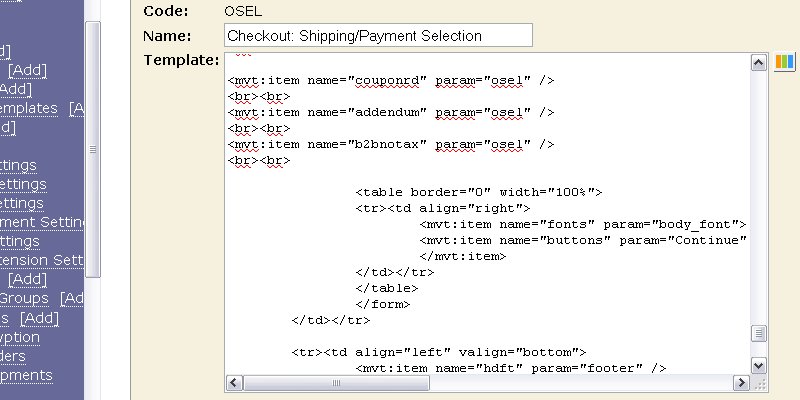
The module is called within specific template screens with render tokens. They are in the format of
<mvt:item name="itemcode" param="xxxx" />
The templates are listed at the Pages link. You will edit the template by inserting the token and clicking the Update (fig 7). Important: After adding the render token to a template page, you must click the Items link for that page, scroll down to the item name and assign it to the page. These two steps are repeated for every page that a module's render token is used on.
1) On page 'osel' (shipping/payment selection), insert <mvt:item name="b2bnotax" param="osel" /> just above the continue button code and the closing </form> tag.
2) On page 'opay' (order payment), insert <mvt:item name="b2bnotax" param="opay" /> just above the continue button code and the closing </form> tag.