Copyright © 2005, William Weiland
This plugin module allows you to have multiple category templates in a single store. You can have a different template for every category in your store if you want. The template uses the standard store morph technology template editor in MIVA Merchant 5.
1) In admin, click Add Modules link (fig 2)
2) Click the file upload button
3) Browse to find the catman.mvc file on your hard drive and upload (fig 3)
4) Click Add to add it to the domain
5) Then in admin click on the plus to the left of Stores
6) Click the plus to the left of your store name
7) Click on the word Utilities under your store (fig 9)
8) Check the box next to the Category Manager
9) Click Update
10) Click Pages link to get to the User Interface (fig 4)
11) Click Items link at the top of the User Interface page (fig 5)
12) Click the Add Item button (fig 6)
13) Enter catman for the code (fig 8)
14) Look up and scroll to the last page of items and Category Manager should be at the end of the list of items
15) Select Category Manager
16) Click the Add button to assign the module
17) FTP the asc.gif, desc.gif, right.gif, and left.gif to the mm5/graphics directory
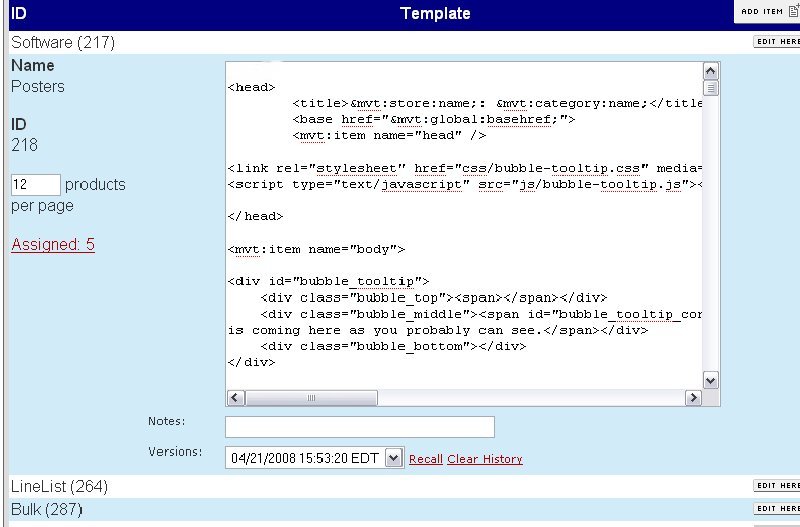
18) You can create as many different templates as you need. You can use the built in ctgy page template to get started by copying it to the clipboard and then adding a new template in the module's admin in the store utilities menu and pasting the built in template into the new template's input. (fig 10)
19) You design each template based on the layout you want. Here are links to some MMUI example templates. See ctgytmp1.txt for an example of a single column category layout. See ctgytmp2.txt for an example of a three column category layout. See ctgytmp3.txt for an example of a line list category layout. Within these examples you will see the template code for the dynamic sorting controls and the pagination and totals display. Note: each of these example pages is a txt file and is missing the beginning <html> and ending </html> tags. Only add the ending </html> tag. (fig 12)
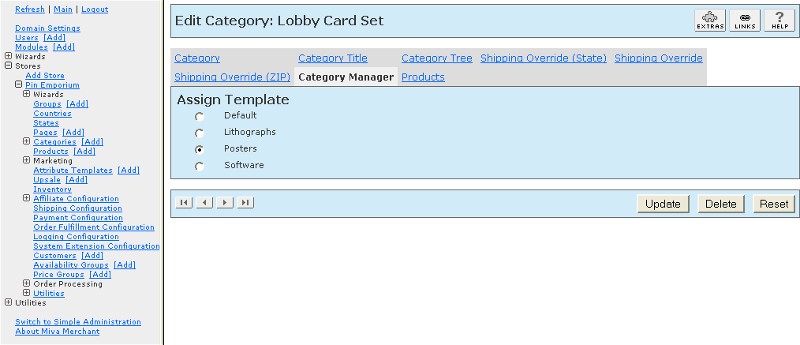
20) Once you create custom templates, you can assign them to categories. Go to the store's categories link and click it. Locate the category you want to assign the custom template to and click the edit button. Click the link at the top for Category Manager. Assign the applicable template. (fig 11) If your store is CSSUI, you can create multiple templates. Use the existing category template code to craft your layout.
1) You will add four lines between the <mvt:item name="html_profile" /> tag and the <head> tag at the beginning of the ctgy page template. Click the link under your store for pages. Click the edit for the ctgy page. Add these four lines between the two tags: (fig 7)
<mvt:item name="catman" param="display" />
<mvt:if expr="l.settings:catman:replaced">
<mvt:exit>
</mvt:if>
2) Next, click the Items link for the ctgy page. Scroll down to the catman item name and assign it to the page (fig 8).
You can include a breadcrum trail, e.g. Home > Software > Developer Bundles by inserting the following code in your custom category templates:
<mvt:item name="catman" param="trail" />
<mvt:if expr="NOT ISNULL l.settings:catman:trail">
<mvt:item name="fonts" param="ctgy_font">
<a href="&mvt:global:sessionurl;Screen=SFNT&Store_Code=&mvta:store:code;">
<u>Home</u></a>
<mvt:foreach iterator="trail" array="catman:trail">
<mvt:if expr="pos1 GT 1">
>
<a href="&mvt:global:sessionurl;Screen=CTGY&Store_Code=&mvta:store:code;&Category_Code=&mvta:trail:code;">
<u>&mvt:trail:name;</u></a>
</mvt:if>
</mvt:foreach>
</mvt:item>
</mvt:if>
<br><br>
You can include the sub-categories on the parent category page (to the right) by inserting the following code in your custom category templates:
<mvt:item name="catman" param="subcats" />
<mvt:if expr="NOT ISNULL l.settings:catman:subcats">
<table><tr>
<mvt:foreach iterator="subcats" array="catman:subcats">
<td align="left" valign="bottom" nowrap>
<mvt:item name="fonts" param="body_font">
<a href="&mvt:global:sessionurl;Screen=CTGY&Store_Code=&mvta:store:code;&Category_Code=&mvta:subcats:code;">
<u>&mvt:subcats:name;</u></a>
</mvt:item>
</td>
<mvt:if expr = "(pos1 MOD 3 ) EQ 0">
<tr>
</mvt:if>
</mvt:foreach>
</tr></table>
</mvt:if>
Note: If you want to display the category image (if there is one) you would use a conditional check for the image instead of just the line for the name like:
<mvt:if expr="l.settings:subcats:image">
<img src="&mvt:subcats:image;" border="0"></a>
<mvt:else>
<u>&mvt:subcats:name;</u></a>
</mvt:if>
Beginning with the Category Manager version 5.021 you can hide specific products from the display. Insert <!-- miva_nodisplay //--> anywhere in the description of the products and they will not show in the category. The text will also not display in the description because it is surrounded with html comment tags. This feature is different from availability groups. Availability groups hide the product on all screens unless the customer is in the group and logged in. This "nodisplay" feature is used when you don't want it to show in the category display but you may still want it to be found with a direct link or in the product list screen.
You can insert a custom category field value on the CTGY page template.
<mvt:item name="catman" param="customcategory|info|l.all_settings:category:id|copyright" />
&mvte:global:info;
This will check the custom category field "copyright" for the current category and save the value to a variable called "info". You can then mvte the info variable to display it. Note: This function requires use of the Miva Corp built-in custom fields module and that you have created custom category fields.
Beginning with Category Manager version 5.024 you can let the customer select the number of products per page to show, e.g. show all. Put this drop down on the page where you want it.
Show
<select size="1" name="findcat" onchange="document.location.href=this.value">
<mvt:if expr="g.ProductsPerPage EQ 12">
<option value="&mvt:global:sessionurl;Screen=CTGY&Category_Code=&mvta:global:Category_Code;&Store_Code=&mvta:global:Store_Code;&ProductsPerPage=12" selected>
12</option>
<mvt:else>
<option value="&mvt:global:sessionurl;Screen=CTGY&Category_Code=&mvta:global:Category_Code;&Store_Code=&mvta:global:Store_Code;&ProductsPerPage=12">
12</option>
</mvt:if>
<mvt:if expr="g.ProductsPerPage EQ 36">
<option value="&mvt:global:sessionurl;Screen=CTGY&Category_Code=&mvta:global:Category_Code;&Store_Code=&mvta:global:Store_Code;&ProductsPerPage=36" selected>
36</option>
<mvt:else>
<option value="&mvt:global:sessionurl;Screen=CTGY&Category_Code=&mvta:global:Category_Code;&Store_Code=&mvta:global:Store_Code;&ProductsPerPage=36">
36</option>
</mvt:if>
<mvt:if expr="g.ProductsPerPage EQ 99999">
<option value="&mvt:global:sessionurl;Screen=CTGY&Category_Code=&mvta:global:Category_Code;&Store_Code=&mvta:global:Store_Code;&ProductsPerPage=99999" selected>
ALL</option>
<mvt:else>
<option value="&mvt:global:sessionurl;Screen=CTGY&Category_Code=&mvta:global:Category_Code;&Store_Code=&mvta:global:Store_Code;&ProductsPerPage=99999">
ALL</option>
</mvt:if>
</select> per page
You will also have to pass the ProductsPerPage value in links and forms used in the page. You will add &ProductsPerPage=&mvta:global:ProductsPerPage; into the url links for the page counts. In the product layout section you will insert <input type="hidden" name="ProductsPerPage" value="&mvte:global:ProductsPerPage;"> in the forms for add to basket, next and previous.
Q: I just upgraded to Merchant 5.5 and the templates look different.
A: In the templates change:
<mvt:item name="head" />
to
<mvt:item name="head" param="head_tag" />
Remove the <html> tag at the beginning as it is being added by the <mvt:item name="html_profile" /> tag in the main template.
If your category column has suddenly become wider, locate the line
<td align="left" valign="top" nowrap>
at the beginning of the category column. Remove the nowrap.
Also, the editing requirements on the CTGY page template have changed. See the editing requirements section above and figure 7 below for the location of the four lines.
Q: How can I mass update the category template assignments
A: Use the included category import and export modules (see their install doc)
Still have a question?