Copyright © 2008, William Weiland
The category minimums and maximums allows you to set the number of products that must be in the basket from designated categories before the customer can complete the checkout. You can alternatively setup the module so it restricts based on category subtotal instead of quantities. If you don't list categories in the configuration of the module, then those categories have no restrictions.
1) In admin, click Add Modules link (fig 2)
2) Click the file upload button
3) Browse to find the catmins.mvc file on your hard drive and upload (fig 3)
4) Click Add to add it to the domain
5) Click the plus to the left of your store name if not already expanded
6) Click on the word Utilities under your store (fig 9)
7) Check the box next to Category Minimums and Maximums
8) Click Update
9) See the editing requirements below on how to add the Category Minimums/Maximums to the checkout page in the store.
Enter data into the applicable input field.
For those categories that you want to apply restrictions, enter the category code, minimum,
and maximum. For example:
ABC=3=10|
MNOP=5=99999|
Category ABC would have a minimum of 3 and maximum of 10. Category MNOP would have a minimum of
5 and maximum 99999.
If you want to base restrictions on subtotal instead of quantities, simply begin the input with the $ character.
Do not put the $ at the beginning of each line; just once at the beginning of the input. For example:
$ABC=25=1000|
MNOP=15=100|
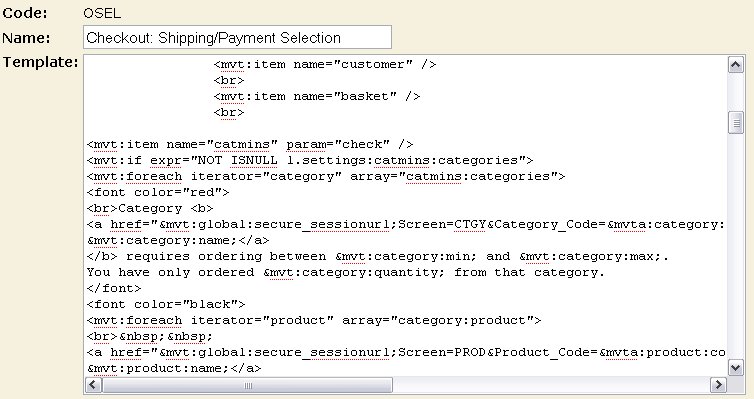
You will edit the OSEL page template by inserting the token and store morph code below and then clicking the Update (fig 7). Important: After adding the code to a template page, you must click the Items link for that page, scroll down to the catmins item name and assign it to the page (fig 8).
<mvt:item name="catmins" param="check" />
<mvt:if expr="NOT ISNULL l.settings:catmins:categories">
<mvt:foreach iterator="category" array="catmins:categories">
<font color="red">
<br>Category <b>
<a href="&mvt:global:secure_sessionurl;Screen=CTGY&Category_Code=&mvta:category:code;&Store_Code=&mvta:global:store:code;">
&mvt:category:name;</a>
</b> requires ordering between &mvt:category:min; and &mvt:category:max;.
You have only ordered &mvt:category:quantity; from that category.
</font>
<font color="black">
<mvt:foreach iterator="product" array="category:product">
<br>
<a href="&mvt:global:secure_sessionurl;Screen=PROD&Product_Code=&mvta:product:code;&Store_Code=&mvta:global:store:code;">
&mvt:product:name;</a>
</mvt:foreach>
</font>
</mvt:foreach>
</td></tr>
<tr><td align="left" valign="bottom">
<mvt:item name="hdft" param="footer" />
</td></tr>
</table>
<br /><center></center>
<mvt:item name="hdft" param="global_footer" />
</body>
</html>
<mvt:exit>
</mvt:if>