Copyright © 2001, William Weiland
Easily offer a discount based on the number of items in the basket. The default is to calculate product charges in the specified category (including attribute charges) to determine the total to discount. You can optionally include non-product charges in the calculation. Then in admin, the store owner configures the trigger levels (number needed to activate the discount) and the corresponding percentage off. The store owner can designate 1 - 4 (1 - 12 in the first group) trigger levels so that he/she can vary the percentage discount based on the amount spent. The store owner then includes a list of category codes that will be used in the calculation. The discount amount will appear during checkout on the screen after the customer has entered their shipping method or can appear in the basket prior to checkout. Waiting until checkout allows Merchant to include (optionally) any miscellaneous fees or coupons redeemed on the Shipping - Payment selection screen.
Install catoff_q.mvc
1) In admin, click Add Modules link (fig 2)
2) Click the file upload button
3) Browse to find the catoff_q.mvc file on your hard drive and upload (fig 3)
4) Click Add to add it to the domain
5) Then in admin click on the plus to the left of Stores
6) Click the plus to the left of your store name
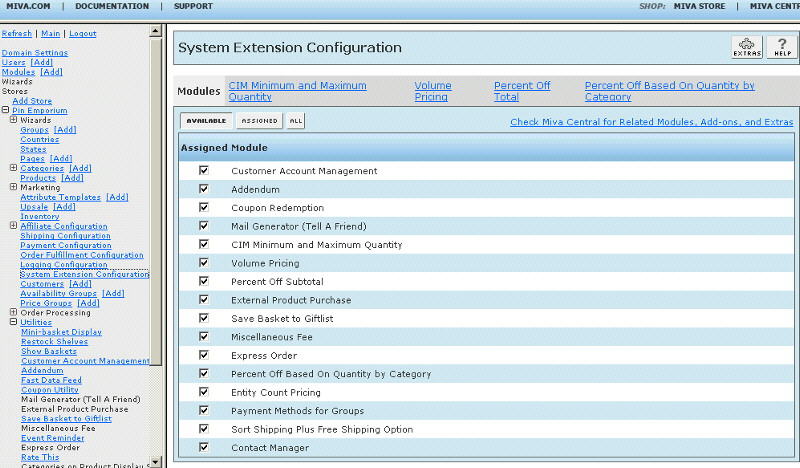
7) Click on System Extension Configuration link (fig 4)
8) Check the box next to the Percent Off Based On Quantity by Category
9) Click Update
10) Click Pages link to get to the User Interface
11) Click Items link at the top of the User Interface page
12) Click the Add Item button
13) Enter catoff_q for the code
14) Look up and scroll through the list of items and find Percent Off Based On Quantity by Category
15) Select Percent Off Based On Quantity by Category
16) Click the Add button to assign the module
17) The CIM Activity Log (cim_log.mvc) may already be in your store as it is used by many of our modules. Check under the Modules link to see if it is already there. If it is there, skip to 26. If not, then go to 18.
Install cim_log.mvc
18) Again, click Add Modules link
19) Click the file upload button
20) Browse to find the cim_log.mvc file on your hard drive and upload
21) Click Add to add it to the domain
22) Click on the Logging Configuration Link
23) Check the box next to the CIM Activity Log
24) Click Update
25) Skip to 31
Update cim_log.mvc
26) Click Modules link
27) Scroll down to CIM Activity Log and click the link
28) Click the file upload button
29) Browse to find the cim_log.mvc file on your hard drive and upload
30) Click Update to update the module
Configure the module
31) Return to the System Extension Configuration screen (fig 4) and click the link for Percent Off Based On Quantity by Category to enter the configuration settings
Input data as applicable.
Include non-product charges (coupon, misc. fees, etc). You can't use this if groups 2, 3, 4, 5, 6, 7, or 8 are used.
Subtract discount from total before tax computation. This makes the tax on the discount a negative taxable amount so the tax module will subtract it from the total tax due.
Show discount prior to checkout. You can display the discount in the basket as items are added and prior to checkout.
Exclude Price Group. You can exclude one price group from obtaining the discount.
Invoice Label. In the basket you can configure what you want the discount line item to display.
In the discount tiers, list the quantity trigger levels in the left column and percentage discount in the right. Start with the top line. Put in the highest trigger level. The module checks each row from the top down when applying the discount. When it comes to 0, it stops processing. So do not skip rows until you have no more tiers to enter. You don't have to use all rows. For example, in the first group you might only have 3 tiers. They would occupy the top 3 rows. Below that, you would have zeroes.
Include Category Codes For Discount. At least one code is required for the group discount to be applied. Be sure to put a | character after each code. This input is for category codes. However, there are two notable exceptions. If you use an * in this input and nothing else, it will treat all remaining products as belonging to this group if they were not already in a group higher. The module starts at group 1 and works down. So if you put some category codes in groups 1 and 2 as normal, the products in those categories would get the discount based on the tiers in those groups. Then if you put an * in the category input for group 3, all of the rest of the products in the store would be treated as if they were in group 3. The other exception (beginning with module version 5.005) is you can use product codes. To differentiate a product code from the expected category code in this input, you need to preceed the product code with the # character and terminated it with the | character. In the screen shot (fig 5) below you can see that Group 6 includes all of category "HD_" plus one other product "1S_00002", which is not in this category. As you can see, you can combine a group of products from other than specific categories to form the group discount.
Beginning with version 5.005 you can automatically include the category discount table on the category page template. Make sure you completed steps 10-16 above. Then at the location you want the table on the CTGY page template, insert the following code (which you can customize to your liking):
<mvt:item name="catoff_q" param="cattable" />
<mvt:if expr="NOT ISNULL l.settings:catoff_q_table">
<table border="0" cellpadding="2" cellspacing="2">
<tr>
<th colspan="2" bgcolor="#00d3ff">
Quantity Discount
</th>
</tr>
<mvt:foreach iterator="level" array="catoff_q">
<tr>
<td align="center" width="50%">
&mvte:level:trigger;
</td>
<td align="right" width="50%">
&mvte:level:percent;%
</td>
</tr>
</mvt:foreach>
</table>
</mvt:if>
Beginning with version 5.005 you can automatically include the discount table on the product page template. Make sure you completed steps 10-16 above. Then at the location you want the table on the PROD page template, insert the following code (which you can customize to your liking):
<mvt:item name="catoff_q" param="prodtable" />
<mvt:if expr="NOT ISNULL l.settings:catoff_q_table">
<table border="0" cellpadding="2" cellspacing="2">
<tr>
<th colspan="2" bgcolor="#00d3ff">
Quantity Discount
</th>
</tr>
<mvt:foreach iterator="level" array="catoff_q">
<tr>
<td align="center" width="50%">
&mvte:level:trigger;
</td>
<td align="right" width="50%">
&mvte:level:percent;%
</td>
</tr>
</mvt:foreach>
</table>
</mvt:if>
You can replace &mvte:level:percent;% with &mvte:level:amount; if you want the product price to show.