Copyright © 2001, William Weiland
Import categories into your Merchant store directly from a flat file. This module will import the category name, code, parent code, and active status of each category. It does not import headers, footers, images and other attributes of each category. If you are using our Category Manager module, it also can import the category template code so you can quickly assign categories to the various category templates.
1) In admin, click Add Modules link (fig 2)
2) Click the file upload button
3) Browse to find the catsimpt.mvc file on your hard drive and upload (fig 3)
4) Click Add to add it to the domain
5) In admin, click Add Modules link (fig 2)
6) Click the file upload button
7) Browse to find the catsexp.mvc file on your hard drive and upload (fig 3)
8) Click Add to add it to the domain
9) Import and Export modules automatically reside in each store within a domain so there is no need to update them to the store
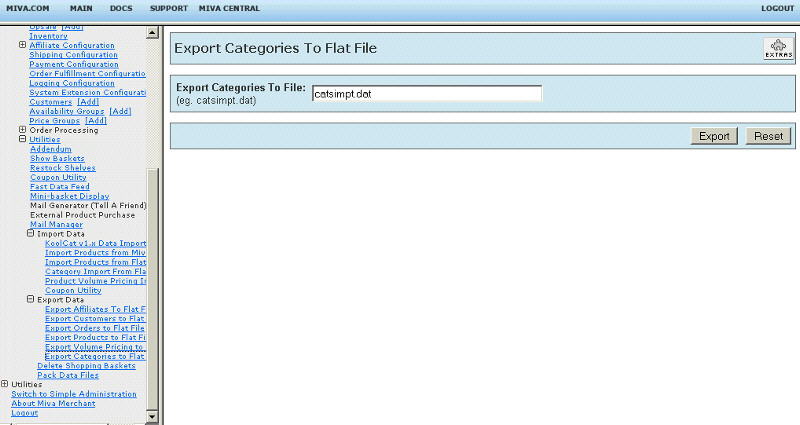
Export: Click on the plus to the left of the word Utilities under the store. Then click on the plus for Export Data. Then click on the link for Category Export (fig 5). The prompt will ask for the flat file name. Only put the file name, no path. For example, catsimpt.dat
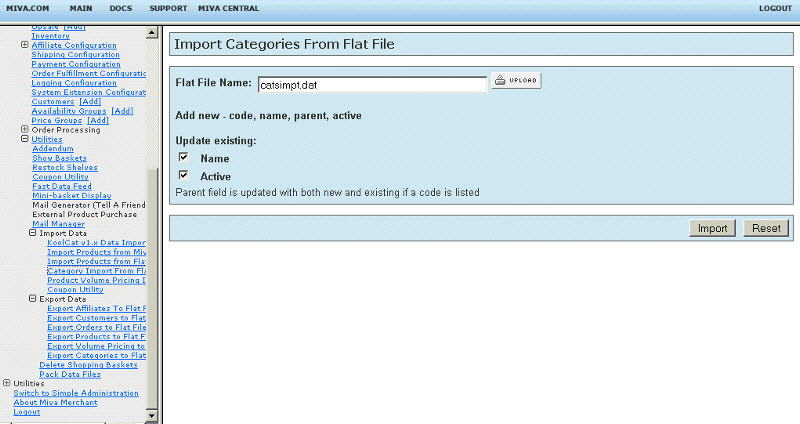
Import: Click on the plus to the left of the word Utilities under the store. Then click on the plus for Import Data. Then click on the link for Category Import (fig 4). The prompt will ask for the flat file name. Only put the file name, no path.
Headstart
If your store already has categories, use the export module, catsexp.mvc, to
create a flat file in the proper format. This can also serve as a backup
(archive) copy of your categories. The default name of the export file is
catsimpt.dat. Keep a copy off-line along with your other backup copies
of data.
The data elements which comprise the categories are pulled from the flat file in a specific order. Since there is no artificial intelligence involved in this flat file import, it is imperative that the data be placed in a flat file in the same order that the program expects it to be. Any variance from that is likely to result in corrupt data in your database.
Creating the Flat File
If you are starting from scratch and have no categories in
your store yet, you can create the flat file in your text editor. Create
the flat file. The default name should be catsimpt.dat. Select the import
module from the admin menu (fig 4) and upload the file. Then import.
Format the Flat File
For Example:
Leave the last line of catsimpt.dat blank.
When there is no parent category, either use a 0 or leave it blank. The
last field will be a 1 (active) or 0 (inactive)
If you are having time-out problems with importing, you may need break up
your flat file into smaller flat files.
If you also are using our Category Manager module and want to assign the
template to the category upon import, put the template name in the 5th
position. For example, 1AA|Software|0|1|col3 would assign the 1AA category to
the col3 template.
Only four elements are on each line for each category linkage. They are the
category code, name, parent category code (if any), and active status
separated by the | delimiter. Exception: If you are using our Category Manager
module, you can add a fifth element at the end of the line which is the name of
the template.
1AA|Software|0|1
1AAF|Shipping Modules|1AA|1