Copyright © 2002, William Weiland
Set minimum and maximum quantity order rules. You can establish a required minimum number of each product that must be ordered. You can also establish a maximum number of each product that can be in a single order.
1) In admin, click Add Modules link (fig 2)
2) Click the file upload button
3) Browse to find the cim_qmin.mvc file on your hard drive and upload (fig 3)
4) Click Add to add it to the domain
5) Then in admin click on the plus to the left of Stores
6) Click the plus to the left of your store name
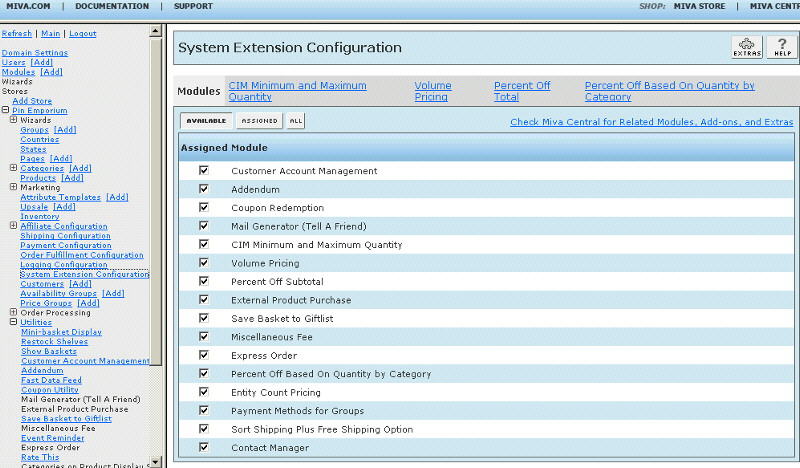
7) Click on System Extension Configuration link (fig 9)
8) Check the box next to the CIM Minimum and Maximum Quantity
9) Click Update
10) Click Pages link to get to the User Interface (fig 4)
11) Click Items link at the top of the User Interface page (fig 5)
12) Click the Add Item button (fig 6)
13) Enter cim_qmin for the code (fig 8)
14) Look up and scroll to the last page of items and CIM Minimum and Maximum Quantity should be at the end of the list of items
15) Select CIM Minimum and Maximum Quantity
16) Click the Add button to assign the module
Configure the module
17) Return to the System Extension Configuration screen (fig 9) and click the link for CIM Minimum and Maximum Quantity to enter the configuration settings
You can include a message box when the customer attempts to order a quantity that is below the minimum or above the maximum for the product. If you leave the override messages blank, then there will be no message box displayed when the customer is out of bounds.
Product code quantity rules are set by including the product code, the minimum and the maximum. Each are separated with the ^ character and the line is terminated with the | character. Example: XYZ123^2^20| would apply the rule to product XYZ123 with an order minimum of 2 and maximum of 20. If you effectively have no maximum, put in the number 999999 or whatever you think would be necessary to limit the quantity. If you have no minimum, you can put 0.
You can have an optional
multiple select box replace the text input for quantity. To do this,
include a 4th parameter on the line. The 4th parameter must be equal to the
2nd (minimum) and be evenly divisible into the 3rd (maximum),
e.g. XYZ123^2^24^2| or you can map the entire select list
e.g. XYZ123^2^24^+2,6,12,18,24| With this latter, start the 4th parameter
with a + character and follow with the list from the minimum to the maximum
with each value separated with a comma. If you use the + at the beginning
of the 4th parameter, you can have a 5th parameter for labels. The label is
what is seen in the drop down box. Example:
4th parameter: +2,6,12,18,24
5th parameter: 2 @ $5.00,6 @ $4.75,12 @ $4.50,18 @ $4.25,24 @ $4.00
This is merely an example of creating the labels in the drop down list.
In order to get the actual discount pricing you would need to be using
our Volume Pricing module.
Alternatively, you can apply the rules to every product code in your store. ALL^1^999999| would apply the 1 minimum and 999999 maximum to all products.
These rules apply to product codes. The attributes do not make the entry start a new calculation. Hence, if you have a shirt as product XYZ123 and set the limit to 10, the customer could buy 5 blue and 5 red to total 10. But they could not buy 10 blue and 10 red as the product code would exceed the 10 maximum for that product code.
You will need to edit the product page and basket page templates where you want the quantity input to be altered and display the error message. You may also want the quantity controls and error message on the product list, category and search pages. The module can be linked within specific template screens with render tokens. They are in the format of
<mvt:item name="itemcode" param="xxxx" />
The templates are listed at the Pages link. You will edit the template by inserting the token and clicking the Update (fig 7). Important: After adding the render token to a template page, you must click the Items link for that page, scroll down to the item name and assign it to the page (fig 8). These two steps are repeated for every page that a module's render token is used on.
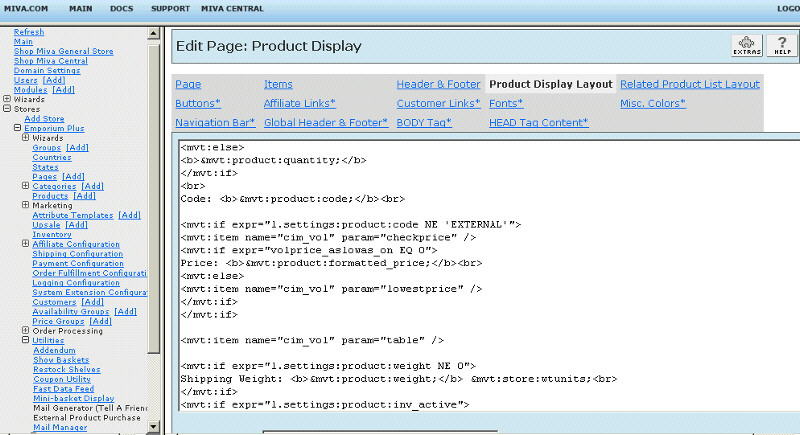
1) On page 'prod' (product display), click the tab at the top labeled Product Display Layout. Insert
<mvt:item name="cim_qmin" param="prod" />
on the page and remove the original input line for quantity. If your Merchant version is Production Release 8 or newer and your Minimum and Maximum Quantity module version is 5.0110 or higher, then you can add a class to the input with a 2nd parameter in the token.
<mvt:item name="cim_qmin" param="prod|product-quantity-input textfield" />
2) On page 'bask' (basket display), click the tab at the top for the Basket Contents. Insert
<mvt:item name="cim_qmin" param="bask" />
on the page just above the update button and remove the original input line for quantity. If your Merchant version is Production Release 8 or newer and your Minimum and Maximum Quantity module version is 5.0110 or higher, then you can add a class to the input with a 2nd parameter in the token.
<mvt:item name="cim_qmin" param="bask|textfield basket-qty-input small" />
3) On the prod and bask pages, you can add the error message token. Insert
<mvt:item name="cim_qmin" param="minmax_error_message" />
at the location that you want the error message to appear on each applicable page. This location should not be in the details area, i.e. not in the Product Display Layout or Basket Contents. Rather it should be on the main Page template for the applicable pages.
4) In addition to the prod and bask pages, you might want to have the error message appear on product list pages. The controls will still be in place on those additional pages, but if the limits are not met, the quantity will be readjusted without the customer knowing it. Hence, it is best to put the error message on the additional pages where a customer can click the Add to Basket button, even though there is no quantity box.
5) You have the possiblity of missing attributes on the screen the product is added from. So in order to pass beyond the missing attribute screen with the error message info, you can include the following two hidden inputs inside the form on the PATR (missing product attributes) page. Make sure they are inside the form on that page.
<input type="hidden" name="QMin_Error_Code" value="&mvte:global:QMin_Error_Code;">
<input type="hidden" name="QMin_Error_Message" value="&mvte:global:QMin_Error_Message;">
Q: How do I customize the error message that comes up when a customer orders an incorrect quantity?
A: In the module's admin, erase the text in the inputs Message Code Label and Message Description Label. Then at the location where you want the error message, use &mvte:global:QMin_Error_Message; to display the message. You can then wrap that message with whatever table and font formatting you want.