
Copyright © 2004, William Weiland
Display the contents of completed orders. You can select from existing batches or you can enter a delimited list of order numbers to include in the report. You can run a typical batch report with elements like Addendum responses. You can also add in info using the %module|xxxx|xxx% method. By checking or unchecking specific elements in the report you can easily customize the report. You can even create packing slips by leaving off pricing, payment and shipping elements. If you are using the FEDEX online label maker, the EZ Batch will create a flat file which can be imported into the label maker. You can also use the UPS flat file to import customer addresses into the My UPS program.
1) In admin, click Add Modules link (fig 2)
2) Click the file upload button
3) Browse to find the ezbatch.mvc file on your hard drive and upload (fig 3)
4) Click Add to add it to the domain
5) Then in admin click on the plus to the left of Stores
6) Click the plus to the left of your store name
7) Click on the word Utilities under your store (fig 4)
8) Check the box next to the EZ Batch
9) Click Update
1) In admin, click on Stores
2) Click the plus to the left of your store name
3) Click the plus to the left of Utilities under your store
4) Click the link to the EZ Batch
5) Configure the report using the checkboxes and select lists

Select a batch from the existing batches in a select list. Alternatively you can enter a string of order numbers separated with a | (pipe) character. If you use the second option, be sure you do not have a batch selected, i.e. select unbatched orders when running specific order numbers. When selecting unbatched, if you don't list order numbers, it will report all of the unbatched orders in the database.
If you check the box to include Store Info, the store address will appear at the beginning of each order entry. This is useful for packing slips if you also select to have a page break between orders.
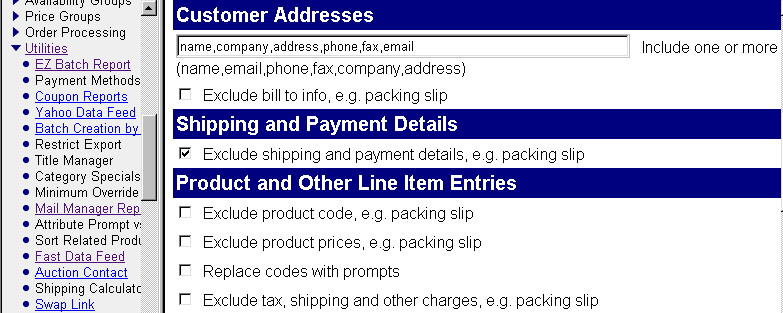
You can include one or more customer fields in the report. Enter the fields in the order you want them to appear in the report and separate each with a comma.
You can exclude several data elements by checking the applicable boxes. The exclusion options will probably be used when you create packing slips.
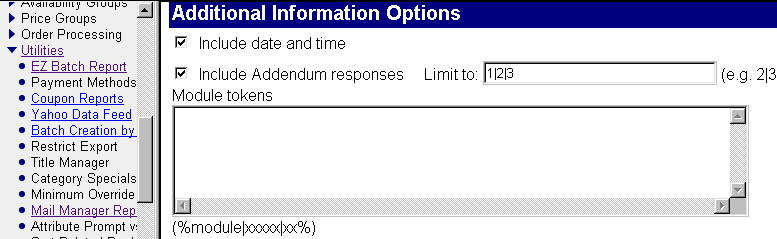
You can include data elements which are related to an order. A commonly used module, Addendum, allows the customer to respond to checkout questions like special shipping instructions, gift card messages, etc. The EZ Batch lets you include the customers' responses in the batch report. You can also specify to only include certain responses.
You can include other external module info using the module token in the format %module|xyz|abc%. This feature works with 3rd party modules which correctly formulate the data for return to the calling program.

When printing the EZ Batch report, you may find it useful to have the printer eject between orders so that each order prints on a separate page. Checking this option will cause the page break with most browsers and printers.
When printing the batch report, it will print faster and not use expensive colored ink if you check the box to remove the color bar. It will change the standard batch color bars to black and white. It also will change the color bar in the Addendum responses. It does not change color bars which other external modules create.
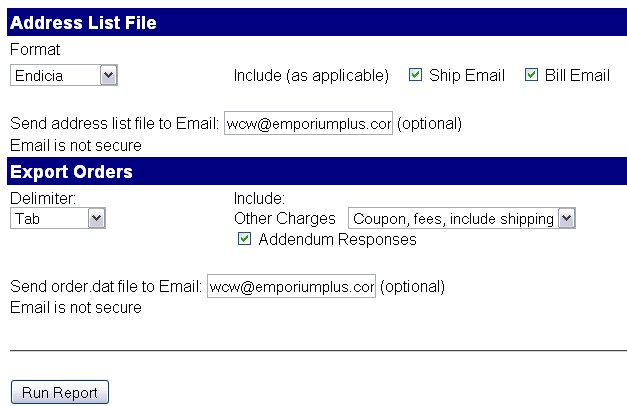
You can create an address list flat file for use with label makers and postage calculators.
You can create an orders export similar to the standard orders export in Miva Merchant. However, if you use coupons, discounts, fees, etc, the EZ Batch can include those entries, whereas the standard report does not. You can list the shipping method on a separate line after the products have listed. If your store allows the customer to select only one shipping method per order, then you can also include the shipping method on the same line as each product. Don't use this option if your store uses a module that allows multiple shipping methods per order.
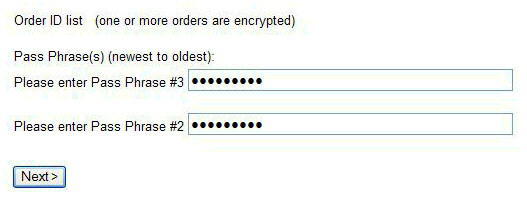
If you are using encryption in your store, you will have entered a pass phrase as an encryption key. That phrase is stored with each order. If you change the phrase, the new key is tied to subsequently placed orders. When you run EZ Batch it checks to see if you used a pass phrase. If you did, it prompts you for each of the pass phrases related to the orders you are running in the report. This could be one or it could be many, depending on how often you change your pass phrase.
When creating a flat file export, you can email it to yourself as an attachment. Like the regular order emails, these emails are non-secure so you need to evaluate the sensitivity of the information in the export file before you use the email feature. No credit card info is in the order export file. You may need to save it to your PC as a dat file, then import into the program using it so that the fields will be properly delimited.
Normally you go to admin > utilities to run this batch report module. However, you can use cron to run it automatically at set times during the day or night. Obviously you won't run it for the purpose of viewing the batch report since a cron task does not involve a human viewing the screen. You don't supply a pass phrase since there is nobody to view the credit card data. You will use this feature to export orders to a file. That file can also be automatically emailed to you. This feature is in version 5.0220 and newer of the module. You will need to have access to cron in your domain. Some hosts don't provide that. You will setup a cron task for the times you want it to run. Below is the example command to run the auto report. Change the UserName and Password to match your admin login info. Change the Store_Code to yours. Change the url to your admin.mvc. On this page the line appears wrapped. This is actually one long line of text.
wget --post-data='Screen=SUTL&Action=SUTL&Store_Code=YOURSTORECODE&Module_Code=ezbatch&auto=1&UserName=YOURUSERNAME&Password=YOURPASSWORD&Provision=yes&Submit=Login' https://www.YOURDOMAIN.com/mm5/admin.mvc --no-check-certificate >/dev/null 2>&1
After the batch runs and exports the orders, it can email the file to you if you have setup the EZ Batch admin screen to email orders. The autorun feature uses the same settings you used when you manually ran it in admin > utilities. The only difference is the autorun feature only exports the most recent batch in the file which was probably not the last one you manually selected. Note: This method exports the most recent batch. If there were no orders since the previous batch, and therefore no new batch, you could get the same orders.dat export twice in a row. Make sure the new orders.dat is truly different from the previous orders.dat, i.e. new order numbers.


