Copyright © 1999, William Weiland
The purpose of giftlist.mvc is to allow a customer to place items they desire into a saved file so that others may view their desires and place an order. This is particularly suited for weddings, baby showers, kids wants for Santa, etc. It can also be used as a wish list for their own purchases in the future. They can show and then save the basket contents to their own personal wish list or favorites list.
Special Upgrade Note: If you have our Gift List module version 5.0000 - 5.0010 and are upgrading to 5.0020 or higher there is a minor change to the "gift" page template you had installed previously. On the line following
<mvt:item name="giftlist" param="gift2" />
add the line
<mvt:item name="giftlist" param="default" />
Alternatively, I have developed a fully editable template so you can change the layout of your gift list display. That new template is in the file giftalt.mvt. You can replace the template you have for "gift" page with this new text if you want more control and feel comfortable editing Miva page templates.
There are seven files in the giftlist.zip distribution file. Unzip giftlist.zip. Upload the giftlist.mvc as a module (steps 1-19). The sXX_giftlist.htm is FTPd (see step 26). The _readme.htm has a link to the install docs and license info.
- If you are using MMUI - The giftpage.mvt is a template and is copied and pasted per the instructions when you get to that step. Alternative, you can use the giftalt.mvt as your template instead of the giftpage.mvt. The giftpage.mvt uses a default layout which is much less confusing for store owners new to Miva Merchant. The giftalt.mvt is an example of the default layout but is completely open source so you can change the template to suit your layout needs. To make changes in the alternate template, you will need to have moderate skill level in editing Miva templates.
- If you are using CSSUI - The giftpagecssui.mvt is a template and is copied and pasted per the instructions when you get to that step. Alternative, you can use the giftaltcssui.mvt as your template instead of the giftpagecssui.mvt. The giftpagecssui.mvt uses a default layout which is much less confusing for store owners new to Miva Merchant. The giftaltcssui.mvt is an example of the default layout but is completely open source so you can change the template to suit your layout needs. To make changes in the alternate template, you will need to have moderate skill level in editing Miva templates.
2) Click the file upload button
3) Browse to find the giftlist.mvc file on your hard drive and upload (fig 3)
4) Click Add to add it to the domain
5) Then in admin click on the plus to the left of Stores
6) Click the plus to the left of your store name
7) Click on the word Utilities under your store (fig 9)
8) Check the box next to Save Basket to Giftlist
9) Click Update
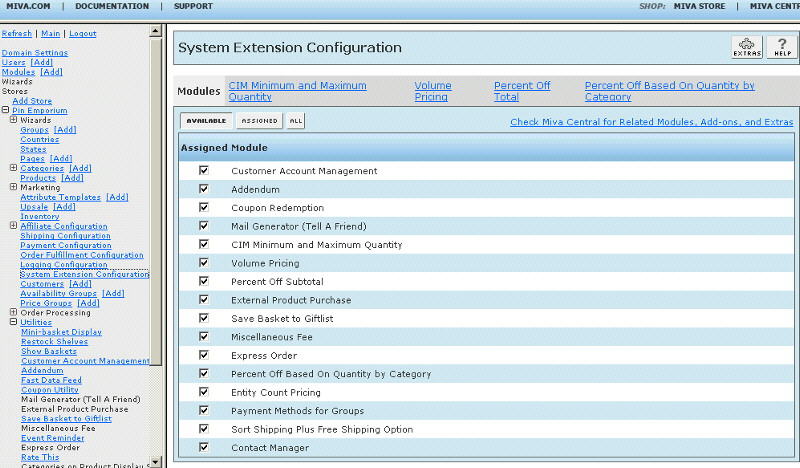
10) Click on System Extension Configuration link (fig 10)
11) Check the box next to Save Basket to Giftlist
12) Click Update
13) Click Pages link to get to the User Interface (fig 4)
14) Click Items link at the top of the User Interface page (fig 5)
15) Click the Add Item button (fig 6)
16) Enter giftlist for the code (fig 8)
17) Look up and scroll to the last page of items and Save Basket to Giftlist should be at the end of the list of items
18) Select Save Basket to Giftlist
19) Click the Add button to assign the module
20) Again, click Pages link to the User Interface (fig 4)
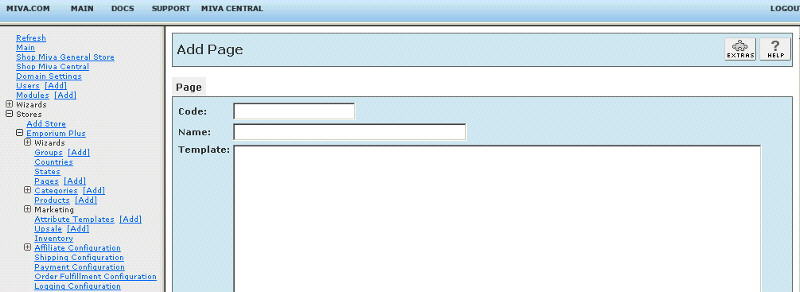
21) Click the Add Page button
22) Enter the page Code as GIFT (fig 7)
23) Enter the page Name as Gift List (or Wish List or other name you want to use)
24) To get started, copy the contents of giftpage.mvt (if MMUI) or giftpagecssui.mvt (if CSSUI) to the clipboard and paste it into the page Template input and click the Add button. You can use the giftalt.mvt (if MMUI) or giftaltcssui.mvt (if CSSUI) instead if you want more control of the gift list layout. See paragraph above. Note: this is a complete page with several lines. If your text editor opens it as an html file, you will need to view source in order to copy the contents to the clipboard.
25) Click on the Items link at the top and assign the following items to the page and update:
a. If MMUI - html_profile, head, hdft, store, product, body, category_tree, navbar, colors, fonts, customerlink, affiliatelink, product_attributes, giftlist
b. If CSSUI - html_profile, head, store, product, navbar, product_attributes, hdft, category_tree, giftlist
26) FTP the sXX_giftlist.htm file to modules/util/sXX_giftlist.htm (store number replacing the XX). If you want to change this help popup screen's text you can edit this file with a text editor.
27) You'll need to FTP a gif file that signifies add to cart consistent with your site. Name it add2cart.gif and put it in /mm5/graphics/ directory.
28) See the editing requirements below on how to add the gift list button and input forms to pages in the store.
Go back to step 7 to open the Utility menu. Click the link at the top for the Gift List. Enter data into the applicable input fields.
Expires After
Enter the number of days a gift list can be good for.
Add To Cart Image URL
Enter the virtual URL of the add to cart image, e.g. graphics/add2cart.gif
View List
The text input is used on the standard submit button. If you also include a
virtual path to an image, it will replace the standard submit button.
Save List
The text input is used on the standard submit button. If you also include a
virtual path to an image, it will replace the standard submit button.
Screen After Save
After a customer saves a single product to the gift/wish list, you can choose
which screen to take the customer to; back to the product or on to the
gift/wish list screen.
Help Button Image URL
Enter the virtual path to your help file image. The default is the Merchant
standard help button.
Remove from List Text
When a customer moves a gift list item to their basket, they have the option of
removing the item from the gift list. This entry defines what the label for
that process reads.
Allow Saving Without Login
Display the Save To prompts only if the customer is logged in.
Footer
Enter a footer message that displays when the customer displays a previously
saved gift list.
The module is called within specific template screens with render tokens. They are in the format of
<mvt:item name="itemcode" param="xxxx" />
The templates are listed at the Pages link. You will edit the template by inserting the token and clicking the Update. Important: After adding the render token to a template page, you must click the Items link for that page, scroll down to the item name and assign it to the page (fig 8). These two steps are repeated for every page that a module's render token is used on.
1) Save to gift list on the product page - On page 'prod' (product display), click the tab at the top labeled Product Display Layout. Then near the bottom, if the template code is not exposed, click the link for Advanced Mode. Insert
<mvt:item name="giftlist" param="prod" />
on the page. Make sure this token is outside, preferably below, the closing form tag of the add to basket button. Alternatively, you can use a href type link to save a product to the wish/gift/favorites list. This can even be on pages other than the product page. For example, on the category page you could have a link like
<a href="&mvt:global:secure_sessionurl;Screen=GIFT&SubScreen=GIFT&Store_Code=&mvta:global:Store_Code;&Product_Code=&mvta:product:code;&Action=ADDONE">Add to Favorites</a>
included with each product by adding it in the ctgy page template under the Category Product List Layout tab.
2) View Gift List button and input - On the pages where you want the single line input with button to appear, e.g. store front, insert
<mvt:item name="giftlist" param="button" />
at the location where you want it to appear. Make sure it is outside of any other forms as you cannot have a form within a form. Also, with this input, there is normally a help button to give customers instructions on what to enter. It is a javascript popup so you will need to include the token that inserts the javascript into the head section of the page. Use token
<mvt:item name="giftlist" param="js" />
just above the </head> tag on the page.
3) On page 'bask' (basket contents), insert
<mvt:if expr="NOT l.settings:basket:empty">
<mvt:item name="giftlist" param="basket" />
</mvt:if>
where you want the form to display for saving the entire basket.
4) On page 'patr' (missing product attributes), insert
<mvt:item name="giftlist" param="patr" />
where you see the form tag and several hidden inputs. Include this token after the last hidden input.
5) On page 'srch' (search), insert
<mvt:item name="giftlist" param="srch" />
where you want the form to view existing gift lists. This token on the search screen is optional.
6) The tokens for the GIFT page are already included in the text that you previously copied when you added the new GIFT page in the initial setup above.
7) If you decided to use the giftalt.mvt template you have the ability to make custom edits for each line in the display. A fast delete feature is available in gift list module version 5.007 or newer. The gift list owner can delete products without having to save to the basket first. The code of that is:
<mvt:if expr="giftlist:can_edit EQ 1">
<a href="&mvt:global:sessionurl;Screen=GIFT&SubScreen=GIFT&Action=GDEL&myphone=&mvta:global:giftlist:owner;&Store_Code=&mvta:store:code;&Product_Code=&mvta:listitem:code;">X</a>
</mvt:if>
8) An alternate way of finding a gift list is with a link instead of a form. To use this method, the customer must be logged in. The code would be:
<mvt:if expr="g.basket:cust_id GT 0">
<mvt:item name="giftlist" param="link" />
Wish List</a>
</mvt:if>
9) In Jan 2010 Miva implemented inventory at the attribute level. To handle this you need to include the following code inside the form where you see the other hidden inputs on the PLMT and POUT page templates. This will alert the customer that the specific attribute is limited or sold out and the back button will return them back to the gift/wish list screen.
<mvt:if expr="g.Screen EQ 'GIFT'">
<input type="hidden" name="Action" value="VIEW">
<input type="hidden" name="SubScreen" value="GIFT">
<input type="hidden" name="myphone" value="&mvte:global:myphone;">
</mvt:if>
Below is an example form to post to the tell a friend module from the GIFT page template. It does require that you also have our tell a friend module. Change the image path in the last input to match yours.
<mvt:if expr="NOT ISNULL giftlist:tellfriend">
<tr>
<td colspan="3">
<mvt:item name="fonts" param="body_font">
<center>
<form METHOD ="post" ACTION ="&mvt:global:sessionurl;">
<input TYPE ="hidden" NAME="Store_Code" VALUE ="&mvt:store:code;">
<input TYPE ="hidden" NAME="Screen" VALUE ="TELL">
<input TYPE ="hidden" NAME="SubScreen" VALUE ="TELL">
<input TYPE ="hidden" NAME="Old_Screen" VALUE ="GIFT">
<input TYPE ="hidden" NAME="myphone" VALUE ="&mvte:global:giftlist:owner;">
<input TYPE ="hidden" NAME="ListTitle" VALUE ="Gift List">
<input TYPE ="image" ALT ="Tell A Friend" SRC ="../btell.gif" BORDER="0">
</form>
</center>
</mvt:item>
</td>
</tr>
</mvt:if>
When the customer has filled their basket, rather than checking out, they can save the products to a file.
Q: The save button on the product page is formatted in a table cell. How can I get rid of the cell?
A: You can replace the <mvt:item name="giftlist" param="prod" /> token with the href link described
in the paragraph about that token or you can use a form as below.
<form method="post" action="&mvt:global:secure_sessionurl;">
<input type="hidden" name="Store_Code" value="&mvte:global:Store_Code;">
<input type="hidden" name="Product_Code" value="&mvte:product:code;">
<input type="hidden" name="Action" value="ADDONE">
<input type="hidden" name="SubScreen" value="GIFT">
<input type="hidden" name="Screen" value="GIFT">
<input type="image" alt="Save to Gift List" src="PATH TO YOUR BUTTON IMAGE" BORDER="0">
</form>
Still have a question?