Copyright © 1999, William Weiland
Provide an easy interface for visitors to refer your site URL to their friends. It uses the MIVA SMTP capability. The subject and body of the Tell a Friend message is configurable through the Merchant admin interface. If the customer sends this email when they are on a specific product screen, a second link to the product is included in the email. Also configurable is the customer screen and optional log and store emails.
There are two files in the mailgen.zip distribution file. Unzip mailgen.zip. Upload the mailgen.mvc as a module (steps 1-19). The mailgen.mvt and mailgencssui.mvt are templates and are copied and pasted per the instructions when you get to that step.
1) In admin, click Add Modules link (fig 2)
2) Click the file upload button
3) Browse to find the mailgen.mvc file on your hard drive and upload (fig 3)
4) Click Add to add it to the domain
5) Then in admin click on the plus to the left of Stores
6) Click the plus to the left of your store name
7) Click on the word Utilities under your store (fig 9)
8) Check the box next to Mail Generator
9) Click Update
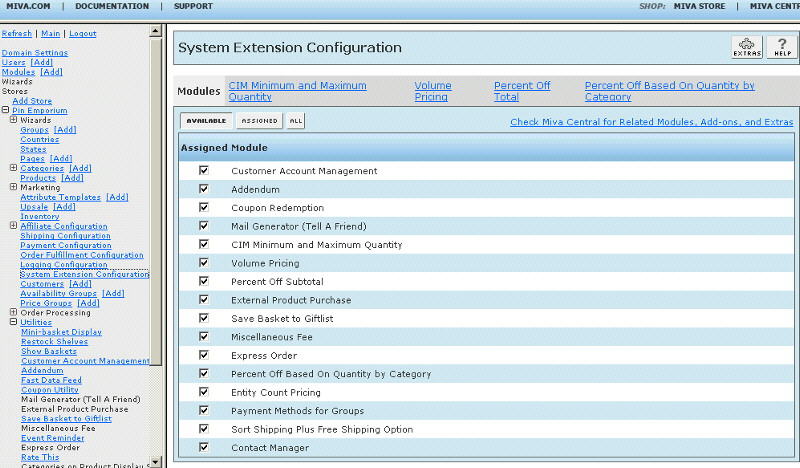
10) Click on System Extension Configuration link (fig 10)
11) Check the box next to Mail Generator
12) Click Update
13) Click Pages link to get to the User Interface (fig 4)
14) Click Items link at the top of the User Interface page (fig 5)
15) Click the Add Item button (fig 6)
16) Enter mailgen for the code (fig 8)
17) Look up and scroll to the last page of items and Mail Generator should be at the end of the list of items
18) Select Mail Generator
19) Click the Add button to assign the module
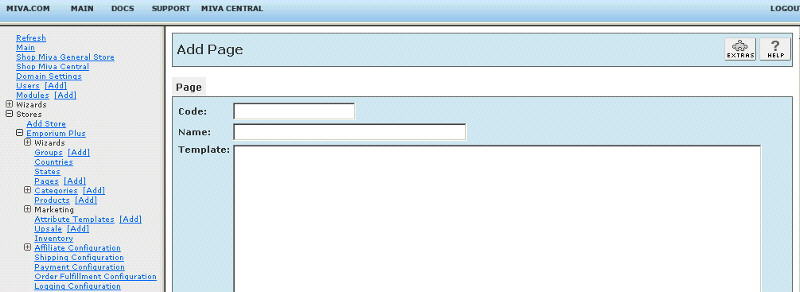
20) Again, click Pages link to the User Interface (fig 4)
21) Click the Add Page button
22) Enter the page Code as TELL (fig 7)
23) Enter the page Name as Tell A Friend
24) To get started, copy the contents of mailgen.mvt (if using MMUI) or mailgencssui.mvt (if using CSSUI) to the clipboard and paste it into the page Template input and click the Add button. Note: this is a complete page with several lines. If your text editor opens it as an html file, you will need to view source in order to copy the contents to the clipboard.
25) Click on the Items link at the top and assign the following items to the page and update:
a) If using MMUI - head, hdft, store, body, messages, mmui_messages, category_tree, navbar, colors, fonts, customerlink, affiliatelink, mailgen
b) If using CSSUI - html_profile head store navbar hdft category_tree mailgen
26) See the editing requirements below on how to add the Tell A Friend button to pages in the store. You can put the button on any page. As you can see, it is already in the newly created TELL page.
In the store utility configuration screen, enter data into the applicable input fields of the Mail Generator.
Subject
Enter the text you want for the subject of the email that is sent.
Letter Body
Enter the body of the letter, including your store URL you want them to have
as a link. There are two examples which
should get you started. Beginning with version 5.0200 of the tell a friend module, you can change the
character set of the email. If your store uses a character set other than iso-8859-1, you
can change the character set with a token in the letter body. For example, to change the
character set to utf-8, you would use the token %charset|utf-8% in the letter body.
Store Email (Optional)
Include an email address if you want to get an email whenever someone
sends a Tell-A-Friend email. If you are concerned your Tell-A-Friend may spam people,
this is a useful monitor.
Form Button
Enter the text you want for the text of the button for Tell-A-Friend.
Form Button Image (Optional)
If you want to use a graphic for a button, enter the path, e.g.
graphics/tell.gif
Form Button Location
Choose from among the eight possible locations on the screen to put the button.
In addition to the eight locations, you can combine the mid product screen
location with the nav bar or category column location.
Screen Title
Enter the text you want for the title at the top of the screen.
Font Size, Face, Color
Enter the settings you want for the FONT tag.
Table Background
Enter the color you want for the form the customer sees when entering the
Tell-A-Friend email info.
Flat File Log
You can create a flat file log of each Tell-A-Friend entry. It includes the
date, from email, to email and the product code if it was sent from a specific
product screen. The flat file is stored in the store data directory under a
subdirectory called mailgen. The file name is mailgen.dat, e.g.
Merchant5/s01/mailgen/mailgen.dat You can periodically retrieve the file
for analysis or crediting those customers who refer people to your site.
It can be deleted and it will start anew with the next Tell-A-Friend entry.
Templates
In the compiled version of the module you can add tokens to the email. You
can also use an alternate friend entry form which is a template that you can
customize. View a
sample of each of these templates.
The module is called within specific template screens with render tokens. They are in the format of
<mvt:item name="itemcode" param="xxxx" />
The templates are listed at the Pages link. You will edit the template by inserting the token and clicking the Update. Important: After adding the render token to a template page, you must click the Items link for that page, scroll down to the item name and assign it to the page (fig 8). These two steps are repeated for every page that a module's render token is used on. On the pages where you want the button to appear, insert
<mvt:item name="mailgen" param="button" />
Beginning with the tell a friend module version 5.008, you can change the destination screen the customer is taken to after the emails have been sent. The default is prod, srch, gift if the customer is on one of those screens. Otherwise, the destination is sfnt. If you include a hidden input in the form, you can override that destination screen. For example,
<input type="hidden" name="Screen_Override" value="TELL">
will take the customer back to the tell a friend form. This destination is useful if you want to put the tell a friend screen in a popup instead of within the full merchant screen. You'll need to know javascript coding to do popups; this example is just a hint that it can be done.
Beginning with the tell a friend module version 5.008, you can include a thank you message on the screen after the emails. This example code can be placed in the template of the screen, e.g. sfnt page. You can even include a coupon code if you have our coupon module which can generate unique coupons on-the-fly.
<mvt:if expr="(g.SubScreen EQ 'TELLSEND') AND (g.their_email1) AND (g.mailgen_address_error EQ 0)">
<center>
<table border="0" width="450" bgcolor="#ffff00">
<tr>
<td>
<mvt:item name="fonts" param="body_font">
Thanks for the referral. Use coupon code
<b>
THANKS
</b>
for a discount off your next order at our store.
</mvt:item>
</td>
</tr>
</table>
</center>
</mvt:if>