Copyright © 2008, William Weiland
You can create unlimited order custom fields in the Utilities menu. Those fields can be populated by customers during checkout or store personnel in admin. The custom field values can be displayed on any Merchant screen, invoice, emails, order edit admin screen and in the batch reports as long as the order/batch has not been deleted from the store.
1) In admin, click Add Modules link (fig 2)
2) Click the file upload button
3) Browse to find the ordercfm.mvc file on your hard drive and upload (fig 3)
4) In Global Settings click Add to add the module to the domain
5) Click on the word Utilities under your store name (fig 8)
6) Check the box next to the Order Custom Fields
7) Click Update
8) Click Pages link to get to the User Interface (fig 4)
9) Click Items link at the top of the User Interface page (fig 5)
10) Click the Add Item button (fig 6)
11) Enter ordercfm for the code (fig 6)
12) Look up and scroll to the last page of items and Order Custom Fields should be at the end of the list of items
13) Select Order Custom Fields
14) Click the Add button to assign the module
15) In the Utility configuration screen you will see the Order Custom Fields module as a link on the right side of the screen. Click it and enter the order number and where you purchased the license from (fig 9). You will also need to supply a license key before adding custom fields. This is not the license key you may have received when you purchased the license, as some vendors have their own license system. This license key is obtained directly from Emporium Plus by clicking the link to "Request License Key" in the module's admin screen. 1) enter your order number and where you got it, 2) click Update, 3) request the key. Make sure the order number, domain, and store code are correctly inserted in the request form. The license key is based on these three elements. If you provided that info, the key will be sent back to you. After entering the key and saving, the module will be available for use in your store. The license info is stored in the cim_lic.dbf and cim_lic.mvx which are in your data "export" directory. Do not delete those files or you will have to re-enter your order number and license key in the module's admin.
16) On the same screen where you create the order custom fields, there is a checkbox input "Clean up old records". Periodically you should run this feature, perhaps every couple months.
1) Go to the Utility configuration screen and click on the Order Custom Fields link on the right. (fig 9)
2) Click the Add button on the far right, just below the license key input.
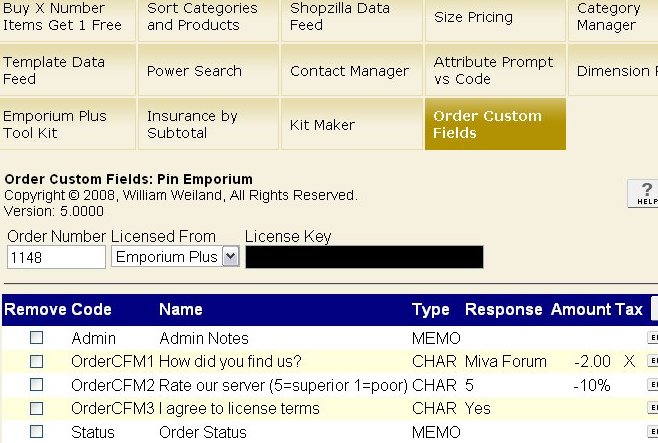
3) Checkout custom fields must follow a specific naming convention for the field CODES. The codes are OrderCFM1, OrderCFM2, and so on. Increment the number beginning with 1, for as many as you want/need. You should not skip numbers so the processing will be as efficient as possible. However, it is not a hard and fast rule. So if you delete questions as time goes on, you do not need to renumber; just leave them skipped. The code is case sensitive, i.e. OrderCFM1, NOT ordercfm1.
4) Field names are the prompts/labels and can be anything you want and can contain spaces.
5) Field type is either CHAR or MEMO. The character fields will hold up to 100 characters and will occupy that much space on the disk no matter how many characters are in the field. MEMO will hold several thousand characters and will take up a minimum of 512 characters no matter how much text is in the field. Choose the field type based on what type of data you will collect in the field. If it will never exceed 100 characters, use the CHAR type. You don't want to fill up the server disk unnecessarily.
6) Response, amount, and taxable are used only if the field question/response will be used to assign a fee or discount. Response is optional. When the customer answers the question, their answer will be compared with the entry in the response field. If it is not an exact match (case sensitive), the fee/discount will not be applied.
7) Amount is the amount that will be charged or debited. If you preceed the number with a minus character, the charge will be discounted from the order total. Otherwise, it will be a charge added to the order. If you put a % character after the number, it will be a percentage of the total (v5.000-5.016) or products subtotal (v5.017 or newer) as a discount subtracted or a fee added. You'll find this feature useful for adding a fee, e.g. for gift wrap, expedited handling, etc. You can even make it a hidden input that the customer does not see, nor can they change, to add a surcharge to the order for things like fuel increases. The discount feature could be used for a simple coupon campaign. Course if you need a more feature rich coupon module, we have one of those too. Beginning with Order Custom Fields module version 5.0150, you can have a customer entered amount. This would be used with things like donations. In the admin, you will put the ? character instead of a number. Do not put anything in the "response" input. Thus, if the customer enters 5.00 during checkout the module will see the amount field is ? and it will use the response that the customer entered to assign a fee. If the customer tries to enter a negative fee it will be ignored. You can see this on the shipping selection screen in our test store. Put an item in the basket and go to checkout to test it on the OSEL screen.
8) Tax is checked if you want the fee or discount to be taxable, thus adding to or reducing the tax, depending on the charge.
9) Sync custom customer field code [XXXXX] with customer entered value lets you collect responses in checkout using the OrderCFM1, etc naming, then updating the corresponding custom customer field (CCF) automatically. It requires you have a CCF setup. The code in CCF cannot contain spaces. The code you enter in this input in the Order Custom Fields module must match exactly the code in the CCF module's input (case sensitive). This feature lets customers enter checkout data into the custom customer fields (a feature not available in out-of-the-box Merchant) and that data is saved with their permanent customer record. You can even make it a required input.
1) Go to the Utility configuration screen and click on the Order Custom Fields link on the right. (fig 9)
2) Click the Add button on the far right, just below the license key input.
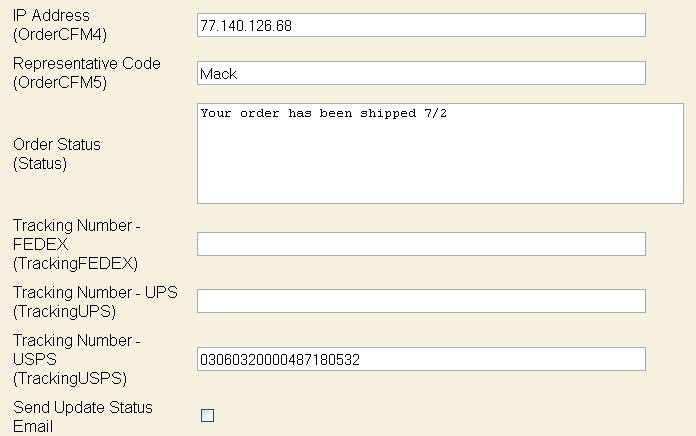
3) Custom field codes for admin do not have any specific naming convention. The code is case sensitive. Use only letters, numbers, or underline characters. No spaces. Do NOT use the field code INFO as that is used as a comment field in the import and export. If you use several different shippers you could have a custom field for each; e.g. TrackingUSPS, TrackingUPS, TrackingFEDEX, etc. If your orders sometimes have more than one tracking number, i.e. separate packages, you could even have TrackingUSPS1, TrackingUSPS2, etc. The email would only show the fields you filled in.
4) Field names are the prompts/labels and can be anything you want and can contain spaces.
5) Field type is either CHAR or MEMO. The character fields will hold up to 100 characters and will occupy that much space on the disk no matter how many characters are in the field. MEMO will hold several thousand characters and will take up a minimum of 512 characters no matter how much text is in the field. Choose the field type based on what type of data you will collect in the field. If it will never exceed 100 characters, use the CHAR type. You don't want to fill up the server disk unnecessarily.
6) Response, amount, taxable and sync are not used for admin/order status questions.
1) Click on admin > order processing.
2) Locate the order number (as batched or unbatched) on the right side and click the edit button.
3) Click the Order Custom Fields tab at the top.
4) You will see all of the fields you previously created in the Utilities screen.
5) Edit data as needed, then click the Update button.
6) NOTE: There is a bug in Miva Merchant which is only in some stores. The bug is that when you click update, a popup appears that says "Please specify a valid number" and the focus jumps to the Order Information tab. The bug is in Miva's Order Information module. They are aware of the bug. The workaround is after clicking the edit button in step 2 above, go to the Order Information tab first. Then click on the Order Custom Fields tab. Hopefully Miva will fix this annoying bug soon. Forum thread
7) You can put html tags in the admin/order status inputs. You cannot use them in the OrderCFM (checkout) custom fields. This is because those fields are populated by customer entered text. The entries have to be "sanitized" to block hacker attempts. This includes encoding certain characters so they cannot execute malicious commands.
8) Optionally send the "bill to" customer an email with order status change information. You can send a generic email with a link to the OCFM page (see next paragraph) or you can use store morph code to conditionally show the fields you want to display if they have values in them. The default email can be changed in the admin > order fulfillment settings menu > order custom fields email tab. As example, you could add something like the below into the existing email body. Only the fields with a value will show in the email. The default character set for the html emails is iso-8859-1. If you need a different character set, e.g. utf-8, you can use the charset token like %charset|utf-8% in the body of the email (requires ordercfm version 5.0080 or newer).
<mvt:if expr="Status:value">
&mvt:global:Status:name;: &mvt:global:Status:value;
<br>
<br>
</mvt:if>
or
<mvt:if expr="TrackingUSPS:value">
&mvt:global:TrackingUSPS:name;:
<a href="http://trkcnfrm1.smi.usps.com/PTSInternetWeb/InterLabelInquiry.do?origTrackNum=&mvta:global:TrackingUSPS:value;">
&mvt:global:TrackingUSPS:value;</a>
<br>
<br>
</mvt:if>
1) In the ordercfm.zip file is a text file called ocfm.mvt. Using a text editor (e.g. notepad) open that file. Select all of the text and copy it to the clipboard.
2) In admin > pages, click the Add Page button.
3) Enter OCFM as the page code.
4) Name the page anything you want, e.g. Order Status.
5) Paste the contents of the clipboard (previously copied ocfm.mvt) into the body of the template.
6) Click the Add button.
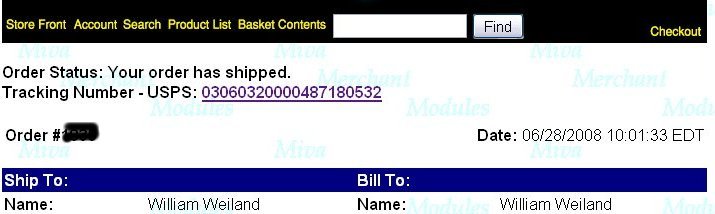
7) The ocfm.mvt is just an example. It includes examples of store morph code used to display two order custom fields called Status and Tracking. It also includes all the text you would normally see on the Invoice (INVC) screen. You can use this as a redisplay of the invoice. However, since it can be displayed without logging in (more on that in #8 below), you might find it better to remove many of the fields and only use it for an order status feature. In addition to the status, you can use this page to allow customers to reorder the same things that are in the old order. Put this link on the page.
<a href="&mvte:global:secure_sessionurl;Action=NEW&SubScreen=OCFMORDR&myorder=&mvta:order:id;&myemail=&mvta:order:ship_email;&Store_Code=&mvta:global:Store_Code;">Reorder</a>
You can also use the OCFM store morph code for the questions/responses on the INVC screen if you have a module (e.g. Emporium Plus Tool Kit) that lets logged in customers display order history and redisplay the invoice screen.
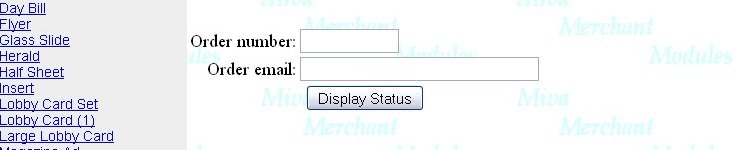
8) Displaying the OCFM screen can be done by passing the order number and order email address (fig 11) to the OCFM screen (fig 12). Place the following form on any page in the store.
<form method="post" action="&mvt:global:sessionurl;">
<input type="hidden" name="Store_Code" value="&mvte:global:Store_Code;">
<input type="hidden" name="Screen" value="OCFM">
<table border="0">
<tr>
<td align="left">
Order number:
</td>
<td align="left">
<input type="text" name="myorder" value="" size="10">
</td>
</tr>
<tr>
<td align="right">
Order email:
</td>
<td align="left">
<input type="text" name="myemail" value="" size="30">
</td>
</tr>
<tr>
<td align="center" colspan="2">
<input type="submit" name="trash" value="Display Status">
</td>
</tr>
</table>
</form>
9) In addition to using a form on a template pages, with template email modules like our Mail Manager and the built in customer confirmation email, you can provide a link to the order status page (OCFM). The link would look like:
Check order <a href="&mvt:global:sessionurl;Screen=OCFM&Store_Code=&mvta:global:Store_Code;&myorder=&mvta:order:id;&myemail=&mvta:order:bill_email;">status</a>.
1) Create a flat file in the format
order number|field code|value to be inserted
for example:
1234|Status|Your order has been shipped
1234|TrackingUSPS|03060320000487180532
1234|sendmail|1
2) You can use pipe (|), comma (,) or tab for the delimiter.
3) Go to admin > Utilities
4) Click the + to the left of Import
5) Click the link Order Custom Fields
6) Upload the flat file
7) Choose the delimiter
8) Click the import button
9) Alternatively, you can import from a XML file in a specific format, as below. You define the fields in the opening and closing tags. You put the value between them.
<?xml version="1.0" encoding="UTF-8"?>
<ORDERCFM>
<ORDER ID="1843">
<Status>Your order has been shipped 7/1</Status>
<TrackingUSPS>03060320000487180532</TrackingUSPS>
<:sendmail>1</sendmail>
</ORDER>
<ORDER ID="1844">
<Status>Your order has been shipped 6/30</Status>
<TrackingUSPS>03060320000487180533</TrackingUSPS>
<sendmail>1</sendmail>
</ORDER>
</ORDERCFM>
10) If using XML you would select XML type and the delimiter does not matter
11) The sendmail in both types of download is optional. If you want to send an email to the bill to customer to show the status, include the sendmail line with a value of 1 as the last entry for each of the orders you want to send it with. The email is the same email sent from the order edit screen.
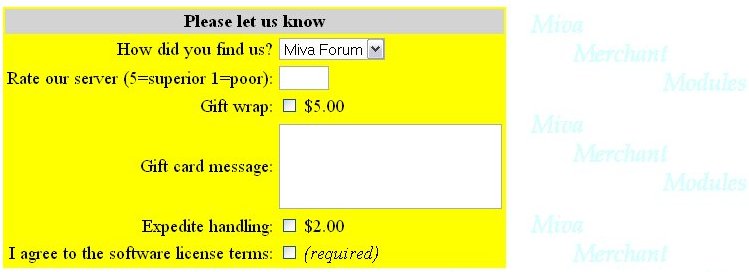
You can put the checkout questions on any of the three checkout pages; OCST, OSEL, or OPAY (fig 13). Most people put them on the OSEL (shipping/payment selection) page. Below is an example of three questions. The third question is required. If you have required questions create a hidden input called OrderCFMRequired. For the value, enter the question numbers separated with the | character, e.g. 2|4|7|8 would ensure those four questions were required. Failure to enter a response would cause the page to redisplay. You can then use store morph code to evaluate the g.OrderCFMErrorMessage variable and display a custom message for each required question that was not answered. In addition to the questions, which are typical html tags, you need to include a hidden input for OrderCFM_Count. Its value is the highest numbered question in the set. If you have setup questions to charge a fee/discount, you cannot put the questions on the OPAY page. They would have to be on the OCST or OSEL page. If any of your payment modules take the customer offsite, e.g. PayPal, you cannot put the questions on the OPAY page. Again, they would have to be on the OCST or OSEL page. If you put the questions on the OCST page AND your store has upsell products, you will need to pass the variables through those page's forms to the OSEL page. You do that by making them hidden inputs, e.g. <input type="hidden" name="OrderCFM2" value="&mvte:global:OrderCFM2"> and including them in the form on the upsell pages. As you can see, most stores are going to put the questions on the OSEL page.
<mvt:if expr="'|3|' IN g.OrderCFMErrorMessage">
<font color="red">Please Agree with License Terms</font><br>
</mvt:if>
How did you find us?
<select name="OrderCFM1">
<option value="Miva Forum">Miva Forum</option>
<option value="Google">Google</option>
<option value="Friend">Friend</option>
<option value="Host">Host</option>
</select>
<br>
Rate our server (5=superior 1=poor):
<input type="text" name="OrderCFM2" value="">
<br>
I agree to the software license terms:
<input type="checkbox" name="OrderCFM3" value="Yes">
<br>
<input type="hidden" name="OrderCFM_Count" value="3">
<input type="hidden" name="OrderCFMRequired" value="3">
<br>
Many have indicated they would like to collect the IP address of the customer and include it with the order. Before you do this, check the legal issues which may preclude you from doing this. Also, you must disclose this in your published privacy policy page. You have been warned. This can be done by including a hidden input for a custom customer field. First create a custom field in utilities to hold the IP address. For our example, we will give it field code OrderCFM4. Now in the same form where we inserted the other questions, we would put something like this:
<mvt:item name="ordercfm" param="vassign|ip|remote_addr" />
<input type="hidden" name="OrderCFM4" value="&mvte:global:ip;">
Note that if we included this in the example set of questions above, we would also need to increase the value of the input OrderCFM_Count from 3 to 4.
You can use the power of store morph code along with the built-in sassign function to make certain questions available only if certain products are in the basket. For example, OrderCFM3 above relates to software license terms so we would only want to show that if the customer ordered software. In this example, we have the questions on the OSEL page and all of our software has AA in the product code. On the OSEL page template click the Basket Contents tab at the top. Locate the line
<mvt:foreach iterator="item" array="basket:items">
on the next line, put
<mvt:if expr="'AA' CIN l.settings:item:code">
<mvt:item name="ordercfm" param="sassign|ok3|1" />
</mvt:if>
This code says if AA is contained in the item code, then assign the value of 1 to the global variable ok3. Then in the question set on the main template of the OSEL page we would wrap the OrderCFM3 question with a conditional test of ok3 being true. The 1 makes it true. If we did not assign a value to it, it would have been false.
<mvt:if expr="g.ok3">
I agree to the software license terms:
<input type="checkbox" name="OrderCFM3" value="Yes">
</mvt:if>
In this scenario we would not change the value of the OrderCFM_Count input variable. It would still be the highest numbered question in the set, even if it might not be displayed. Also, in this scenario above we had made question 3 a required question. So we would want to wrap that input with the same conditional, e.g.
<mvt:if expr="g.ok3">
<input type="hidden" name="OrderCFMRequired" value="3">
</mvt:if>
Now suppose we only wanted customers in the US to rate our server speed. We could wrap that question with a conditional, e.g.
<mvt:if expr="basket:bill_cntry EQ 'US'">
Rate our server (5=superior 1=poor):
<input type="text" name="OrderCFM2" value="">
</mvt:if>
The module's rollover feature lets you spread the questions across two pages. Let's say you want to include a 2nd address line on the customer information page (OCST) and the rest of the questions on the shipping/payment selection page (OSEL). On the OCST page, just below the input for the first address line, you could include this input (change question number to match your questions).
<input type="text" name="OrderCFM5" value="">
Then on the OSEL page, you would include a hidden input which would pass the value to the save function.
<input type="text" name="OrderCFM5" value="&mvte:global:OrderCFM5;">
The limitation is that this "rollover" input cannot be a required input.
The inputs are typical html for select drop down, radio, checkbox, text and textarea. A common usage for textarea is gift card messages. An example would be:
Gift Card Message
<br>
<textarea name="OrderCFM6" rows="5" cols="30"></textarea>
If you are going to use this module for order status, here is a tip which will make looking up pending orders very easy. Create a custom field, e.g. code = OrderCFM9 with a name of Order Status. Then in the checkout questions put a hidden input for that question.
<input type="hidden" name="OrderCFM9" value="Order received">
Then in the order search routine you can do a non-exact search for the word "received" on the OrderCFM9 field. That will bring up a list of all orders which have not had their order status changed from Order received to something else; e.g. Shipped, Processing, Backordered, Cancelled, etc. You can send the xml file to your email address. You can then edit the status of all pending orders and import the xml file. In a matter of minutes you can update all of the day's orders.
1) As discussed previously you can also use store morph code for the questions/responses on the INVC screen if you have a module (e.g. Emporium Plus Tool Kit) that lets logged in customers display order history and redisplay the invoice screen.
2) In addition to inserting the code for order status, you can display the checkout question responses:
<br>Additional Information:
<mvt:item name="ordercfm" param="get|l.all_settings:order:id|OrderCFM1" />
<mvt:if expr="NOT ISNULL l.settings:OrderCFM:value">
<br>&mvt:OrderCFM:name; &mvte:OrderCFM:value;
</mvt:if>
<mvt:item name="ordercfm" param="get|l.all_settings:order:id|OrderCFM2" />
<mvt:if expr="NOT ISNULL l.settings:OrderCFM:value">
<br>&mvt:OrderCFM:name;: &mvte:OrderCFM:value;
</mvt:if>
<mvt:item name="ordercfm" param="get|l.all_settings:order:id|OrderCFM3" />
<mvt:if expr="NOT ISNULL l.settings:OrderCFM:value">
<br>&mvt:OrderCFM:name;: &mvte:OrderCFM:value;
</mvt:if>
3) At the top of the INVC page template, click the word Items. Scroll to the end and locate Order Custom Fields. Check the box and click Update.
1) If you have version 5.014 of this module, beginning with the Merchant version released in May 2010, you can also use store morph code for the questions/responses on the Shipment Picklist and Order History screens. This picklist page is displayed in the Manage Shipments menu.
2) In addition to inserting the code for admin notes to the customer, you can display the checkout question responses similar to the INVC page above. Let's say we have one order custom field called Admin and two of the checkout custom fields that we want to display. It would look like this:
<br>Additional Information:
<mvt:item name="ordercfm" param="get|l.all_settings:ordershipment:order:id|Admin" />
<mvt:if expr="NOT ISNULL l.settings:OrderCFM:value">
<br>&mvt:OrderCFM:name; &mvte:OrderCFM:value;
</mvt:if>
<mvt:item name="ordercfm" param="get|l.all_settings:ordershipment:order:id|OrderCFM1" />
<mvt:if expr="NOT ISNULL l.settings:OrderCFM:value">
<br>&mvt:OrderCFM:name;: &mvte:OrderCFM:value;
</mvt:if>
<mvt:item name="ordercfm" param="get|l.all_settings:ordershipment:order:id|OrderCFM2" />
<mvt:if expr="NOT ISNULL l.settings:OrderCFM:value">
<br>&mvt:OrderCFM:name;: &mvte:OrderCFM:value;
</mvt:if>
3) At the top of the SHIPMENT_PICKLIST page template, click the word Items. Scroll to the end and locate Order Custom Fields. Check the box and click Update.
4) You can do the same thing on the Order History (ORDS) page. The only difference is the second parameter, which is the order id variable. The token would be
<mvt:item name="ordercfm" param="get|l.all_settings:order:id|Admin" />
1) In the ordercfm.zip file is a file called meremailcfm.mvc. Install that like other modules.
2) Assign it in the admin > order fulfillment settings.
3) Configure the inputs and it should be ready for use.
4) If you are using our Mail Manager module for emails, you will need to insert tokens.
a) If using the legacy template, the token %module|ordercfm|email% is inserted into the main section at the location in the email template that you want the responses to display. That will display all responses in the email.
b) If using the store morph template, below is an example of code to use at the location you want the responses to appear. Also, be sure you assign the Order Custom Fields item to the items list of the email's store morph template.
<mvt:item name="ordercfm" param="email" />
<mvt:if expr="NOT ISNULL g.OrderCFM1">
<br>How did you find us? &mvte:global:OrderCFM1;
</mvt:if>
<mvt:if expr="NOT ISNULL g.OrderCFM2">
<br>Rate our server: &mvte:global:OrderCFM2;
</mvt:if>
<mvt:if expr="NOT ISNULL g.OrderCFM3">
<br>Agree to license terms: &mvte:global:OrderCFM3;
</mvt:if>
5) In addition to displaying the responses in the emails, with template email modules like our Mail Manager and the built in customer confirmation email, you can provide a link to the order status page (OCFM) that is described above. The link would look like:
Check order <a href="&mvt:global:sessionurl;Screen=OCFM&Store_Code=&mvta:global:Store_Code;&myorder=&mvta:order:id;&myemail=&mvta:order:bill_email;">status</a>.
Example code to show question/response #4 in the customer order email that can be re-sent in admin:
<mvt:item name="ordercfm" param="get|l.all_settings:order:id|OrderCFM4" />
<mvt:if expr="NOT ISNULL l.settings:OrderCFM:value">
&mvt:OrderCFM:name; &mvte:OrderCFM:value;
</mvt:if>
Example in shipment confirmation for an order custom field called Admin:
<mvt:item name="ordercfm" param="get|l.all_settings:shipments:order_id|Admin" />
<mvt:if expr="NOT ISNULL l.settings:OrderCFM:value">
&mvt:OrderCFM:name; &mvte:OrderCFM:value;
</mvt:if>
Example in back order email for an order custom field called ETA:
<mvt:item name="ordercfm" param="get|l.all_settings:backorder:order:id|ETA" />
<mvt:if expr="NOT ISNULL l.settings:OrderCFM:value">
&mvt:OrderCFM:name; &mvte:OrderCFM:value;
</mvt:if>
1) In the ordercfm.zip file is a file called stdacct3.mvc. Install that like other modules.
2) After installing to the domain, it is automatically assigned to the store.
3) It is run under order processing by clicking the button to Run Reports.
4) If you are using our EZ Batch Report module, you will need to insert a token. In the Additional Information Options input of the report configuration, use the %module|ordercfm|batch% token to display the checkout responses.
1) Click the + to the left of the word Utilities.
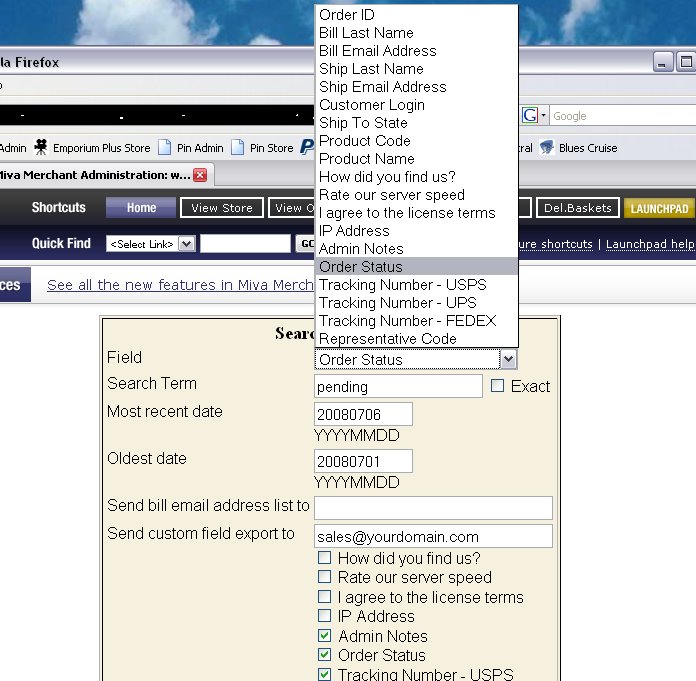
2) Click on Order Custom Fields (fig 14).
3) You can filter any of the searches by date range. Enter the newest and oldest dates in YYYYMMDD format.
4) Select the field to search.
a) If you search by order ID, you can leave it blank and it will list all orders in the system. If you put in one ID, it will show only that one. If you put in a range, e.g. 1500-1600 it will show all in that range.
b) All of the other searches require a search term.
c) The exact checkbox means it will search for that exact word as the result in the field. If you uncheck it, it will search for that word or string of characters appearing anywhere in the field. So if the field contains the words "Order received" and you search with exact on for just "received", it will not find it. If you turn off the exact search, it will find the word "received" in the string "Order received". The exact setting has no effect on the Order ID, Customer Login, or State fields.
5) If you want to search for something like a donation which you don't know the amount, you can't use the exact search. Instead you will turn the exact off and put just the decimal in the search input. All donations in version 5.0150 or newer of the module will contain the "." character as they are rounded to two decimal places.
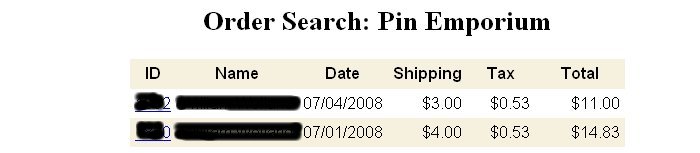
6) The ID link goes straight to the order edit screen so you can update/view checkout and admin notes quickly (fig 15).
7) When you run the search, if you enter an email address in the input for sending the bill email address list, it will create a flat file of all the "bill to" email addresses in the search results and send the file as an attachment.
8) When you run the search, if you enter an email address in the input for sending custom field export, it will create a xml file of all the custom fields you checked from the found orders and send the file as an attachment. This file is in the xml format discussed above for importing. This makes a convenient document to edit so you can quickly and easily update order custom fields with the bulk import. It adds two INFO lines (name and order date) which are skipped in the import. They are there to make editing of the file easier. It also adds the sendmail line but the default is off. If you want to send an email, put a 1 between the sendmail tags of those orders you want to send an order status update email.