Copyright © 2002, William Weiland
Sort your payment methods, with your preferred method at the top of the list. In addition to the ability to sort the methods, you can restrict any of the methods to specific price group(s), locations or order total range. Each method can have its own list of acceptable or unacceptable groups, locations, or order total range. The default (blank) displays the method without restrictions. You can also use the template in the module to layout the selections as radio buttons instead of drop down list.
1) In admin, click Add Modules link (fig 2)
2) Click the file upload button
3) Browse to find the paygroup.mvc file on your hard drive and upload (fig 3)
4) Click Add to add it to the domain
5) Then in admin click on the plus to the left of Stores
6) Click the plus to the left of your store name
7) Click on the word Utilities under your store (fig 8)
8) Check the box next to Payment Methods for Groups
9) Click Update
10) Click on System Extension Configuration link
11) Check the box next to Payment Methods for Groups
12) Click Update
13) Click Pages link to get to the User Interface (fig 4)
14) Click Items link at the top of the User Interface page (fig 5)
15) Click the Add Item button (fig 6)
16) Enter paygroup for the code
17) Look up and scroll to the last page of items and Payment Methods for Groups should be at the end of the list of items
18) Select Payment Methods for Groups (fig 7)
19) Click the Add button to assign the module
20) Edit the OSEL page template per the Template Editing Requirements section below
In the Utility Configuration screen you will establish the sort order for your store's payment methods by entering the sequence in the order column. Do not leave them as 0 unless you do not want the method to display at checkout. Most other inputs are self explanatory (fig 14).
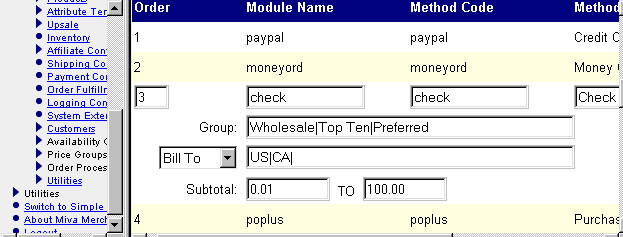
Do not change the module name or method code in the edit function. It is editable in case you make a mistake when you manually add a payment method. Normally all payment methods will appear in the list by default. The admin screen auto-lists all payment methods which are coded into the payment modules used by the store. In the case of a payment module which configures payment methods at runtime, e.g. available based on login or availability group, the store owner can manually add that method to the ordered list and include price group, location or order total range acceptability.
* You can limit payment methods to specific price groups (optional)
* If you leave it blank, the method is available to all customers
* To limit, enter each price group separated with the | character
* The default is to include the payment method for only price groups listed
* If you begin the line with a minus character (e.g. -Wholesale|Preferred|Top Ten) the module
will hide (exclude) the payment method if the customer's price group is in the list
* You can limit payment methods to specific countries (optional)
* If you leave it blank, the method is available to all locations
* To limit, enter each country code separated with the | character
* The default is to include the payment method for only those countries listed
* If you begin the line with a minus character (e.g. -US|CA|MX) the module will hide the payment method if the country is in the
list
* You can choose whether the country designation applies to the ship to or bill to address
* You can limit payment methods based on the subtotal (products in basket not counting separate line item discounts and
miscellaneous charges) falling within the specified range
* You can limit payment methods based on the categories of products that are in the basket
* If you leave it blank, the method is available to all categories of products
* To limit, enter each category code separated with the | character
* All products in the basket must be in the categories listed in the input or the payment method will not be available
* Added in version 5.0120, if you begin the category line with the minus character and if any product in the basket is
in any of those categories, the payment method will be excluded
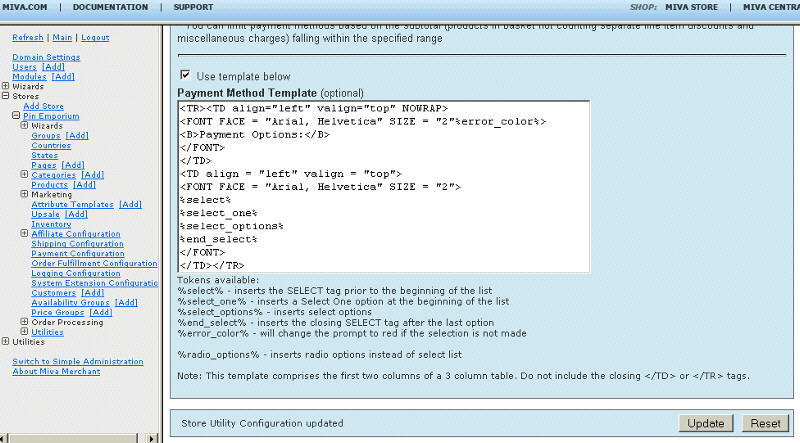
This module can be used in one of two ways; replace only the inputs (default) or replace the whole payment section with a template. The optional template is edited within the Payment Methods for Groups admin screen. Figure 9 shows the payment method layout using select drop down. Figure 10 shows the layout using radio buttons.
The module is called within the osel template screen with a render token. It is in the format of
<mvt:item name="itemcode" param="xxxx" />
Templates are listed at the Pages link. You will edit the template by inserting the token and clicking the Update (fig 9). Important: After adding the render token to a template page, you must click the Items link for that page, scroll down to the item name and assign it to the page.
If you are using the default payment method layout you will use the first edit option below. If using the optional payment method template, you will use the second edit option below.
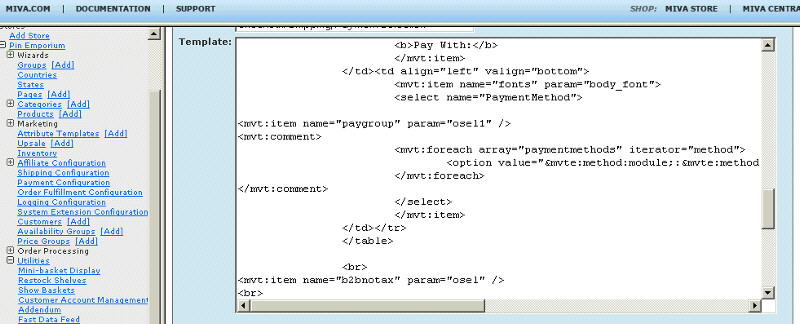
1) On page 'osel' (shipping/payment selection), insert
<mvt:item name="paygroup" param="osel1" />
between the select tags for PaymentMethod. Comment out the pre-existing option tags. See figure 11 for a picture of what this edit looks like.
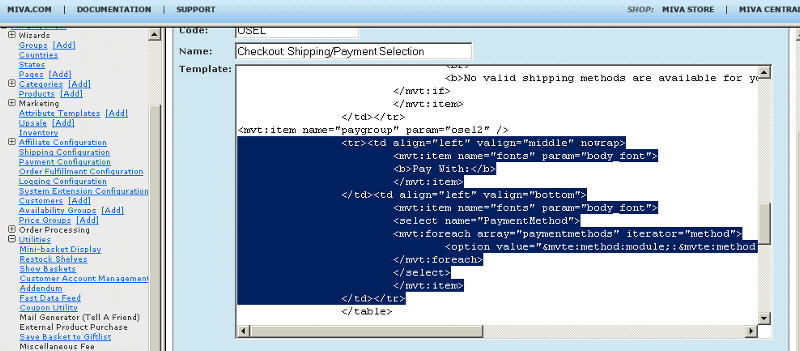
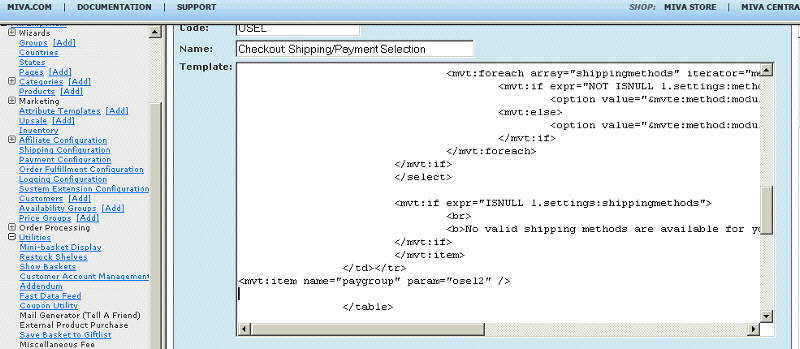
2) Alternatively, on page 'osel' (shipping/payment selection), insert
<mvt:item name="paygroup" param="osel2" />
as shown in figures 12 and 13. Figure 12 shows highlighting and deletion of the pre-existing method layout. Simply highlight and then click the delete key. Then insert the token as shown in figure 13.
3) On the page 'opay' you can add a message token by inserting
<mvt:item name="paygroup" param="opay" />
4) On the page 'invc' you can add a message token by inserting
<mvt:item name="paygroup" param="html_message" />
5) If you choose to include the select one as an option in the drop down list, a customer could fail to make a selection. At this point you would want the screen to redisplay and an error message to display. You can put the following token on the osel page template to display an error message.
<mvt:item name="messages" />
Then in the items list for the osel page, assign the messages item to the page.