Copyright © 2008, William Weiland
Price Group Manager (PGM) greatly extends the functionality of the price group system in Miva Merchant. The built-in system lets you assign customers and products to groups so they can get a designated discount off specified products. This module lets you have a different discount percentage for virtually every product in the group versus the built in one percentage groupwide. You can even set a fixed price vs a percentage for products that do NOT have attributes. You can manage unlimited price groups and unlimited product variations within each group. The module applies the price group price as the items are added to the basket. So if the customer is not logged in when they put it in the basket, the module has a feature that recalculates the basket price when they log in. There is a safety feature in that it will not change the price if the price in the basket is already lower than the price group price. Another safety feature is you can specify product codes that will not have their basket price recalculated at all. This is useful when other 3rd party modules are in the store that set the basket price based on a set of rules unknown to this module. You can update the discount settings in the product edit screen or use an easy flat file import. The import can be used to import both customers and products into the price groups.
Install pgrpman.mvc
1) In admin, click Add Modules link (fig 1)
2) Click the file upload button (fig 2)
3) Browse to find the pgrpman.mvc file on your hard drive and upload (fig 3)
4) Click Add to add it to the domain
5) Then in admin click on the plus to the left of Stores if it is not already opened
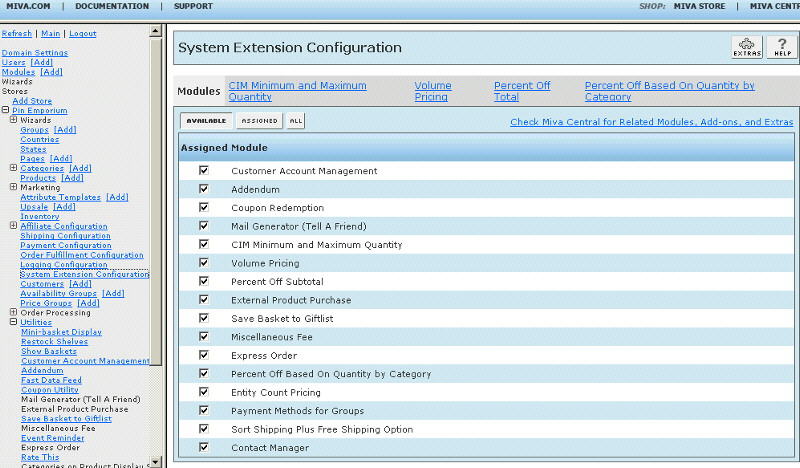
6) Click on System Extension Settings link (fig 4)
7) Check the box next to the Price Group Manager
8) Click Update
9) Click the link at the top for Price Group Manager. Enter the order number and where you purchased the license from. You will also need to supply a license key before you can use the module. This is not the license key you may have received when you purchased the license, as some vendors have their own license system. This license key is obtained directly from Emporium Plus by clicking the link to "Request License Key" in the module's admin screen. 1) enter your order number and where you got it, 2) click Update, 3) then request the key. Make sure the order number, domain, and store code are correctly inserted in the request form. The license key is based on these three elements. If you provided that info, the key will be sent back to you. After entering the key and saving, the module will be available for use in your store. The license info is stored in the cim_lic.dbf and cim_lic.mvx which are in your data "export" directory. Do not delete those files or you will have to re-enter your order number and license key in the module's admin.
Configure price group settings
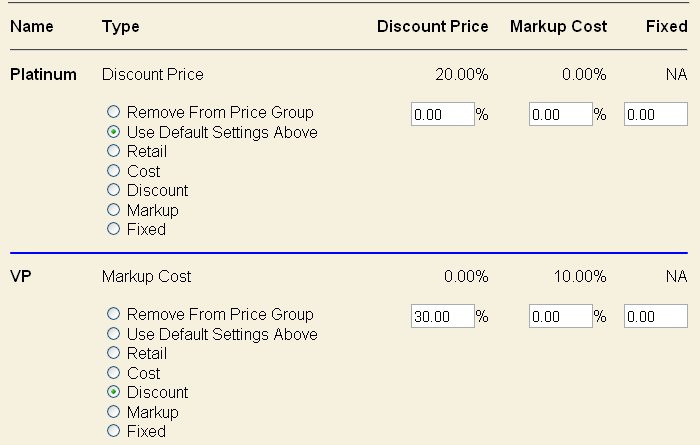
10) First create your price groups with a default discount for each group
11) Assign customers to the groups based on who you want to give discounts to
12) Then for those products you want to vary the discount from the default, go to their product edit screen and click the Price Group Manager link at the top
13) All price groups are shown with the default on the first line of each group (fig 5)
14) Modify the settings for those groups you want to have a different value or method of calculating from the default
15) Click the update button
You can import the customers and products from a flat file using this module (fig 6) into price groups. The delimiter can be pipe, comma or tab. The format is very specific.
1) The products section begins with #Products Then each line below that contains values for the products's fields, each separated with the delimiter. The fields are:
product code
price group name
type - P = primary default price group settings, R = retail price, C = cost, D = discount from price, M = markup over cost, F = fixed
amount - used only with the D, M and F types
2) The customers section begins with #Customers and contains the customer login and price group name, separated with the delimiter. For readability you can include other fields separated with the delimiter to make the file more readable for you, e.g. first and last name. Those fields are not use by the upload and are ignored.
Example flat file:
#Products
LC_00001|Chairman|D|25
LC_00002|Chairman|C|10
LC_00001|Gold|M|10
#Customers
fasteddy|Gold
hotdog|Gold
hotdog|Chairman
Leave the last line blank.
You can import the customers and products from a flat file using this module (fig 6) into availability groups. The delimiter can be pipe, comma or tab. The format is very specific.
1) The products section begins with #a-Products Then each line below that contains values for the products's fields, each separated with the delimiter. The fields are:
product code
availability group name
2) The customers section begins with #a-Customers and contains the customer login and availability group name, separated with the delimiter. For readability you can include other fields separated with the delimiter to make the file more readable for you, e.g. first and last name. Those fields are not use by the upload and are ignored.
Example flat file:
#a-Customers
WW-1148|Wholesale
#a-Products
VARIANT|Wholesale
Leave the last line blank.
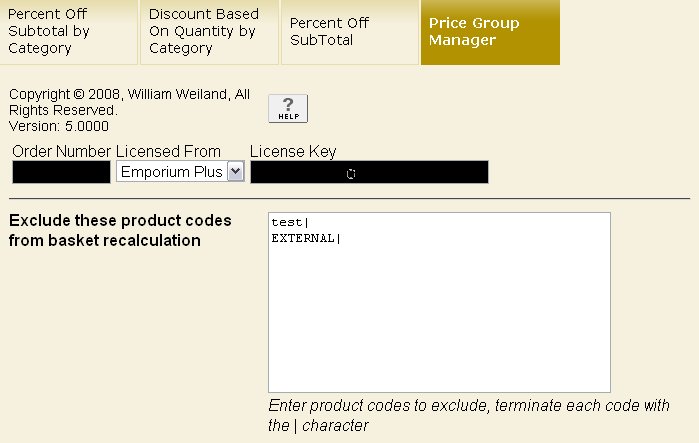
Some 3rd party modules set the basket price based on certain factors other than the price in the products database. For example, a size pricing module might let customers enter a number in an attribute input and the module will calculate the basket price based on the customer entered value. By putting that product's code in this module's admin screen (fig 7), you can avoid erasing the value that was inserted by the other 3rd party module when a customer logs in. All other items in the basket will be checked upon login to make sure the price group price is used for the order.
PGM works as an extension to the "product_list" item which is a Merchant built-in item that is used to display product info on the product screen and other screens which list products. However, some 3rd party modules may replace the product_list item with their own variation of it. If that is the case, you can still use this module by inserting a token in the store morph code and displaying a different variable. First, assign the pgrpman item to the page's items list for the page you are going to put the token on. Then below is an example that displays the raw price and the formatted (for country's currency) price.
<mvt:item name="pgrpman" param="adjusted_price|Product_Code" />
&mvt:pgrpman:adjusted_price; &mvt:pgrpman:formatted_adjusted_price;
Beginning with version 5.016 of the module we added a new token for the product page. On the product page if you want to display add or subtract text after the prompts, you can include the following token after each prompt. The price that displays is price group manager aware so it changes based on customer and product price group status. Note that the parameters change slightly depending on the type of attribute. Also, in the examples you see the variable &mvt:global:adjusted:modified_formatted_price; Other variables available are &mvt:global:adjusted:price; and &mvt:global:adjusted:formatted_price; You make the edits in the Product Attribute Template tab on the PROD page template. In addition to the edits below, make sure you assign the pgrpman item to the items list of the PROD page.
text
<mvt:item name="pgrpman" param="attribute|adjusted|l.all_settings:product|l.all_settings:attribute:code|l.all_settings:attribute:template_code|" />
<mvt:if expr="g.adjusted:price GT 0">
(add &mvt:global:adjusted:modified_formatted_price;)
</mvt:if>
<mvt:if expr="g.adjusted:price LT 0">
(subtract &mvt:global:adjusted:modified_formatted_price;)
</mvt:if>
memo
<mvt:item name="pgrpman" param="attribute|adjusted|l.all_settings:product|l.all_settings:attribute:code|l.all_settings:attribute:template_code|" />
<mvt:if expr="g.adjusted:price GT 0">
(add &mvt:global:adjusted:modified_formatted_price;)
</mvt:if>
<mvt:if expr="g.adjusted:price LT 0">
(subtract &mvt:global:adjusted:modified_formatted_price;)
</mvt:if>
radio
<mvt:item name="pgrpman" param="attribute|adjusted|l.all_settings:product|l.all_settings:attribute:code|l.all_settings:attribute:template_code|l.all_settings:option:code" />
<mvt:if expr="g.adjusted:price GT 0">
(add &mvt:global:adjusted:modified_formatted_price;)
</mvt:if>
<mvt:if expr="g.adjusted:price LT 0">
(subtract &mvt:global:adjusted:modified_formatted_price;)
</mvt:if>
select
<mvt:item name="pgrpman" param="attribute|adjusted|l.all_settings:product|l.all_settings:attribute:code|l.all_settings:attribute:template_code|l.all_settings:option:code" />
<mvt:if expr="g.adjusted:price GT 0">
(add &mvt:global:adjusted:modified_formatted_price;)
</mvt:if>
<mvt:if expr="g.adjusted:price LT 0">
(subtract &mvt:global:adjusted:modified_formatted_price;)
</mvt:if>
If you have a need to export the customer data in specific price groups so can contact them, this feature makes that an easy task. Enter the file name you want to export to. Select the price group to export or select all if you want to export all price group customers. Check the boxes next to the fields you want to export. Select a delimiter. Click the button to export.
Q: I don't seem to be getting the lowest price group price.
A: Go to admin > storename > settings. The Price Group Overlap Resolution setting should be set to Lowest Price.