Copyright © 2000, William Weiland
The purpose of this module is to allow a customer to rate and write a review about products in your store.
You will install two modules (ratethis.mvc and cim_log.mvc).
Install ratethis.mvc
1) In admin, click Add Modules link (fig 2)
2) Click the file upload button
3) Browse to find the ratethis.mvc file on your hard drive and upload (fig 3)
4) Click Add to add it to the domain
5) Then in admin click on the plus to the left of Stores
6) Click the plus to the left of your store name
7) Click on the word Utilities under your store (fig 9)
8) Check the box next to the Rate This
9) Click Update
10) Click Pages link to get to the User Interface (fig 4)
11) Click Items link at the top of the User Interface page (fig 5)
12) Click the Add Item button (fig 6)
13) Enter ratethis for the code (fig 8)
14) Look up and scroll to the last page of items and Rate This should be at the end of the list of items
15) Select Rate This
16) Click the Add button to assign the module
17) The CIM Activity Log (cim_log.mvc) may already be in your store as it is used by many of our modules. Check under the Modules link to see if it is already there. If it is there, skip to 26. If not, then go to 18.
Install cim_log.mvc
18) Again, click Add Modules link
19) Click the file upload button
20) Browse to find the cim_log.mvc file on your hard drive and upload
21) Click Add to add it to the domain
22) Click on the Logging Configuration Link
23) Check the box next to the CIM Activity Log
24) Click Update
25) Skip to 31
Update cim_log.mvc
26) Click Modules link
27) Scroll down to CIM Activity Log and click the edit link
28) In the files tab click the file upload button
29) Browse to find the cim_log.mvc file on your hard drive and upload
30) Click Update to update the module
FTP image files
31) FTP the two included gif files, whole.gif and half.gif to the graphics/ directory under your Merchant directory. The images are of a heart. If you want to use other images, eg. stars or half stars, simply FTP them to the server and change the URL settings in admin.
Configure the module
32) Return to the store Utility menu and click the link for Rate This to enter the configuration settings
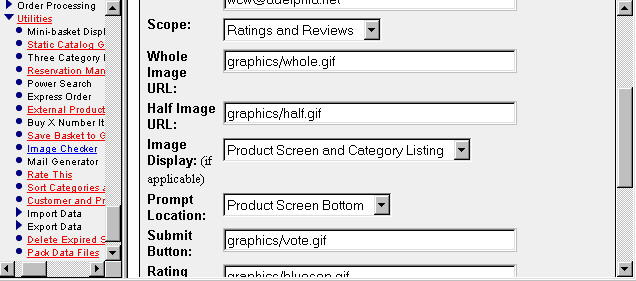
In admin, under the store, select the Utilities link. Then select the link for Rate This so that you can configure your rating system (fig 10).
Email
Email address to send ratings to: If you do not want to be notified
every time a rating is made, leave this blank.
Scope
Select which system you want to use and display in your store.
Whole Image URL
The URL should be virtual under your Merchant store.
Half Image URL
The URL should be virtual under your Merchant store.
Image Display
When using the ratings image display (hearts, stars, etc) they will display
at the bottom of each product's screen. This setting allows you to also
display the ratings on the category listing screen.
Prompt Location
The submission prompt can either be in the category tree or at the bottom
of the product screen.
Button
You can change the rating/review submission button to a graphic button by
including a virtual URL.
Separator
If you include a virtual URL for a line image, it will appear between each
customer's review.
Footer
You can include a footer message under the rating/review prompts.
Not logged in message
If the customer is not logged in, you can provide a brief message to tell
them that they must login before rating a product. You can even use a
token for a link to login. After login, the customer will be forwarded back
to the product page instead of the typical storefront. This will be ok IF
you do not have images on your product pages with full url. Virtual paths
to images are ok. If you do have full url to images on your product pages,
then you will need to make the not logged in message just text, no link.
Templates
You have more control over the layout of the prompt and display for ratings
and reviews if you use the templates. You will need to know some html if you
do replace the default layouts with the templates.
The module is called within specific template screens with render tokens. They are in the format of
<mvt:item name="itemcode" param="xxxx" />
The templates are listed at the Pages link. You will edit the template by inserting the token and clicking the Update (fig 7). Important: After adding the render token to a template page, you must click the Items link for that page, scroll down to the item name and assign it to the page (fig 8). These two steps are repeated for every page that a module's render token is used on.
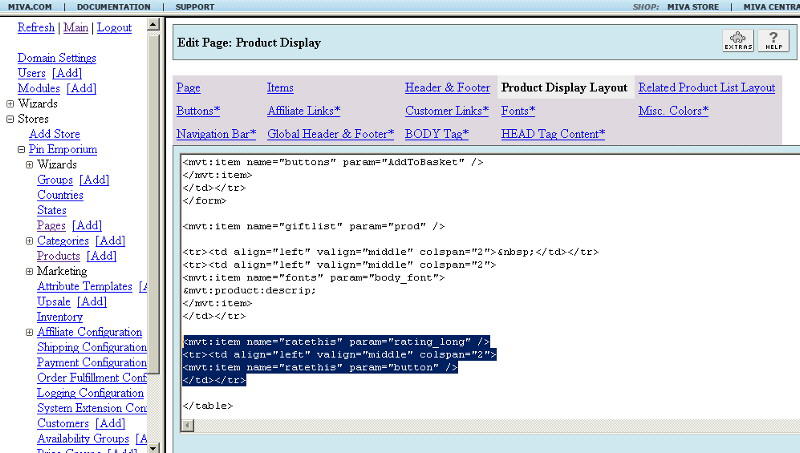
1) On page 'prod' (product display), click the tab at the top labeled Product Display Layout. Then near the bottom, if the template code is not exposed, click the link for Advanced Mode. Insert
<mvt:item name="ratethis" param="rating_long" />
on the page, probably below the description. Make sure it is not inside the add to basket form, so it should be below that form's closing form tag. See Fig 7 for example.
2) On the same page 'prod' (product display) within the Product Display Layout, insert
<mvt:item name="ratethis" param="button" />
on the page, probably below the rating_long insert. Make sure it is not inside the add to basket form, so it should be below that form's closing form tag. See Fig 7 for example.
3) On page 'ctgy' (category display), click the tab at the top for the Category Product List Layout. Then near the bottom, if the template code is not exposed, click the link for Advanced Mode. Insert
<mvt:item name="ratethis" param="rating_short" />
on the page, probably below the product code line. This token places the images in a table row. So if you place the token in a location that is inside another table cell, you will need to wrap the token with table tags, e.g.
<table>
<mvt:item name="ratethis" param="rating_short" />
</table>
4) On page 'logn' (customer login) insert
<mvt:item name="ratethis" param="logn" />
on the page. Make sure it IS inside the login form, so it should be between that form's opening and closing form tags.
Q: The prompt to enter the ratings and reviews is not showing up at the product screen.
A: Consider:
1) The customer must be logged in before they see the prompt. This discourages mischievous ratings.
2) Make sure you completed the editing requirements above.
Q: The customer enters a rating and review but it is not showing up at the product screen.
A: If you have the module configured so that you have to approve ratings, you need to approve the new ratings in the queue before anybody will see them. The approval process is at admin:storename:utilities:rate this.
Q: Are there variables to determine if a rating or review has been made?
A: Yes, beginning with module version 5.0190 you can use store morph code to check those variables and display a message that the item has not yet been rated, e.g.
<mvt:if expr="g.rating_average + g.review_count EQ 0">
Not yet rated
</mvt:if>
Q: I saw that you had buttons/links to publish the rating to a customer's Twitter or Facebook in your 4x store. How do you do that in a 5x store?
A: Here's the how to.
Still have a question?