Copyright © 2005, William Weiland
Create a flat file of your products which can be used to populate external databases, e.g. Shopzilla.
You will install one module (zilladf.mvc).
Install zilladf.mvc
1) In admin, click Add Modules link (fig 2)
2) Click the file upload button
3) Browse to find the zilladf.mvc file on your hard drive and upload (fig 3)
4) Click Add to add it to the domain
5) Then in admin click on the plus to the left of Stores
6) Click the plus to the left of your store name
7) Click on the word Utilities under your store (fig 4)
8) Check the box next to the Shopzilla Data Feed
9) Click Update
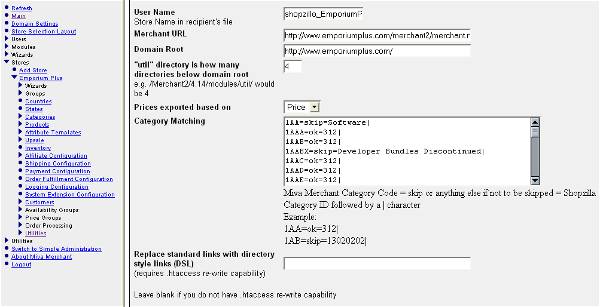
10) Click the link at the top of the screen for Shopzilla Data Feed to enter the configuration settings (fig 5)
1) In admin, click on Stores
2) Click the plus to the left of your store name
3) Click the plus to the left of Utilities under your store
4) Click the link to the Shopzilla Data Feed (fig 6)
5) Click on the data exporting button
6) If successful, the file path will appear as a link
The module will attempt to resolve images for your thumbnails. If you use the full path url for images in your store, it will use them. If you use a virtual path below your mm5/ directory it will add the root directory for graphics that is defined in your admin domain settings. If you preceed the image urls with ../ it will replace the ../ with the domain root you define in the zilladf module's admin.
Note: All categories will be skipped until you change the word "skip" to anything else in the module's admin. For each that is changed from "skip", the products in that category will be exported to the flat file. Uncategorized products will not be exported. Shopzilla requires that you use the category IDs from their site to define where your products belong. You'll need to change the text category name to their category ID in the list. When you first install this module it will insert the store's categories into the input on the module's configuration screen. This is a one time import for convenience. If you add new categories to your store and you want the products in those new categories to be included in the datafeed, you will need to add the new categories in the module's configuration screen.
Inactive and deleted products will not be exported. Products with zero quantity can be exported. The presumption being that if they are exported they will be searchable in indexes. Once the customer reaches your store, it is up to your policy to decide what to tell them. This way, products will not be missed by search engines just because they are out of stock the day the export is run.
Products will be included in the datafeed even if they are in availability groups and are supposed to be restricted viewing. You can prevent this by ensuring they only appear in categories which are skipped or are not in any categories (as above).
You may find the affiliate code generation useful, even if the file is not going to an affiliate. By creating a dummy affiliate account, you can track where sales are coming from by checking the affiliate commissions.
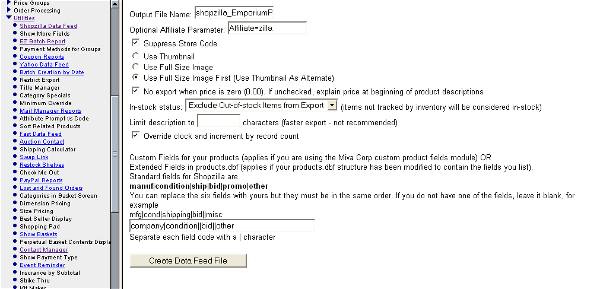
When you run the report, be sure the file name in the first input is a valid file name (ie letters, numbers, underline and hyphen - no spaces). It is based on the Shopzilla supplied user name that you entered in the zilladf data feed module's admin configuration screen.
When you run the export, if you only have one store in your domain and do not expect to add more stores to it, it is recommended that you check the box to suppress the store code. If you do add another store, you can always re-run the export, adding in the Store_Code.
Additional fields. Shopzilla has additional optional fields which you may want to include in the export. Those fields are not among the standard fields which are in MIVA Merchant. However, you can use the built in MIVA Merchant Custom Product Fields module to provide the data. You will need to assign the custom field module under the store utilities. Then in each product record you can assign values to those fields. Below is a list of fields which Shopzilla will import. The fields, marked with an asterisk, are the additional fields which you can include data if you have assigned values in the product records for those custom fields.
Category
*Mfr
Title
Description
LINK
Image
SKU
Stock
*Condition
Ship Weight
*Ship Cost
*Bid
*Promo Des.
*Other
Price
Fortunately, you do not need to call your custom fields the same names as Shopzilla uses. You may have other exports which would name them slightly different. So in the Shopzilla data feed module you can map your custom fields to match the six optional fields that Shopzilla can use. You will need to put them in the same order in the special input provided in the admin screen for this purpose. Separate each field with the | character. If you do not have one or more of the custom fields, you will leave the field name blank but still use the | character to mark the location. You must have all six slots to use this feature. As example, manuf|cond||bid|promo|other would map the fields manuf, cond, bid, promo, and other in your Merchant custom fields to Shopzilla's mfr, condition, ship cost, bid, promo, other. This example would skip ship cost since you did not list one in the custom fields list and left that spot blank.
After running the export, the link will appear in the admin window. That link uses another window to display your text file results. When you go to that other window, be sure you refresh/reload the screen as the previous export may still be in the cache. Save that file to your PC and then upload per Shopzilla's instructions.
Q: I ran the data feed and it is saying 0 products.
A: Make sure you changed the skip to ok as described above. The Shopzilla directory is category based and a category ID is needed in the data feed for each product. Only those categories that you have selected to export (by changing to ok) will be exported.
Q: I ran the data feed and it is only exporting 742 products. I have over 1100 products in my store.
A: The Shopzilla directory is category based and a category ID is needed in the data feed for each product. Only those categories that you have listed to export in the module's admin configuration screen will be exported. If you have added new categories since the data feed module was originally installed, you will need to add those categories that you want to export to the list in the zilladf module's admin. See step 10 in the "Setup" section at the top of this document.
Q: I ran the data feed and the screen turns blank after a period of time.
A: There are a couple issues that could cause this. First, try running it with the override clock with a value. If it still fails, go back to the configuration screen and change the util directory depth to 3. If it still does not work, change it to 0.
Q: I ran the data feed and it is requiring me to click on a "Next 0 Products" button for each product.
A: There is a setting to Override clock and increment every XXX records. This establishes how many records you want to export at a time. You'll need to experiment with your store as it is based on speed of server and how much text is in your descriptions. My store can easily export 400 at a time. So try replacing the 0 with 400. It will do 400, then the button for the next 400 will appear when those are completed. Keep pressing the button until done. You'll need to experiment to see what the best setting is without encountering a "application timeout" error. It could be as low as 5 in a real slow server.
Still have a question?