Copyright © 1999, William Weiland
The addendum module allows you to collect supplemental responses from customers at checkout. You can add as many questions to your form as you want. The responses are exported to a delimited text file which can be imported into most database management systems for further analysis. You can also have those responses appear in the Email notification and batch processing.
1) In admin, click Add Modules link (fig 2)
2) Click the file upload button
3) Browse to find the addendum.mvc file on your hard drive and upload (fig 3)
4) Click Add to add it to the domain
5) Then in admin click on the plus to the left of Stores
6) Click the plus to the left of your store name
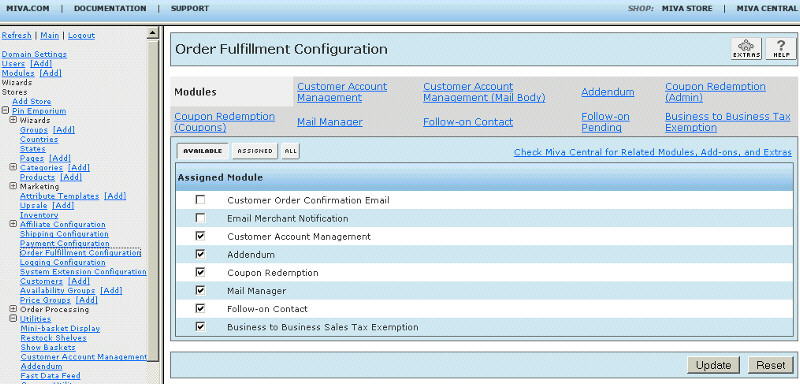
7) Click on Order Fulfillment Configuration link (fig 9)
8) Check the box next to the Addendum
9) Click Update
10) Click on System Extension Configuration link
11) Check the box next to the Addendum
12) Click Update
13) Click on the word Utilities
14) Check the box next to the Addendum
15) Click Update
16) Click Pages link to get to the User Interface (fig 4)
17) Click Items link at the top of the User Interface page (fig 5)
18) Click the Add Item button (fig 6)
19) Enter addendum for the code
20) Look up and scroll to the last page of items and Addendum should be at the end of the list of items
21) Select Addendum (fig 8)
22) Click the Add button to assign the module
23) Return to the Order Fulfillment Configuration screen and click the link for Addendum to enter the configuration settings and add Addendum questions.
a. You can have radio, select, checkbox, text and textarea type inputs.
b. Note: if you are using PayPal, paylink or any of the other payment modules that send the customer off-site to complete payment information, you cannot place the addendum questions on the last checkout screen (order payment). Rather, you should use the next to the last screen (shipping and payment selection).
c. You can also designate one or more of the questions to be required. If the customer does not answer the question, they will be recycled to the same page and will not be able to continue. In many cases this will be in the form of a checkbox to Accept terms of the purchase/sale. Simply include the NUMBER of the question(s) you want to be mandatory.
d. You can limit the display of Addendum questions based on specific product codes. If you list product codes in the admin input, the questions will only be displayed if one of those products is in the basket at checkout. You can also use the wild card product code like 1AA*. If the applicable products all begin with the same characters, you can use the asterisk. This can only be used for the beginning characters in the product codes. If you leave the product code input blank, the addendum questions will appear at checkout no matter what product were ordered.
e. You can optionally include the questions in the emails along with the responses. We've included a modified version of the merchant notification email which will include the responses. If you want more flexibility with your emails, our inexpensive email module Mail Manager is available.
f. You have the ability to use tokens to save and retrieve Addendum responses when a screen is refreshed due to missing data, e.g. the customer does not choose a shipping or payment method. These are very specialized tokens and are fairly complex in their implementation. The example page of each question input type will help you understand their implementation. We recommend that you setup the Addendum with basic questions and test to make sure everything is working. Then you can experiment with the tokens.
24) Edit page templates per the Template Editing Requirements section below
The module is called within specific template screens with render tokens. They are in the format of
<mvt:item name="itemcode" param="xxxx" />
The templates are listed at the Pages link. You will edit the template by inserting the token and clicking the Update (fig 7). Important: After adding the render token to a template page, you must click the Items link for that page, scroll down to the item name and assign it to the page. These two steps are repeated for every page that a module's render token is used on. The first three of these page tokens are required no matter what page the questions will be placed on. The other three page tokens are optional (see note after each).
1) On page 'ocst' (customer information), insert <mvt:item name="addendum" param="ocst" /> just above the continue button code. Make sure it is above the closing </form> tag.
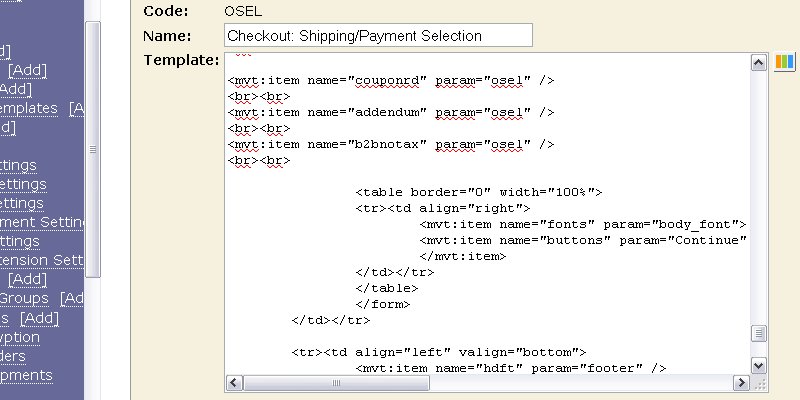
2) On page 'osel' (shipping/payment selection), insert <mvt:item name="addendum" param="osel" /> just above the continue button code. Make sure it is above the closing </form> tag.
3) On page 'opay' (order payment), insert <mvt:item name="addendum" param="opay" /> just above the continue button code. Make sure it is above the closing </form> tag.
4) On page 'ous1' (upsell single), insert <mvt:item name="addendum" param="ous1" /> just above the two </form> tags on this page. There is an add to order form and a do not add to order form, so both need to have the token inserted. If you are not going to have upsell products in your store, this screen edit is not needed.
5) On page 'ousm' (upsell multiple), insert <mvt:item name="addendum" param="ousm" /> just above the continue button code. Make sure it is above the closing </form> tag. If you are not going to have upsell products in your store, this screen edit is not needed.
6) On page 'invc' (invoice), insert <mvt:item name="addendum" param="invc1" /> if you want the responses numbered. Use <mvt:item name="addendum" param="invc2" /> if you do not want responses numbered. If you do not need the responses to display on the customer's invoice screen, this screen edit is not needed.
7) Beginning with version 5.017, if you are using the picklist page template in your order processing menu, you can add this token to display the responses on the pick list.
<mvt:item name="addendum" param="pick|l.all_settings:ordershipment:order:id" />
<br>&mvte:global:question1;
<br>&mvte:global:question2;
and so on....
You can also display the responses on the Order History (ORDS) page. The token is almost the same as the picklist except the order variable is a bit different.
<mvt:item name="addendum" param="pick|l.all_settings:order:id" />
The most recent responses are stored in a file called addendum.dat in the addendum subdirectory of the store data files, for example s01/addendum/addendum.dat This file contains responses since the last time you purged responses. All purged responses are maintained in the addendum.arc flat file so it holds the complete history unless you delete it. If you delete it, it will start over. You can download either file to your hard drive and import it to a word processor or database manager as you see fit. If you make the selections as optional selections, and the customer chooses not to respond, a line will not be added for that customer. Text input and select inputs can be optional, radio will not be. In addition to the responses, which are captured, the addendum.dat will contain three fields from the customer's order (order number, bill to last name, bill to zip).
You can go to the admin:storename:utilities screen and click the link for Addendum. You can enter search criteria and display either the complete response list or just the order numbers that match.
You can include responses in the template emails. Here is an example of displaying the responses to four of the questions. Be sure to assign the addendum item to the items list of the email page template. Additional Info:
<mvt:if expr="NOT g.maxquestions">
<mvt:item name="addendum" param="pick|l.all_settings:order:id" />
</mvt:if>
<mvt:if expr="g.question1">
<br />Version Verified: &mvte:global:question1;
</mvt:if>
<mvt:if expr="g.question2">
<br />License Terms Accepted: &mvte:global:question2;
</mvt:if>
<mvt:if expr="g.question3">
<br />Reviewed Installation: &mvte:global:question3;
</mvt:if>
<mvt:if expr="g.question6">
<br />Your Search Terms: &mvte:global:question6;
</mvt:if>
We recommend using the built-in template based batch report for your batch reports. You can add this code to the batch report template to include addendum responses.
<mvt:item name="addendum" param="pick|l.all_settings:order:id" />
&mvte:global:question1;
&mvte:global:question2;
&mvte:global:question3;
etc.
If you are using our EZ Batch Report module (ordered separately), you simply configure the EZ Batch to include the reponses. You also can use the EZ Batch Report for printing the batches with or without the addendum responses. Our EZ Batch Report allows several configuration parameters like page break between orders, ability to exclude payment, shipping, and bill to name/address, and prices. These latter features are usefull if you want to use the batch report for creating packing slips. Whether you need Addendum responses in the batch report or not, this module will create packing slips so you don't need to buy another module elsewhere. In addition to reporting from an existing batch, you can insert one or more order numbers and it will report them as long as they still exist in the orders database.
If you have not kept your Miva Merchant version current, we have included a modified Standard Batch Report (stdacct2.mvc) to replace the original batch report. It will also include the Addendum responses but does not have the configuration features like our EZ Batch Report. It is not needed if you are using the template based batch reports.
Q: The responses are not being saved in the addendum.dat file nor are they showing in the emails
A: Make sure that you named the question inputs correctly, e.g. question1, question2, question3, and so on. Then at the end of the questions you need a hidden input for maxquestions which will have a value of the highest numbered question, e.g. <input type="hidden" name="maxquestions" value="3">
A: Make sure you put the required tokens (listed above) on ALL three pages and the other pages when applicable. Also, double check that you assigned the Addendum in the items list for ALL three pages and others, as applicable.
Q: The responses ARE being saved in the addendum.dat file but they are not showing in the emails.
A: Use the template emails. See the code above to include desired responses in the email.
Q: I am using the modified batch report and I'd like to get a page break after each order. How do I do that?
A: Locate the data directory using FTP on your server. Under Merchant5/s01/addendum/ FTP a file there called eject.dat. If that file is present, the modified batch report will eject after each order. It does not matter what is in the file called eject.dat. Just create it with notepad and put anything in it.
Q: I am using compiled Merchant and want to setup an optional charge at checkout. How do I use this feature?
A: You include a question that has an answer that triggers the fee. It is best to use a specific value for the answer, but you could use a text input that any data entered would trigger the fee. Note that the fee can be positive or negative. In the image
 you can see that I made a negative fee if the customer answered "Yes" to
question number 6. The actual question number 6 in the addendum questions
for this example is
you can see that I made a negative fee if the customer answered "Yes" to
question number 6. The actual question number 6 in the addendum questions
for this example is <INPUT TYPE="checkbox" NAME="question6" VALUE="Yes">
Still have a question?