Copyright © 2000, William Weiland
The purpose of Power Search is to allow a customer to search one or more fields which are allowed by the store owner. The store owner can choose any fields within the products database and/or the custom product fields (Miva Corp built-in utility module) database to be searchable.
You will install one module, powrsrch.mvc.
1) In admin, click Add Modules link (fig 2)
2) Click the file upload button
3) Browse to find the powrsrch.mvc file on your hard drive and upload (fig 3)
4) Click Add to add it to the domain
5) Click the plus to the left of your store name if you have more than one store in the mall
6) Click on the word Utilities under your store (fig 10)
7) Check the box next to the Power Search
8) Click Update
9) Click the link at the top for Power Search to enter settings. If your version of the module is 5.061 or newer complete the rest of this step. If not, skip to 10. Enter the order number and where you purchased the license from. You will also need to supply a license key before configuring the module. This is not the license key you may have received when you purchased the license, as some vendors have their own license system. This license key is obtained directly from Emporium Plus. If you purchased from Emporium Plus, the key may have been included in the delivery email. If you purchased from other than the Emporium Plus store or it was not in the Emporium Plus delivery email, you can get it by clicking the link to "Request License Key" in the module's admin screen. 1) enter your order number and where you got it, 2) NEXT, click Update, 3) then request the key. Make sure the order number, domain, and store code are correctly inserted in the request form and the order number is in the subject. The license key is based on these three elements. Important: The order number must be in the subject line along with the words "License Request powrsrch". If you provided that info, we will send the key back to you after we receive the email. The module will function for 10 days without the key so you don't need to worry if you don't get a reply right away.
10) If you have custom product fields and want to limit which are included in the mirror database, enter the field codes separated with a comma, e.g. manuf,isbn,upc
11) Click the plus to the left of Utilities
12) Click the link for Power Search
13) IMPORTANT: BEFORE RUNNING the next step READ THIS WARNING and make changes if necessary
14) Rebuild the Power Search file (default is set to 100 - if your server times out, lower that number or limit the number of custom fields to include)
15) Click the word Utilities
16) Click the link at the top for Power Search
17) Assign the fields that you want searchable and update (do not edit the mini-templates on this page yet)
18) If you have a MySQL store, you can have a FULLTEXT index search for relevancy sorting, e.g. name,descrip (no spaces and separate with a comma). You should limit that to 2 or 3 main fields. Rebuild the mirror whenever you change this setting.
19) FTP the left.gif and right.gif to the mm5/graphics/ directory in your domain
20) See Editing Requirements for template editing changes
The module is called within specific (primarily srch) template screens with render tokens. The tokens are in the format of
<mvt:item name="powrsrch" param="xxxx" />
The templates are listed at the Pages link. You will edit the template by inserting the token and clicking the Update (fig 7). Important: After adding the render token to a template page, you must click the Items link for that page, scroll down to the item name (probably near the end of the list) and assign it to the page (fig 9). These two steps are repeated for every page that a module's render tokens are used on.
The Power Search module has five tokens available. Each token inserts a mini-template into the main 'srch' page template. You already saw the default text that is in the five mini-templates when you assigned the fields in step 16 above.
Before inserting tokens on the srch page template, select Items at the top of the page with the srch template on the screen. This will bring up the list of items which are assigned to the srch template page. At the bottom of the list should be Power Search. Check the box to assign it and click update.
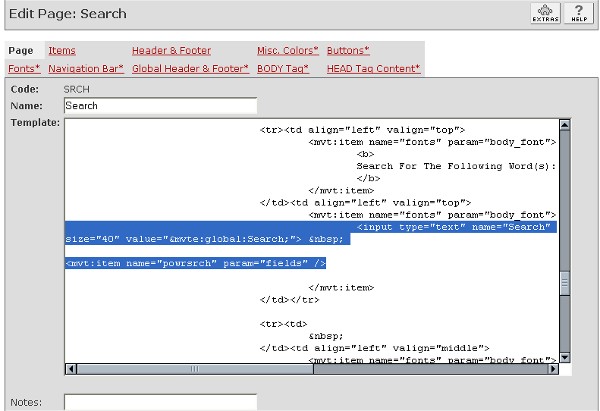
1) You can include a list of checkboxes of the fields you want to be searchable. The customer can select them when searching, If they do not select any, it will search all of them. The token needs to be within the search form on the srch page. You will probably put it just below the input for the search keywords as in the example shown at figure 7 below. The token is:
<mvt:item name="powrsrch" param="fields" />
You can make changes to the form in the Power Search module's admin page. Each input for a field will be with the syntax like srch_name-of-field-code. Note that regular and custom fields codes can only be 10 characters long (no spaces or hyphens; only letters, numbers, or underline characters allowed). So when you configure your custom fields module, keep the limitations in mind. Also, do not create custom fields with the same code of fields that already exist in the products database; eg name, code, id, image, thumbnail, weight, active, price, cost, sku. In the custom fields module you will create a field code and field name (prompt) for every custom field you want to use. The Power Search module will use the first 10 characters for the field in the mirror database and in the inputs. So a field code like manuf would appear in the searchable fields inputs like
<input type="checkbox" name="srch_manuf" value="1">
2) You can change the scope (type) of search by allowing the customer to select how they want the keyword(s) treated; any, all, exact phrase, beginning. This token can be separate on the srch page or you can imbed the token inside the mini-template for search fields in the Power Search admin.
<mvt:item name="powrsrch" param="scope" />
3) You can provide a category filter so that the search will be run in a single category. This token can be separate on the srch page or you can imbed the token inside the mini-template for search fields in the Power Search admin.
<mvt:item name="powrsrch" param="catsel" />
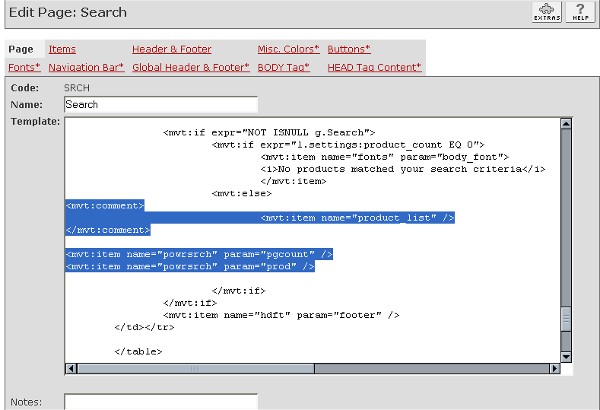
4) You can list a found total and provide a handy page navigation so that if there are more hits then your page is configured to display, it will show the page numbers of the other pages. Those numbers are clickable links. Normally, you will put this token just above the product listing. (fig 8)
<mvt:item name="powrsrch" param="pgcount" />
5) In May 2010 Miva released PR7 with the CSSUI. New stores created after that release are created as a CSSUI store unless overridden as MMUI. You can tell which UI you have by going to admin, click your store name, then click settings. If it says "Store User Interface: Miva Merchant CSSUI", you have the CSSUI. You will need to add the following code to the <head>......</head> section of the SRCH page template. If you do not have CSSUI, you do not need to add this code.
<style type="text/css">
<!--
#pswrap { padding-top:20px;}
#pwrsrchbox {width:70%; font-family:Georgia, 'Times New Roman', Times, serif; font-size:14px; padding-bottom: 10px;}
.pwrsrchleftbox {float:left; width:120px; height: 20px; padding:2px 20px 10px 2px; text-align:left;}
.pwrsrchrightbox {float:left; width:240px; height: 20px; padding:2px 20px 10px 2px; text-align:left;}
.pwrsrchalphalist { padding:20px; text-align:center; font-family:Georgia, 'Times New Roman', Times, serif; font-size:14px;}
#psbox { width:30%; float:right; font-family:Georgia, 'Times New Roman', Times, serif; font-size:14px; padding-bottom: 10px;}
#searchcount { font-family:Georgia, 'Times New Roman', Times, serif; font-size:14px; }
.prodfound {float:left; width:160px; height: 20px; padding:2px 20px 2px 2px;}
.pagecount {float:left; /*width:160px;*/ padding:2px 20px 2px 2px;}
.currentcat {float:right; padding:2px 20px 2px 2px;}
select { font-family:Georgia, 'Times New Roman', Times, serif; font-size:14px;}
-->
</style>
6) Setting your product layout. It is probably the same as the product layout you have already in your srch page template. However, that layout cannot be used because it runs the search in the background before it displays the products. So there are three steps when you replace the original product layout with the Power Search product layout.
a) Put comment tags around the original <mvt:item name="product_list" /> item tag. (fig 8) If using CSSUI the item tag to comment out is <mvt:item name="search_results" />
b) Insert this token just below (outside) those comment tags. (fig 8)
<mvt:item name="powrsrch" param="prod" />
c) Unassign the product_list (or search_results if using CSSUI) item from the srch page template's item list only. Do not remove it from the master list of items. Do not skip this step as it is critical for the proper function of power search.
The Power Search module uses a mirror database of your products, custom fields and categories; much like the big search engines use. By creating a mirror before the search is made, many operations to join multiple databases together can be avoided, so the customer gets a much faster search. The build of the mirror database goes quite quickly in mid sized stores (e.g. 40,000 products or less) and is a maintenance procedure you will do periodically. The small amount of time you take to build the mirror will save your customers significant amounts of time in their searches.
When rebuilding, there is a checkbox for Turbo rebuild (version 5.114 or newer). I recommend you try that as it builds the mirror MUCH MUCH faster than the non-turbo method. When you check the box and click the Next button to rebuild, the computer will act as if nothing is happening. After a period of time you will either see a line like "Power Search Mirror Rebuilt: 36964 products in 6 seconds" or you will see a timeout message. If you get the timeout message you could try cutting down on the number of custom fields you put in the mirror. If that does not work, you will need to revert to the old method, e.g. process 100 records at a time. The other consideration with the turbo method is it does not sanitize the "reviews" custom product field. So if you have a reviews custom product field which might contain login IDs, do not make it searchable in the power search admin screen. Do include it in the mirror, otherwise you will get an error when customers add or edit a review in merchant. The Turbo rebuild cannot be used with stores that use MivaSQL due to a bug in the Miva Engine (which Miva is working on fixing).
When you initially install the Power Search module, you will build the mirror. When you add, edit or delete products in admin, the mirror is automatically updated so you don't need to re-run the build. You can even edit the custom field data within the product edit screen and it will update the mirror.
When to rebuild the mirror:
1) After doing a flat file import of products or categories.
2) If you create new custom fields and then add product data to those new fields. Rarely do you add new custom fields to your store once you have been in operation for awhile, so this should not be needed often.
3) After adding products to price or availability groups.
- IMPORTANT note about custom product fields. You must NOT use certain "Reserved" words as custom product field CODES. The name (the text the customer sees) can be anything. But the CODE must be letters, numbers, or underline only. They cannot start with a number. They must not be in the "Reserved" words list. Check the Reserved words list before creating custom product fields. If you already have a field CODE with one of these words, change it before running this module's mirror build. Change the CODE, e.g. "match" could be changed to "xmatch". Also, the field code must not be longer than 10 characters. When the mirror is rebuilt, the field codes are truncated to 10 characters so if you have the same first 10 characters in more than one field code, the rebuild will fail with the duplicate field error.
Limit to custom fields
When rebuilding the mirror you can limit the number of custom fields in the mirror. This is highly advisable to make the searches more efficient and reduce server load. Rarely do you need all of the custom fields. Enter the desired custom field codes into a comma separated list.
Create as memo from above custom fields
If you limit the custom fields as above, beginning with Power Search 5.121 you can create some of those as memo fields in the mirror. That would allow product custom fields you have in your store to be search past the 254 character limit of regular text fields. Caution though; these fields require the engine to grab large amounts of memory to handle them. You should limit the number of these to five or less. None is best. As above, insert them in the input as a comma separated list.
This version of Power Search is for Merchant version 5.5, Production Release 7 or newer. If you are still using Production Release 6 or older you will need to create a custom product field called sku. Simply add the field, you don't need to put any data in it. Then rebuild the mirror. Then just before you update to Production Release 7, delete the sku custom product field and rebuild the mirror again.
Power Search Log Cleanup:
Periodically you need to cleanup the power search log. You can purge older than 6, 3 or 1 month or you can purge all. The log is used for the recent search history and the search cloud. If you are not using those and don't plan to, purge all. If you are using those, the number you purge is dependant on how busy your store is. If you have a busy store you will probably purge older than 1 month. If a small, quiet store, you will probably select older than 6 months. The smaller the search log, the more efficient your page will load. If it is too small the search cloud will be useless. If you have Power Search version 5.112 or newer you can select to do it automatically in the module's admin. Then when you delete expired baskets you have the option to clean up 3rd party module databases. If you do not select it to automatically do it, you can still cleanup in the form just below the mirror rebuilding form.
Full Index Search Feature:
Beginning with Power Search version 5.060 you have the option of creating a fulltext search index if your store uses MySQL. You will see a prompt "Fulltext Index Fields:" and the fields "name,descrip" in the input by default. You can change that field list and include other fields in the mirror. This feature allows you to search the fields and score the keyword frequency found in them. You would not want to list all fields but the two listed and maybe a couple custom fields would help your search relevancy. If you don't want the rebuild to create the fulltext index, simply erase the field names from that input. Important: If you use this feature and give a fulltext search option on your SRCH screen, the field list here must agree with the field list you put in the input on the SRCH page template. See the section on Keyword Scoring further down in this document.
While the build does take some admin time once in awhile, it always reduces the time required for your customers to do searches.
There are two methods for automating the mirror rebuild.
1) Beginning with Power Search version 5.082, you may be able to automate the mirror rebuild with cron. If you have access to cron on your server you can try. If you have too many products, you will need to change the global timeout on the server, which you may not have permission to do. You can test before you setup cron. Go to the mirror rebuild form. Enter 7777777 and click the button. If it runs without timing out, you will be able to use cron. This example below will run the mirror rebuild. You will need to change the store code, admin url, username, and password. This will be one long line in your cron task setup.
a) wget --post-data='Screen=SUTL&Action=SUTL&Store_Code=YOURSTORECODE&Module_Code=powrsrch&powrsrch_rebuild=7777777&UserName=YOURUSERNAME&Password=YOURPASSWORD&Provision=yes&Submit=Login' https://www.YOURDOMAIN.com/mm5/admin.mvc --no-check-certificate >/dev/null 2>&1
If you are using MySQL and want to also create the fulltext index (recommended), you will add &powrsrch_fulltext=name,descrip to the line. If your store is using different fields for fulltext, then change this to the correct fields. So in a MySQL store which is also using fulltext search (keyword scoring), use this. This example also uses the Turbo rebuild setting which requires Power Search v5.114 or newer.
b) wget --post-data='Screen=SUTL&Action=SUTL&Store_Code=YOURSTORECODE&Module_Code=powrsrch&powrsrch_rebuild=7777777&powrsrch_fulltext=name,descrip&turbo=1&UserName=YOURUSERNAME&Password=YOURPASSWORD&Provision=yes&Submit=Login' https://www.YOURDOMAIN.com/mm5/admin.mvc --no-check-certificate >/dev/null 2>&1
Remember, you can only use &powrsrch_fulltext=name,descrip in the line if you use MySQL for your store. Remember, you must have Power Search version 5.114 or newer and your store uses MySQL.
2) If you are using Power Search version 5.1090 or newer you can use cron and run the technique described at this how to doc. This technique overcomes the timeout limitation of the cron method discussed in the first method. You should be able to run very large mirror rebuilds during low traffic times in the early morning hours.
You can put a link on the product page to return the customer back to the same search location. Note: In the example code below, the link is wrapped to multiple lines. When you copy that to your product page template, that link should be on one line with no spaces. Note the last three parameters are srch_name, srch_code, and srch_descrip. If you have other field checkboxes in your search form, you will need to add those fields too. Study how these three were coded and follow that example for other fields. Note: If you are using the BuySafe module, don't use this example. Rather, skip down to the FAQ section below and read the instructions for use with BuySafe. Also, you will note in the product layout in the power search module's admin that the links to products are long. Do not make them short links. That long link is what passes the return url info to the product page so that the return to search will work. You don't need short links anyway on the search page because search engines don't make up keywords and then run fictitious searches on your search page. A short link on the search page serves no search engine optimization purpose and it disables the return to search feature. If you are using CSSUI, change the &offset=&mvta:global:offset; in the link to &searchoffset=&mvta:global:searchoffset;
<mvt:if expr="NOT ISNULL g.search">
<mvt:if expr="g.oldscreen EQ 'COMPARE'">
<a href="&mvt:global:sessionurl;Screen=COMPARE&Store_Code=&mvta:store:code;&search=&mvta:global:search;&filter_cat=&mvta:global:filter_cat;&PowerSearch_Begin_Only=4&srch_code=1&pscells=&mvta:global:pscells;&psauto=&mvta:global:psauto;&range_low=&mvta:global:range_low;&range_high=&mvta:global:range_high;&sort=&mvta:global:sort;">
<mvt:else>
<a href="&mvt:global:sessionurl;Screen=SRCH&Store_Code=&mvta:store:code;&search=&mvta:global:search;&offset=&mvta:global:offset;&filter_cat=&mvta:global:filter_cat;&PowerSearch_Begin_Only=&mvta:global:PowerSearch_Begin_Only;&sort=&mvta:global:sort;&range_low=&mvta:global:range_low;&range_high=&mvta:global:range_high;&srch_name=&mvta:global:srch_name;&srch_code=&mvta:global:srch_code;&srch_descrip=&mvta:global:srch_descrip;">
</mvt:if>
Return to search</a>
</mvt:if>
You can include the following code on the srch page template, probably just above the footer, to display results of searching category names, codes, headers, and footers for the search terms.
<mvt:if expr="l.settings:cat_count GT 0">
<center>
<table border="0" width="80%">
<tr>
<mvt:foreach iterator="category" array="pscategory">
<td valign="top" align="center">
<mvt:if expr="NOT ISNULL l.settings:category:image">
<img src="&mvt:category:image;" border="0" width="60" height="40">
<br>
</mvt:if>
<a href="&mvt:global:sessionurl;Screen=CTGY&Store_Code=&mvta:store:code;&Category_Code=&mvta:category:code;">
&mvt:category:name;</a>
</td>
<mvt:if expr = "(pos1 MOD 3 ) EQ 0">
</tr>
<tr>
<td colspan="3">
</td>
</tr>
<tr>
</mvt:if>
</mvt:foreach>
</tr>
</table>
</center>
</mvt:if>
You can make this a selectable option by including a checkbox input on your search form like
<input type="checkbox" name="Category_Search" value="1"> Category
You'll also need to make sure the headers and footers are assigned to the srch page. Go to page template "srch" and click the link. Then at the top, click the link for "Items". Scroll through the list and find "prod_ctgy_hdft". Make sure that is checked (assigned) and then update.
With Power Search version 5.032 or newer you can include a drop down of recent searches made by all customers on pages in the store. It can go on any page that the product_list item is NOT assigned to. So it cannot go on the PROD, CTGY, PLST pages. To do this, assign the powrsrch item to the items list of the page you are going to put this drop down on. Then insert the following code at the location you want the drop down. The 10 in the example is used to limit the list to that number of items.
<mvt:item name="powrsrch" param="recent|10" />
<mvt:if expr="l.settings:powersearch_history">
<table border="0" width="80%">
<tr>
<td align="left">
<br>
Recent Searches
<br>
<select size="1" name="recentsearch" onchange="document.location.href=this.value">
<option selected value="&mvt:global:sessionurl;">
--- View ---
</option>
<mvt:foreach iterator="item" array="powersearch_history">
<option value="&mvt:global:sessionurl;Screen=SRCH&Store_Code=&mvta:global:Store_Code;&Search=&mvte:item:searched;">
&mvte:item:searched;
</option>
</mvt:foreach>
</select>
</td>
</tr>
</table>
</mvt:if>
Beginning with Power Search version 5.052 or newer, a variation of this is the recent search for a specific IP address. Normally, this would list the viewing customer's searches. The 12 in the below example is the number of hours to search back for this IP address.
<mvt:item name="powrsrch" param="recentip|12" />
<mvt:if expr="l.settings:powersearch_history_ip">
<table border="0" width="80%">
<tr>
<td align="left">
<br>
Recent Searches by You
<br>
<select size="1" name="recentsearch" onchange="document.location.href=this.value">
<option selected value="&mvt:global:sessionurl;">
--- View ---
</option>
<mvt:foreach iterator="item" array="powersearch_history_ip">
<option value="&mvt:global:sessionurl;Screen=SRCH&Store_Code=&mvta:global:Store_Code;&Search=&mvte:item:searched;">
&mvte:item:searched;
</option>
</mvt:foreach>
</select>
</td>
</tr>
</table>
</mvt:if>
Beginning with Power Search version 5.052 or newer, if you are using a template email module, like our Mail Manager, and your payment method does not take the customer offsite to fill in the credit card info, you can list the search terms the customer used recently in the order email. On the OPAY page template you would put this code inside the existing form on that page. The 12 indicates the number of hours to go back. Also, make sure you assign the powrsrch item to the OPAY page's items list.
<mvt:item name="powrsrch" param="recentip|12" />
<mvt:if expr="l.settings:powersearch_history_ip">
<input type="hidden" name="customer_searched" VALUE="&mvte:powersearch_history_ip;">
</mvt:if>
In the email module you will use a token to display the variable customer_searched which will be a comma separated list of the search terms.
With Power Search version 5.045 or newer you can go direct to the product page if only one product matches the search.
In the existing search form, put
<input type="hidden" name="onlyone" value="1">
to turn on this feature. There have been a handful of sites that cannot use this feature. For an unknown reason the search hangs. If your site hangs on "one found" searches, you will not be able to use this feature so do not include this input in the search form.
If you are using our Tell a Friend module (version 5.005 or newer) you can put a button on the 'srch' page template to pass the Power Search settings on in an email to friends. Customers will be able to click the button and the email that is sent by our Tell a Friend module will have a link to return them to the same search screen you the originator was on. The button should be placed on the 'srch' page template in an area where a successful search had been run, ie products were found. Ideally this would be just above or below the power search token for 'prod' (step 5 in the editing requirements section above). Note: In the example code below, the hidden input for Tell_Jump is wrapped to multiple lines. When you copy that to your page template, that input should be on one line.
<form method="post" action="&mvt:global:sessionurl;">
<input type="hidden" name="Store_Code" value="&mvte:global:store:code;">
<input type="hidden" name="Screen" value="TELL">
<input type="hidden" name="Old_Screen" value="SRCH">
<input type="hidden" name="Tell_Jump" value="&mvt:global:sessionurl;Screen=SRCH&Store_Code=&mvta:store:code;&search=&mvta:global:search;&offset=&mvta:global:offset;&filter_cat=&mvta:global:filter_cat; &PowerSearch_Begin_Only=&mvta:global:PowerSearch_Begin_Only;&sort=&mvta:global:sort;&range_low=&mvta:global:range_low; &range_high=&mvta:global:range_high;&layout=&mvta:global:layout;&mvt:powersearch:field_url;">
<input type="hidden" name="Tell_Title" value="Search: &mvte:global:search;">
<input type="hidden" name="Search" value="&mvte:global:search;">
<input type="hidden" name="Offset" value="&mvte:global:offset;">
<input type="hidden" name="filter_cat" value="&mvte:global:filter_cat;">
<input type="hidden" name="PowerSearch_Begin_Only" value="&mvte:global:PowerSearch_Begin_Only;">
<input type="hidden" name="layout" value="&mvte:global:layout;">
<input type="hidden" name="sort" value="&mvte:global:sort;">
<input type="hidden" name="powersearch_fields" value="&mvt:powersearch_fields;">
<input type="hidden" name="range_low" value="&mvte:global:range_low;">
<input type="hidden" name="range_high" value="&mvte:global:range_high;">
<table border="0" width="100%">
<tr>
<td align="right">
<input type="submit" name="TellEm" value="Send this search to a friend">
</td>
</tr>
</table>
</form>
Beginning with Power Search version 5.043 you can hide specific products from search results. Insert <!-- miva_nodisplay //--> anywhere in the description of the products and they will not show in the search results. The text will also not display in the description because it is surrounded with html comment tags. This feature is different from availability groups. Availability groups hide the product on all screens unless the customer is in the group and logged in. This "nodisplay" feature is used when you don't want it to show in the search but you may still want it to be found with a direct link or in the product list screen.
Beginning with Power Search version 5.051 you can let the customer select the number of products per page to show, e.g. show all. Put this drop down on the page where you want it.
<select name="ProductsPerPage">
<mvt:if expr="g.ProductsPerPage EQ 20">
<option value="20" selected> 20</option>
<mvt:else>
<option value="20"> 20</option>
</mvt:if>
<mvt:if expr="g.ProductsPerPage EQ 40">
<option value="40" selected> 40</option>
<mvt:else>
<option value="40"> 40</option>
</mvt:if>
<mvt:if expr="g.ProductsPerPage EQ 99999">
<option value="99999" selected>ALL</option>
<mvt:else>
<option value="99999">ALL</option>
</mvt:if>
</select>
per page
You will also have to pass the ProductsPerPage value in links and forms used in the search page. So in the Power Search admin you will add &ProductsPerPage=&mvta:global:ProductsPerPage; into the url links in the page count input. Do not put it at the very end of the link. In the product layout input you will insert <input type="hidden" name="ProductsPerPage" value="&mvte:global:ProductsPerPage;"> in the forms for add to basket, next and previous.
Beginning with version 5.0540 you can display a list of most popular searches. Under admin > utilities there is a form for building the most popular list. Enter a number, e.g. 50, and then click the Build button. Then in the SRCH page template, at a location of your choosing, paste the following code.
<style type="text/css">
div.popular a.psmax{font-size:190%;color:#0000dd}
div.popular a.pshigh{font-size:160%;color:#0000dd}
div.popular a.psmid{font-size:130%;color:#0000dd}
div.popular a.pslow{font-size:100%;color:#0000dd}
div.popular a.psmin{font-size:70%;color:#0000dd}
</style>
<div class="popular">
<mvt:item name="powrsrch" param="cloud" />
<mvt:if expr="l.settings:powersearch_cloud">
<table border="0" width="100%">
<tr>
<td align="left">
<font size="+1">
<br>
Most Popular Searches
<br>
</font>
<mvt:foreach iterator="item" array="powersearch_cloud">
<a class="&mvt:item:fontsize;" href="&mvt:global:sessionurl;Screen=SRCH&Store_Code=&mvta:global:Store_Code;&Search=&mvta:item:searched;" title="Rank &mvt:item:rank; of 50">
&mvt:item:searched;</a>
</mvt:foreach>
</td>
</tr>
</table>
</mvt:if>
</div>
You can change the font sizes and colors and the title tag in the href link. Also, you should put this code in the head tag area on the SRCH page template only. <meta name="ROBOTS" content="NOINDEX, NOFOLLOW"> This will prevent search engines from submitting these searches which would boost the hits for those links and not be truly representative of real customers.
Once you have this up and running, if you have access to cron on your server, you can automate the list building. This example will run the build with 50 in the list. You will need to change the store code, admin url, username, and password. This will be one long line in your cron task setup.
wget --post-data='Screen=SUTL&Action=SUTL&Store_Code=YOURSTORECODE&Module_Code=powrsrch&ps_cloud=1&topcount=50&pass=1&UserName=YOURUSERNAME&Password=YOURPASSWORD&Provision=yes&Submit=Login' https://www.YOURDOMAIN.com/mm5/admin.mvc --no-check-certificate >/dev/null 2>&1
Beginning with version 5.0560 you can display a list of searches by letter. In the SRCH page template, at a location of your choosing, paste the following code. Be sure to change the domain from the example "pinemporium" to your actual domain.
<center>
<table border="0">
<TR><TD colspan="2" align="center" nowrap>
<mvt:item name="fonts" param="ctgy_font">
<a name="wordlist">Word List</a><br>
</mvt:item>
<mvt:item name="fonts" param="body_font">
<A HREF="http://www.pinemporium.com/mm5/merchant.mvc?Screen=SRCH&showletter=A#wordlist">A</A>
<A HREF="http://www.pinemporium.com/mm5/merchant.mvc?Screen=SRCH&showletter=B#wordlist">B</A>
<A HREF="http://www.pinemporium.com/mm5/merchant.mvc?Screen=SRCH&showletter=C#wordlist">C</A>
<A HREF="http://www.pinemporium.com/mm5/merchant.mvc?Screen=SRCH&showletter=D#wordlist">D</A>
<A HREF="http://www.pinemporium.com/mm5/merchant.mvc?Screen=SRCH&showletter=E#wordlist">E</A>
<A HREF="http://www.pinemporium.com/mm5/merchant.mvc?Screen=SRCH&showletter=F#wordlist">F</A>
<A HREF="http://www.pinemporium.com/mm5/merchant.mvc?Screen=SRCH&showletter=G#wordlist">G</A>
<A HREF="http://www.pinemporium.com/mm5/merchant.mvc?Screen=SRCH&showletter=H#wordlist">H</A>
<A HREF="http://www.pinemporium.com/mm5/merchant.mvc?Screen=SRCH&showletter=I#wordlist">I</A>
<A HREF="http://www.pinemporium.com/mm5/merchant.mvc?Screen=SRCH&showletter=J#wordlist">J</A>
<A HREF="http://www.pinemporium.com/mm5/merchant.mvc?Screen=SRCH&showletter=K#wordlist">K</A>
<A HREF="http://www.pinemporium.com/mm5/merchant.mvc?Screen=SRCH&showletter=L#wordlist">L</A>
<A HREF="http://www.pinemporium.com/mm5/merchant.mvc?Screen=SRCH&showletter=M#wordlist">M</A>
<A HREF="http://www.pinemporium.com/mm5/merchant.mvc?Screen=SRCH&showletter=N#wordlist">N</A>
<A HREF="http://www.pinemporium.com/mm5/merchant.mvc?Screen=SRCH&showletter=O#wordlist">O</A>
<A HREF="http://www.pinemporium.com/mm5/merchant.mvc?Screen=SRCH&showletter=P#wordlist">P</A>
<A HREF="http://www.pinemporium.com/mm5/merchant.mvc?Screen=SRCH&showletter=Q#wordlist">Q</A>
<A HREF="http://www.pinemporium.com/mm5/merchant.mvc?Screen=SRCH&showletter=R#wordlist">R</A>
<A HREF="http://www.pinemporium.com/mm5/merchant.mvc?Screen=SRCH&showletter=S#wordlist">S</A>
<A HREF="http://www.pinemporium.com/mm5/merchant.mvc?Screen=SRCH&showletter=T#wordlist">T</A>
<A HREF="http://www.pinemporium.com/mm5/merchant.mvc?Screen=SRCH&showletter=U#wordlist">U</A>
<A HREF="http://www.pinemporium.com/mm5/merchant.mvc?Screen=SRCH&showletter=V#wordlist">V</A>
<A HREF="http://www.pinemporium.com/mm5/merchant.mvc?Screen=SRCH&showletter=W#wordlist">W</A>
<A HREF="http://www.pinemporium.com/mm5/merchant.mvc?Screen=SRCH&showletter=X#wordlist">X</A>
<A HREF="http://www.pinemporium.com/mm5/merchant.mvc?Screen=SRCH&showletter=Y#wordlist">Y</A>
<A HREF="http://www.pinemporium.com/mm5/merchant.mvc?Screen=SRCH&showletter=Z#wordlist">Z</A>
</mvt:item>
<BR><BR>
</TD></TR>
</table>
</center>
<mvt:if expr="g.showletter">
<center>
<mvt:if expr="NOT g.showall">
<mvt:item name="powrsrch" param="byletter|51" />
<mvt:if expr="l.settings:powersearch_history_letter">
<font size="+1">&mvte:global:showletter;</font><br>
<table border="0" cellspacing="3" cellpadding="2">
<tr><td align="left" valign="top">
<mvt:foreach iterator="item" array="powersearch_history_letter">
<mvt:if expr = "pos1 LE 50">
<a href="&mvt:global:sessionurl;Screen=SRCH&Store_Code=&mvta:global:Store_Code;&Search=&mvta:item:searched;">
&mvte:item:searched;</a>
<mvt:if expr = "(pos1 MOD 10 ) EQ 0">
</td><td align="left" valign="top">
<mvt:if expr = "(pos1 MOD 50 ) EQ 0">
</td></tr>
</mvt:if>
<mvt:else>
<br>
</mvt:if>
</mvt:if>
<mvt:if expr="pos1 EQ 51">
<tr><td align="left" colspan="5">
<a href="&mvt:global:sessionurl;Screen=SRCH&Store_Code=&mvta:global:Store_Code;&showletter=&mvta:global:showletter;&showall=1#wordlist">
show all...</a></td></tr>
</mvt:if>
</mvt:foreach>
</td></tr>
</table>
<mvt:else>
No successful searches with the letter &mvte:global:showletter;
</mvt:if>
<mvt:else>
<mvt:item name="powrsrch" param="byletter|99999" />
<mvt:if expr="l.settings:powersearch_history_letter">
<font size="+1">&mvte:global:showletter;</font><br>
<table border="0" cellspacing="3" cellpadding="2">
<tr><td align="left" valign="top">
<mvt:foreach iterator="item" array="powersearch_history_letter">
<a href="&mvt:global:sessionurl;Screen=SRCH&Store_Code=&mvta:global:Store_Code;&Search=&mvta:item:searched;">
&mvte:item:searched;</a>
<mvt:if expr = "(pos1 MOD 10 ) EQ 0">
</td><td align="left" valign="top">
<mvt:if expr = "(pos1 MOD 50 ) EQ 0">
</td></tr>
<tr><td colspan="5"> </td></tr>
<tr><td align="left" valign="top">
</mvt:if>
<mvt:else>
<br>
</mvt:if>
</mvt:foreach>
</td></tr>
</table>
<mvt:else>
No successful searches with the letter &mvte:global:showletter;
</mvt:if>
</mvt:if>
</center>
</mvt:if>
You should put this code in the head tag area on the SRCH page template only. <meta name="ROBOTS" content="NOINDEX, NOFOLLOW"> This will prevent search engines from submitting these searches which would boost the hits for those links and not be truly representative of real customers.
Beginning with version 5.0580 you can implement the field boosting feature if your store uses MySQL. This lets you choose which fields are more important in the search. If the any of the search words are in those fields, the record will be sorted to the top of the search results list if the sort value is blank. If the customer chooses to sort on name, price, etc, then the boost is no longer pushed to the top. You can have more than one boosted field, as you see in the example below. They can be a regular product field or a custom product field. In the search form on the SRCH page template include the following code.
<input type="hidden" name="psboost" value="name,code">
In the page count input in the Power Search admin screen locate the page number links. Include the following in them so that the psboost variable gets passed.
&psboost=&mvta:global:psboost;
In the product layout input in the Power Search admin screen locate the forms for add to basket, previous and next. Include the following along with the other hidden inputs that are already there.
<input type="hidden" name="psboost" value="&mvte:global:psboost;">
Beginning with version 5.0600 you can implement the keyword scoring feature if your store uses MySQL. This lets you search a FULLTEXT index and score the rows (products) based on keyword density and some other factors. As the score increases for a product the record will be sorted to the top of the search results list if the sort value is blank. If the customer chooses to sort on name, price, etc, then the relevance is no longer pushed to the top. You can have more than one field in the index. They can be a regular product field or a custom product field. In the search form on the SRCH page template include the following code.
<input type="checkbox" name="psrelevance" value="name,descrip">
Important: Note the field names in the value attribute of this input. This must agree exactly with the FULLTEXT field names you used when you rebuilt the database mirror.
In the page count input in the Power Search admin screen locate the page number links. Include the following in them so that the psrelevance variable gets passed.
&psrelevance=&mvta:global:psrelevance;
In the product layout input in the Power Search admin screen locate the forms for add to basket, previous and next. Include the following along with the other hidden inputs that are already there.
<input type="hidden" name="psrelevance" value="&mvte:global:psrelevance;">
You can use none, one, or both of the relevancy boosting features in this module. To help you decide you can temporarily display the scores when running a search and see how they effect the sort order. For example, include the following code just below the &mvt:product:code; variable.
<mvt:if expr="g.psboost OR g.psrelevance">
<mvt:if expr="g.psrelevance">
<br>Score: &mvt:product:pskeyweight;
</mvt:if>
</mvt:if>
To use the boost and relevance feature, put a selection in the sort drop down that has a value of "" so that no sort variable will be passed to the module.
Read this section to familiarize yourself with the steps needed for faceted search and the minimum Power Search version needed to include the features. After you have read through it, there is a "getting started" copy and paste examples link at the end of this section. You will create the field lists, price ranges and attribute-option lists per the instructions in this section. WARNING: Faceted search was claimed to be a patented process in the past. A court decision found that patent to be invalid. However, the patent owner does have the right to appeal and could contact you about your use of faceted search if they do appeal and win the appeal. Here are a couple of articles on the subject: internetretailer and ecommercefuel. If you, as end user, use Power Search to implement a faceted search strategy you agree to indemnify and hold Licensor and its licensors/suppliers harmless from any claims arising out of use of this software. I recommend you consult with your attorney before you implement a faceted search system in your store.
Beginning with version 5.069 of Power Search customers can refine their search by filtering various data elements. While Power Search has always had price range and category filtering, we've added the ability to filter by custom fields dynamically. As the data set is built, the module retrieves the value in specified custom fields and sums the number of hits for each unique value. You can then display the custom field values with one or more hits in a list with links that let the customer refine their search with that specific value in the specific custom field. Currently you can have two custom field filter lists in addition to the category and price filters. If there is a need for more, I will increase that number. Generally, you will only use this with custom fields that have a small list of unique values, e.g. Poor, Good, Very Good, Excellent, Fine, Nearly Mint, Mint. Obviously this is going to be extra processing for your searches so you may see a speed hit. This will depend on how fast your server is, how many filter lists you build, and how many unique values are in each custom field. Look at your custom fields. Which have a reasonable number of unique values and the time involved in building the list will significantly improve the search experience? You will have to weigh this speed hit against the improved dynamic searching capability this implements. To help you decide I have included an internal timer that measures three points; query build, query build + filter list build, and insert search term into the log. Put the following code in the footer of your SRCH page template. It will be hidden but you can see it if you view source after the page loads.
<br>
<!--
Query Time: &mvte:global:psquerytime;
<br>
Query + Filter Time: &mvte:global:psquerytime2;
<br>
Insert Time: &mvte:global:psinserttime;
//-->
Build the custom field values list. Now that you have chosen a custom field to populate the list with, go to the Power Search screen where you rebuild the mirror. There is a form further down the screen titled "Custom Field Values List". Enter the field code of that custom product field. That code must be lower case and 10 or less characters long and match a previously created custom product field. Click the button to build the list. You will need to build the list again if you use new unique values in that custom field in products. Most custom field lists don't change much. As example, the same "condition" words above will be used for all the products that have "condition" as a data element. Course if you misspell the word, that would add a bogus word to the list. You can easily find that product and correct the misspelled word.
Now you will need to include two lines to tell the search form that there is a custom product field that you want to build a refine list with. Go to your SRCH page template. Locate the search form. You will see the input for "search". Just below that input you will put the following two lines. The only thing you need to change is the field code. In the example you see here, it is condition. Change that to the code of the field in your store that you want for this list.
<input type="hidden" name="customfield1" value="condition">
<input type="hidden" name="filter_cf1" value="&mvte:global:filter_cf1;">
Next you need to locate where you want this list to display. It can be anywhere on your SRCH page template. Insert the following code. Change the name of your list from Condition to whatever you want it. Note the long urls are wrapped in this display. When you copy and paste into the SRCH page, make sure to unwrap the urls AND remove any spaces which might have crept in due to wrapping. There should be no spaces in the urls. There are a few things to note in these two urls. Both are assuming you are using two refine lists as you can see filter_cf1, filter_cf2, customfield1, and customfield2. That is fine even if you only use one refine list. The second variables will be blank based on what you put in the main search form above. If you only declare the 1 refind list, the 2 variables will all be blank values. Also, note below that the two urls are slightly different. The first url is used to run a search with the selected value so it includes the group1:name as the filter_cf1 value. But for the filter_cf2 value in the first url, it just passes the existing value of filter_cf2. Look how that is done as you will need to do similar for refine list 2 if you create one. Now for the second url in this block of code, purpose is to remove the filter_cf1 but leave filter_cf2 as is. This expands the list to show all selections again. As you can see, filter_cf1 is blank and filter_cf2 just passes the existing value on. You will have to think this through if you decide to create a number 2 refind list.
<mvt:if expr="l.settings:psgroup1">
<mvt:item name="fonts" param="ctgy_font">
Condition
<mvt:foreach iterator="group1" array="psgroup1">
<mvt:if expr="l.settings:group1:count GT 0">
<br>
<mvt:if expr="l.settings:group1:name EQ g.filter_cf1">
&mvt:group1:name; (&mvt:group1:count;)
<mvt:else>
<a href="&mvt:global:sessionurl;Screen=SRCH&Store_Code=&mvta:store:code;&search=&mvta:global:search;&offset=&filter_cat=&mvta:global:filter_cat;&filter_cf1=&mvta:group1:name;&filter_cf2=&mvta:global:filter_cf2;&PowerSearch_Begin_Only=&mvta:global:PowerSearch_Begin_Only;&sort=&mvta:global:sort;&range_low=&mvta:global:range_low;&range_high=&mvta:global:range_high;&layout=&mvta:global:layout;&searchcatcount=&mvta:global:searchcatcount;&customfield1=&mvta:global:customfield1;&customfield2=&mvta:global:customfield2;&filter_price=&mvta:global:filter_price;&priceranges=1&mvt:powersearch:field_url;">
&mvt:group1:name;</a> (&mvt:group1:count;)
</mvt:if>
</mvt:if>
</mvt:foreach>
<mvt:if expr="g.filter_cf1">
<br>
<a href="&mvt:global:sessionurl;Screen=SRCH&Store_Code=&mvta:store:code;&search=&mvta:global:search;&offset=&filter_cat=&mvta:global:filter_cat;&filter_cf1=&filter_cf2=&mvta:global:filter_cf2;&PowerSearch_Begin_Only=&mvta:global:PowerSearch_Begin_Only;&sort=&mvta:global:sort;&range_low=&mvta:global:range_low;&range_high=&mvta:global:range_high;&layout=&mvta:global:layout;&searchcatcount=&mvta:global:searchcatcount;&customfield1=&mvta:global:customfield1;&customfield2=&mvta:global:customfield2;&filter_price=&mvta:global:filter_price;&priceranges=1&mvt:powersearch:field_url;">
Expand</a>
</mvt:if>
</mvt:item>
</mvt:if>
As you can see, the above refers to customfield1, psgroup1, group1 and filter_cf1. If you decide to have a second refine list, you will duplicate the code and change the 1 to a 2 in the places you see it in the duplicate code except the urls. In the link urls you will have both variables as it will pass the settings of both filters when the link is clicked, so 1 would be 2 and 2 would be 1.
Next, you will go to the Power Search admin screen where the templates are. You will change the link urls in the page count and product layout and the forms in the product layout. Include the following in the page count urls. Do not put it as the last name value pair. You can put it next to last, e.g. right before &mvt:powersearch:field_url; As you can see below, this just passes the existing value of each of the four variables.
&customfield1=&mvta:global:customfield1;&filter_cf1=&mvta:global:filter_cf1;&customfield2=&mvta:global:customfield2;&filter_cf2=&mvta:global:filter_cf2;
Like the link urls, you need to pass the variable values in the add to basket, previous and next forms. Insert the following in all three forms along with the other hidden inputs.
<input type="hidden" name="customfield1" value="&mvte:global:customfield1;">
<input type="hidden" name="filter_cf1" value="&mvte:global:filter_cf1;">
<input type="hidden" name="customfield2" value="&mvte:global:customfield2;">
<input type="hidden" name="filter_cf2" value="&mvte:global:filter_cf2;">
Build the price range list. Power Search has had a price range filter for many years. Customers can enter the low and high price they want to search for. Beginning with version 5.072 I've added a refine list feature like the custom fields above. To implement, it is very similar to the custom fields feature. Start by creating a text file with the labels and ranges in it. Make sure you do not overlap ranges. Name this file powersearch-price.dat Here is an example.
$1 to $99|1-99.99
$100 to $199|100-199.99
$200 to $299|200-299.99
$300 to $399|300-399.99
$400 to $799|400-799.99
$800 to $10,000|800-10000
Now, FTP that file to the Miva data directory called Merchant5/s01/export/ This is a data directory, not your script directory. If you don't know the difference, here's a doc that explains it. The s01 in that path is the number of your store. It may be s02, s03, etc if you installed more than one store in your domain.
Next, as with the custom fields above, you will need to add two lines to the main search form on the SRCH page.
<input type="hidden" name="priceranges" value="1">
<input type="hidden" name="filter_price" value="&mvte:global:filter_price;">
Then to display the list, insert this code at the location you want it on the SRCH page template. As with the custom fields list above, be sure to unwrap the url link lines and ensure they have no spaces in them.
<mvt:if expr="l.settings:psgroup9">
<mvt:item name="fonts" param="ctgy_font">
Retail Price Range
<mvt:foreach iterator="group9" array="psgroup9">
<mvt:if expr="l.settings:group9:count GT 0">
<br>
<mvt:if expr="l.settings:group9:low $ '-' $ l.settings:group9:high EQ g.filter_price">
&mvt:group9:label; (&mvt:group9:count;)
<mvt:else>
<a href="&mvt:global:sessionurl;Screen=SRCH&Store_Code=&mvta:store:code;&search=&mvta:global:search;&offset=&filter_cat=&mvta:global:filter_cat;&filter_cf1=&mvta:global:filter_cf1;&filter_cf2=&mvta:global:filter_cf2;&filter_price=&mvta:group9:low;-&mvta:group9:high;&PowerSearch_Begin_Only=&mvta:global:PowerSearch_Begin_Only;&sort=&mvta:global:sort;&range_low=&mvta:global:range_low;&range_high=&mvta:global:range_high;&layout=&mvta:global:layout;&ProductsPerPage=&mvta:global:ProductsPerPage;&searchcatcount=&mvta:global:searchcatcount;&customfield1=&mvta:global:customfield1;&customfield2=&mvta:global:customfield2;&priceranges=1&mvt:powersearch:field_url;">
&mvt:group9:label;</a> (&mvt:group9:count;)
</mvt:if>
</mvt:if>
</mvt:foreach>
<mvt:if expr="g.filter_price">
<br>
<a href="&mvt:global:sessionurl;Screen=SRCH&Store_Code=&mvta:store:code;&search=&mvta:global:search;&offset=&filter_cat=&mvta:global:filter_cat;&filter_cf1=&mvta:global:filter_cf1;&filter_cf2=&mvta:global:filter_cf2;&filter_price=&PowerSearch_Begin_Only=&mvta:global:PowerSearch_Begin_Only;&sort=&mvta:global:sort;&range_low=&range_high=&layout=&mvta:global:layout;&ProductsPerPage=&mvta:global:ProductsPerPage;&searchcatcount=&mvta:global:searchcatcount;&customfield1=&mvta:global:customfield1;&customfield2=&mvta:global:customfield2;&priceranges=1&mvt:powersearch:field_url;">
Expand</a>
</mvt:if>
</mvt:item>
</mvt:if>
If you are using the custom field and category refine list filters, you will need to add this to the urls links in each of them. Do not put it as the last name value pair.
&filter_price=&mvta:global:filter_price;&priceranges=1
Next, you will go to the Power Search admin screen where the templates are. You will change the link urls in the page count and product layout and the forms in the product layout. Include the following in the page count urls. Do not put it as the last name value pair. You can put it next to last, e.g. right before &mvt:powersearch:field_url; As you can see below, this just passes the existing value of each of the two variables.
&filter_price=&mvta:global:filter_price;&priceranges=1
Like the link urls, you need to pass the variable values in the add to basket, previous and next forms. Insert the following in all three forms along with the other hidden inputs.
<input type="hidden" name="priceranges" value="&mvte:global:priceranges;">
<input type="hidden" name="filter_price" value="&mvte:global:filter_price;">
Beginning with version 5.075 I added a third custom field refine list. The variables are customfield3 and filter_cf3. Use them just like the other two custom fields.
Take a look at this example in the upper left corner to see how it works.
Beginning with version 5.088 I added the ability to put attribute-option data into facets. The facets work just like the custom product fields above, just with different variable names. The options are actually stored in custom product fields. For this example, I'll use the attribute code color and the options blue, red and green.
1) Create a custom product field called color for the code and Color for the name. Create a test product so you'll see how this is going to work. In the custom product field of that product for color put |blue|red|green| Note the data begins and ends with the | character. Later you can think about importing the data from flat file. This is just to get you started.
2) Rebuild the power search mirror since you have added a new custom field. Then go to the power search admin screen and check the box next to color to make it searchable.
3) Build the attribute-option list. Create a text file with the labels on the left and actual option codes on the right. Name this file powersearch-color.dat Here is an example.
Blue|blue
Red|red
Green|green
Now, FTP that file to the Miva data directory called Merchant5/s01/export/ This is a data directory, not your script directory. If you don't know the difference, here's a doc that explains it. The s01 in that path is the number of your store. It may be s02, s03, etc if you installed more than one store in your domain.
4) Next, as with the custom fields above, you will need to add two lines to the main search form on the SRCH page.
<input type="hidden" name="attropts1" value="color">
<input type="hidden" name="filter_ao1" value="&mvte:global:filter_ao1;">
5) Then to display the list, insert this code at the location you want it on the SRCH page template. As with the custom fields list above, be sure to unwrap the url link lines and ensure they have no spaces in them.
<mvt:if expr="l.settings:psgroup5">
<mvt:item name="fonts" param="ctgy_font">
Condition
<mvt:foreach iterator="group5" array="psgroup5">
<mvt:if expr="l.settings:group5:count GT 0">
<br>
<mvt:if expr="l.settings:group5:name EQ g.filter_ao1">
&mvt:group5:name; (&mvt:group5:count;)
<mvt:else>
<a href="&mvt:global:sessionurl;Screen=SRCH&Store_Code=&mvta:store:code;&search=&mvta:global:search;&offset=&filter_cat=&mvta:global:filter_cat;&filter_cf1=&mvta:global:filter_cf1;&filter_cf2=&mvta:global:filter_cf2;&filter_ao1=&mvta:group5:name;&PowerSearch_Begin_Only=&mvta:global:PowerSearch_Begin_Only;&sort=&mvta:global:sort;&range_low=&mvta:global:range_low;&range_high=&mvta:global:range_high;&layout=&mvta:global:layout;&searchcatcount=&mvta:global:searchcatcount;&customfield1=&mvta:global:customfield1;&customfield2=&mvta:global:customfield2;&attropts1=&mvta:global:attropts1;&filter_price=&mvta:global:filter_price;&priceranges=1&mvt:powersearch:field_url;">
&mvt:group5:name;</a> (&mvt:group5:count;)
</mvt:if>
</mvt:if>
</mvt:foreach>
<mvt:if expr="g.filter_ao1">
<br>
<a href="&mvt:global:sessionurl;Screen=SRCH&Store_Code=&mvta:store:code;&search=&mvta:global:search;&offset=&filter_cat=&mvta:global:filter_cat;&filter_cf1=&mvta:global:filter_cf1;&filter_cf2=&mvta:global:filter_cf2;&filter_ao1=&PowerSearch_Begin_Only=&mvta:global:PowerSearch_Begin_Only;&sort=&mvta:global:sort;&range_low=&mvta:global:range_low;&range_high=&mvta:global:range_high;&layout=&mvta:global:layout;&searchcatcount=&mvta:global:searchcatcount;&customfield1=&mvta:global:customfield1;&customfield2=&mvta:global:customfield2;&attropts1=&mvta:global:attropts1;&filter_price=&mvta:global:filter_price;&priceranges=1&mvt:powersearch:field_url;">
Expand</a>
</mvt:if>
</mvt:item>
</mvt:if>
6) If you are using the custom field and category refine list filters, you will need to add this to the urls links in each of them. Do not put it as the last name value pair.
&filter_ao1=&mvta:global:filter_ao1;&attropts1=&mvta:global:attropts1;
7) Next, you will go to the Power Search admin screen where the templates are. You will change the link urls in the page count and product layout and the forms in the product layout. Include the following in the page count urls. Do not put it as the last name value pair. You can put it next to last, e.g. right before &mvt:powersearch:field_url; As you can see below, this just passes the existing value of each of the two variables.
&filter_ao1=&mvta:global:filter_ao1;&attropts1=&mvta:global:attropts1;
8) Like the link urls, you need to pass the variable values in the add to basket, previous and next forms. Insert the following in all three forms along with the other hidden inputs.
<input type="hidden" name="attropts1" value="&mvte:global:attropts1;">
<input type="hidden" name="filter_ao1" value="&mvte:global:filter_ao1;">
9) Now test. You can have two facets with attribute-option data. The variables would be attropts2, filter_ao2, psgroup6.
Once you get the attribute-option facet working, you can explore methods to put the data into the custom product fields. You can use Excel and manually enter the options into a cell and then do a flat file import. You would update existing products. However, an easier method is in the Template Data Feed module. See the install doc FAQ section of that module on how to create a flat file with the product code and option codes. Then you can import that flat file into products. The process takes most stores about 5 minutes to create the file and import the data.
Take a look at this example in the upper left corner to see how it works. The attribute-option is "version" in this test store.
Now that you have reviewed this section, go to getting started for copy and paste examples.
With Power Search version 5.035 or newer you can include a list of categories that the found items are in along with the count of the number of hits in each of those categories.
In the existing search form, put
<input type="hidden" name="searchcatcount" value="1">
to turn it on. You will also need the searchcatcount variable in urls for page links, etc if you want the list on more than just the initial search. Keep in mind this is an extra amount of processing. You will need to determine if this feature adversely effects search performance in your store. Then at the location where you want the category list to display, put the following code. Note the link in the url has been wrapped to several lines so it does not stretch this doc's display. You'll need to unwrap that line without spaces so it is one long line for the href link.
<mvt:if expr="l.settings:searchcats">
<br>
Category
<mvt:item name="fonts" param="ctgy_font">
<mvt:foreach iterator="searchcat" array="searchcats">
<br>
<mvt:if expr="l.settings:searchcat:id EQ g.filter_cat">
&mvt:searchcat:name; (&mvt:searchcat:count;)
<mvt:else>
<a href="&mvt:global:sessionurl;Screen=SRCH&Store_Code=&mvta:store:code;&search=&mvta:global:search;&offset=&filter_cat=&mvta:searchcat:id;&filter_cf1=&mvta:global:filter_cf1;&PowerSearch_Begin_Only=&mvta:global:PowerSearch_Begin_Only;&sort=&mvta:global:sort;&range_low=&mvta:global:range_low;&range_high=&mvta:global:range_high;&layout=&mvta:global:layout;&searchcatcount=&mvta:global:searchcatcount;&customfield1=&mvta:global:customfield1;&psrelevance=&mvta:global:psrelevance;&psboost=&mvta:global:psboost;&mvt:powersearch:field_url;">
&mvt:searchcat:name;</a> (&mvt:searchcat:count;)
</mvt:if>
</mvt:foreach>
<mvt:if expr="g.filter_cat">
<br>
<a href="&mvt:global:sessionurl;Screen=SRCH&Store_Code=&mvta:store:code;&search=&mvta:global:search;&offset=&filter_cat=&filter_cf1=&mvta:global:filter_cf1;&PowerSearch_Begin_Only=&mvta:global:PowerSearch_Begin_Only;&sort=&mvta:global:sort;&range_low=&mvta:global:range_low;&range_high=&mvta:global:range_high;&layout=&mvta:global:layout;&searchcatcount=&mvta:global:searchcatcount;&customfield1=&mvta:global:customfield1;&psrelevance=&mvta:global:psrelevance;&psboost=&mvta:global:psboost;&mvt:powersearch:field_url;">
Expand</a>
</mvt:if>
</mvt:item>
</mvt:if>
Beginning with version 5.066 of Power Search there is a feature that allows product comparisons displayed either vertically or horizontally. The search form has an extra hidden input that passes the fields that are going to be compared. The search contains the product codes, separated with either a space or comma, of the products to be compared. The form and display are on a different page template called COMPARE. You will create the COMPARE page and decide if you want to display the results horizontally or vertically. The example code can be used to create your page. If you have our Emporium Plus Tool Kit you may want to include the ability to send a screen snapshot of the comparison page to a friend or yourself for further study. Here's an example of the code with the Tool Kit send page form included. You will need the Tool Kit ( sold separately) to use this second form. There are three ways to submit products for comparison.
1) Submit a form which is pre-populated with product codes in a custom product field setup by you in advance. Create a custom product field called "compare". To see how this works, go to the product edit screen of a product that has similar products to it. They should all have the same custom product fields for comparison. Enter the product codes separated by a comma. Now put the below code on the PROD page template. It will only display on a product that has the compare custom product field populated. The only extra input from the regular search form is the hidden input for "pscells". This is also the only input you need to change so it will work in your store. Study the example below. It contains groups of text separated by commas. The first word is the column name that the customer will see. The second word is the field code that stores the data. If the field is a regular product field, e.g. name, thumbnail, etc, you just put in the field code in lower case. If it is a custom product field you prefix the field code with cf_. As you can see in the example below, cf_actors would tell the module that it is a custom field called actors. The other type field data you will retrieve is currency formatted numbers, e.g. formatted_price. The module will recognize that as the price field which is then formatted to your country's currency. It cannot format custom field data. But then you normally would already store that data as currency formatted, e.g. $10.00. The third word in the groups is the align for the table cells. If a third is not include, it will default to "left". The other options are r (right) and c (center). See the example below. If you have various types of products in your store that has different fields for comparison, you could include the pscells value in a custom product field also. Then populate the form for both search and pscells with custom product field data. See the compare button below the description on this example product.
<mvt:if expr="NOT ISNULL l.settings:product:customfield_values:customfields:compare">
<form method="post" action="&mvt:global:sessionurl;">
<input type="hidden" name="Store_Code" value="&mvte:store:code;">
<input type="hidden" name="Screen" value="COMPARE">
<input type="hidden" name="PowerSearch_Begin_Only" value="4">
<input type="hidden" name="srch_code" value="1">
<input type="hidden" name="pscells" value="Image.thumbnail.c,Name.name,Year.cf_circa,Actors.cf_actors,Condition.cf_condition,Studio.cf_company,Price.formatted_price.r">
<input type="hidden" name="search" value="&mvte:product:customfield_values:customfields:compare;">
<input type="submit" name="trash" value="Compare">
</form>
</mvt:if>
2) Put checkboxes on a category type page where the customer can select products to compare. You'll need Power Search version 5.068 or newer for this code to work. This method makes the products more likely to have the same custom product fields (therefore comparable) than a random search or product list screen. There are four steps to accomplish this.
2-1. Go to admin > pages > PROD and click edit. Then click Category Product List Layout. Locate the line which begins the product array <mvt:foreach iterator="product" array="products"> Just before that line you will put the main form. Alternatively you can put the form after the end of the array. You will need to change the hidden inputs for psauto and pscell for your specific store's custom fields (see the last paragraph in this section). On all the browsers I tested this on the search input boxes were hidden using the div tag.
<form id="PowerSearch_Compare" name="PowerSearch_Compare" action="&mvt:global:sessionurl;" method="post">
<input type="hidden" name="Store_Code" value="&mvte:store:code;">
<input type="hidden" name="Screen" value="COMPARE">
<input type="hidden" name="PowerSearch_Begin_Only" value="4">
<input type="hidden" name="srch_code" value="1">
<input type="hidden" name="psauto" value="5|circa,company,condition,style,genre,isbn,rating">
<input type="hidden" name="pscells" value="Image.thumbnail.c,Name.name,psauto,Price.formatted_price.r">
<mvt:item name="powrsrch" param="sassign|one|1" />
<mvt:item name="powrsrch" param="sassign|currentcount|0" />
<div style="display:none;">
<mvt:foreach iterator="product" array="products">
<input type="checkbox" name="search" id="&mvte:global:currentcount;" value="&mvt:product:code;">
<mvt:item name="powrsrch" param="math_add|currentcount|currentcount|one" />
</mvt:foreach>
</div>
<mvt:item name="powrsrch" param="sassign|currentcount|0" />
<input type="submit" name="trash" value="Compare 5">
</form>
2-2. Then each iteration of the products array (between <mvt:foreach iterator="product" array="products"> and </mvt:foreach>), you create a checkbox input at the location where you want the checkbox. As it turns out, if you have the same named input several times, the value of the inputs when selected are tied together in a long string with commas between each selection. So we end up with the search input populated with the product codes of those selected.
<input type="checkbox" name="search" id="&mvte:global:currentcount;" value="&mvt:product:code;" onclick="compareboxes(this)">
<mvt:item name="powrsrch" param="math_add|currentcount|currentcount|one" />
2-3. Note that I named the button Compare 5 in the form above. This depends on how you orient your form on the COMPARE page. The best looking unfortunately will only take about 5 products wide. I made this button to say Compare 5. That does not mean the customer will abide by your instructions. So in the head section of the CTGY page you will put a javascript handler to do two things; 1) stop the customer after they select 5 (or whatever you choose), 2) update the main form with the selected checkboxes. Select the Page link. In the head tag section (between <head> and </head>) you will put the following javascript.
<script type="text/javascript">
<!--
var runningtotal=0
function compareboxes(box)
{
if(box.checked)
{
runningtotal=runningtotal+1;
}else{
runningtotal=runningtotal-1;
}
if (runningtotal>5)
{
runningtotal=runningtotal-1;
alert('Please limit your selections to 5 items')
box.checked=false;
return false;
}
document.PowerSearch_Compare.search[box.id].checked = box.checked;
}
//-->
</script>
<mvt:item name="powrsrch" param="sassign|one|1" />
2-4. Next select the Items link. Scroll to the end and find Power Search (powrsrch). Check the box to assign it. Click Update.
See the checkboxes and Compare button on this example category.
3) Manually enter product codes to compare in the search input form on the COMPARE screen. This only works on the compare screen because that form has the hidden input of PowerSearch_Begin_Only with a value of 4. This tells Power Search to treat each keyword as a product code and put them into an array of product variables. If you are going to use this approach you will need to provide the pscells variable in the submit form on that page. See the example page code for the COMPARE page template. If the pscells variable exists, it uses it. If it does not, it supplies a default store value for that variable. You can see an example here. Copy and paste these codes LC_00105,1S_00025,1S_00031,1S_00034,DB_00001 into the form input and click Compare.
Beginning with version 5.067 of Power Search, you can specify custom product fields to be used if they are not included in the original submission form. See this example that is in the example COMPARE page template.
<input type="hidden" name="psauto" value="5|circa,company,brand,itemsize,actors,condition,director">
<mvt:if expr="g.pscells">
<input type="hidden" name="pscells" value="&mvte:global:pscells;">
<mvt:else>
<input type="hidden" name="pscells" value="Image.thumbnail.c,Name.name,psauto,Price.formatted_price.r">
</mvt:if>
The first line has a 5 in it. That tells the module to show up to 5 custom product fields for comparison. If you layout your field comparisons vertically (see the example COMPARE page code) you could certainly have more than that. The second part of that line is the list of custom product fields with the most important first. Not all products will have all fields. The module checks the products you are displaying in the comparison page and only includes those where at least one of the products used that field. This gives you a dynamic display based on the products listed. The conditional after that line says if a pscells value already exists, use it. If not, here is the list of fields to show. As you can see; thumbnail, name and formatted_price come from the products database. In the middle of that list I put psauto. This tells the module to look at the psauto list and use those custom fields that are applicable in the order they are in the list.
Beginning with version 5.080 of Power Search you can provide your customers with a suggested word list if their search failed to return any results, e.g. because of misspellings. First you must import your suggested words under admin > utilities > import data > power search. Your flat file has to be in the format of one word per line. There are many generic free word lists on the Internet (e.g. Google words.txt). However, I would recommend using words that are characteristic of your store and products. You could make the word list manually by typing words in notepad. The easiest way to do it is use the parse token in our Template Data Feed module. This produces an intelligent word list directly from your name, description and custom product fields. Hence, when the customer selects one of the suggested words, they will get a hit on at least one product.
Once you have built the word list, you need to insert the following code just below the "No products matched your search criteria" line in the SRCH page template.
<mvt:item name="powrsrch" param="soundex" />
<mvt:if expr="l.settings:pssoundex">
Did you mean?
<mvt:foreach iterator="term" array="pssoundex">
<a href="&mvt:global:sessionurl;Screen=SRCH&Store_Code=&mvta:store:code;&search=&mvta:term;&customfield1=&mvta:global:customfield1;&customfield2=&mvta:global:customfield2;&customfield3=&mvta:global:customfield3;&searchcatcount=&mvta:global:searchcatcount;&priceranges=1">
&mvt:term;</a>
</mvt:foreach>
</mvt:if>
Now when customers search on a word and there are no matching products, Power Search will search your previously built file for the soundex code of words that match their search terms.
If you have the Emporium Plus Tool Kit module, you can retrieve the search results from your other store(s) and insert them into a single search page. You can see this effect at our test MivaSQL store. Check the box for two store search. Search for something and note the results return. Then scroll down and you will see the results from our MySQL store inserted in a box with links for a full search at that store. Here is how we did it. On the SRCH page template of the primary store insert the following code where you want the results to display. Be sure to change the domain to your actual domain of the second store.
<mvt:if expr="g.search">
<mvt:item name="toolkit" param="sassign|srchurl|http://www.YOURSECONDSTOREDOMAIN.com/mm5/merchant.mvc" />
<mvt:item name="toolkit" param="sassign|screen|QUICKSRCH" />
<mvt:item name="toolkit" param="vcallurl|altsrch|srchurl|POST|g.screen,g.search,g.filter_cat,g.range_low,g.range_high" />
<mvt:item name="toolkit" param="sassign|screen|SRCH" />
&mvt:global:altsrch;
</mvt:if>
Next, at the second store add a new blank page template called QUICKSRCH. Save the blank page. Then copy and paste the following code into the new page and save the changes. This example will display the first 5 results. Now click Items at the top of the page template and assign the powrsrch, fonts, and colors items to the page. No other items need to be assigned to this page.
<mvt:if expr="l.settings:product_count GT 0">
<center>
<table border="0" cellpadding="2" cellspacing="0" width="60%" bgcolor="#d3d3d3">
<tr>
<td align="left" valign="bottom" colspan="3">
We also have &mvte:product_count; similar item(s) in our other store, <a href="&mvt:global:domain:mm_url;Screen=SRCH&Search=&mvta:global:search;&Store_Code=&mvta:global:store:code;&searchcatcount=1&priceranges=1&filter_cat=&mvta:global:filter_cat;&range_low=&mvta:global:range_low;&range_high=&mvta:global:range_high;">
&mvt:global:store:name;</a>
. </td>
</tr>
<tr>
<td align="left" valign="middle" bgcolor="&mvt:colors:lhdr_bg;">
<mvt:item name="fonts" param="lhdr_font">
<b>
Code
</b>
</mvt:item>
</td>
<td align="left" valign="middle" bgcolor="&mvt:colors:lhdr_bg;" width="100%">
<mvt:item name="fonts" param="lhdr_font">
<b>
Name
</b>
</mvt:item>
</td>
<td align="right" valign="middle" bgcolor="&mvt:colors:lhdr_bg;">
<mvt:item name="fonts" param="lhdr_font">
<b>
Price
</b>
</mvt:item>
</td>
<mvt:foreach iterator="product" array="products">
<mvt:if expr="pos1 LT 6">
<tr>
<td align="left" valign="middle" bgcolor="&mvt:product:bgcolor;" nowrap>
<mvt:item name="fonts" param="body_font">
<a href="&mvt:global:sessionurl;Screen=PROD&Product_Code=&mvta:product:code;&Store_Code=&mvta:global:store:code;&search=&mvta:global:search;&filter_cat=&mvta:global:filter_cat;&range_low=&mvta:global:range_low;&range_high=&mvta:global:range_high;&searchcatcount=1&priceranges=1">
&mvt:product:code;</a>
</mvt:item>
</td>
<td align="left" valign="middle" bgcolor="&mvt:product:bgcolor;">
<mvt:item name="fonts" param="body_font">
&mvt:product:name;
</mvt:item>
</td>
<td align="right" valign="middle" bgcolor="&mvt:product:bgcolor;" nowrap>
<mvt:item name="fonts" param="body_font">
&mvt:product:formatted_price;
</mvt:item>
</td>
</tr>
</mvt:if>
</mvt:foreach>
<tr>
<td align="left" valign="bottom" colspan="3">
<mvt:if expr="l.settings:product_count GT 5">
<a href="&mvt:global:domain:mm_url;Screen=SRCH&Search=&mvta:global:search;&Store_Code=&mvta:global:store:code;&searchcatcount=1&filter_cat=&mvta:global:filter_cat;&range_low=&mvta:global:range_low;&range_high=&mvta:global:range_high;&priceranges=1">
See more</a>
</mvt:if>
</td>
</tr>
</table>
</center>
</mvt:if>
Q: When I build the mirror, I get the following error message:
Fatal Error
MIVA Merchant has encountered a fatal error and is unable to continue. The following information may assist you in determining the cause of the error:
Error Code: MER-UTL-POW-00006
Description: Table 's01_PowerSearchProducts' does not exist
Other Information:
Runtime error in /mm5/5.00/modules/util/powrsrch.mvc @ [00000011:000005c4]: powrsrch.mv: Line 1022: MvOPENVIEW: Unknown table 's01_PowerSearchProducts'
A: This usually occurs when you had a rebuild that fails. When running the mirror rebuild, there is a setting for the number of records at a time. Change that to 567 and run the rebuild. After a successful rebuild, go back and change that number to something other than 567 and rerun the rebuild. If it fails to rebuild, often the problem is how you named the custom product field codes. See the important paragraph above under "when to rebuild the mirror".
Q: It does not appear to be searching the field I selected.
A: In the Power Search admin there is a list of fields. You choose which fields will be searchable by customers. Fields like name, code and description are typical. Fields like weight are not. Make sure any fields you offer for searching in merchant have been assigned as being searchable in the module's admin.
Q: What does the following error mean when I try to rebuild the mirror in admin?
Error Code:
MER-UTL-POW-00007
Description:
mysql_stmt_prepare: You have an error in your SQL syntax; check the manual that corresponds to your MySQL server version
A: More than likely there is a problem with the custom product fields. Please READ THIS WARNING.
Q: What does the following error mean when I run a search in merchant?
Runtime error in /Merchant2/5.00/modules/util/powrsrch.mvc @
[00000018:0000139e]: powrsrch.mv: Line 2452: MvOPENVIEW: mysql_stmt_prepare:
You have an error in your SQL syntax; check the manual that corresponds to
your MySQL server version
A: Go to the Power Search admin screen. Make sure you have checked the box by at least one field name to be searchable.
Q: It does not appear to be sorting correctly or selecting by price range.
A: This is usually caused by not doing the final editing requirements step:
"c) Unassign the product_list (or search_results if using CSSUI) item from the srch page template's item list only. Do not remove it from the master list of items."
A: If that does not fix it, it could be also from a version of the module released during a narrow date range that had code to control for hackers but caused undesireable effects in sorting. If you don't have the latest version, make sure you update to the latest, then test again.
Q: When linking from the search screen to the individual product page, the BuySafe seal does not display.
A: Fix for BuySafe module bug. There is a bug in the BuySafe module that does not like the word Only= in the link url. This word appears in the variable PowerSearch_Begin_Only in the urls linking to the product page from the search. This can easily be fixed if you are using BuySafe and want the seal on the product page. Go to the Power Search admin screen and scroll down to the product layout input. You will see links to the product page containing the text &PowerSearch_Begin_Only= Change that to &PowerSearch_Begin_Only_= ie. simply adding a _ between the Only and = character. Then in the product page template, if you included the code for the optional return to search, change it to read
<mvt:if expr="NOT ISNULL g.search">
<a href="&mvt:global:sessionurl;Screen=SRCH&Store_Code=&mvta:store:code;&search=&mvta:global:search;&offset=&mvta:global:offset; &filter_cat=&mvta:global:filter_cat;&PowerSearch_Begin_Only=&mvta:global:PowerSearch_Begin_Only_; &sort=&mvta:global:sort;&range_low=&mvta:global:range_low;&range_high=&mvta:global:range_high; &srch_name=&mvta:global:srch_name;&srch_code=&mvta:global:srch_code;&srch_descrip=&mvta:global:srch_descrip;">
Return to search</a>
</mvt:if>
Note the _ character only goes at the end of the second instance of PowerSearch_Begin_Only
Q: I rely on related products on the product page. When I click a link from the search page to the product page, the related products do not always display.
A: This problem does not occur in CSSUI stores due to the change in variable naming which Miva implemented for those stores. The url on the search page contains many variables so that the "return to search" functions properly. One of them is offset. If you are on the 1st page of the search results there is not a problem. However, if you are on a deeper page in the search, the offset variable is higher than 0. As it happens, the related products list uses that same variable to decide which page of related products it is on. So if related products on a deep searched product page is more important than return to search capability, you can alter the url. Go to the Power Search admin screen and scroll down to the product layout input. You will see links to the product page containing the text &offset=&mvta:global:offset; Change the url to remove that name value pair (erase &offset=&mvta:global:offset;).
Q: Can I bold the search word in the search results?
A: Beginning with version 5.041 I added two new variable tokens which you can use in the product layout template in the power search admin screen. Replace &mvt:product:name; with &mvt:product:name2; to bold the search term in the product name display. Insert &mvt:product:brief; under the name display if you want a short segment of the description with the search term in bold. In version 5.058 I added span tags so you could change font and color. View the search results page to see how the classes are used.
Q: I noticed that in your example stores you also highlighted the search words on the product page when clicking from the search page. I realize that is probably not done with the Power Search module because it is on the product page, so how did you do that?
A: That is done with the Emporium Plus Tool Kit module which many stores have. It has dozens of neat utility functions. For a "how to" on the highlighting of the search terms, go to this Miva forum post. Scroll to entry #65. This will not work for everybody. Since it is wrapping the search words with bold and span tags, the search words cannot be imbedded inside other tags, e.g. an image tag containing an "alt" with the product name, in the text of your description. Most stores don't do that; they put the image in the proper place using &mvt:product:image; instead of inside the description text.
Q: When I try to rebuild the mirror it seems to do the first 100 products and then hangs.
A: Try a different browser, e.g. Firefox.
Q: What is the syntax for the sort variable?
A: Name the field to sort on followed by ".asc" or ".desc", depending on whether you want ascending or descending order. So to sort on product name would be &sort=name.asc Make sure you use lower case lettering. Beginning with version 5.103 you can sort on multiple fields. For example, to sort on name ascending and price descending (highest first), you would write it as &sort=name.asc,price.desc in urls and <input type="hidden" name="sort" value="name.asc,price.desc"> in forms. No spaces allowed in the sort string.
Q: I received this error when rebuilding the mirror database:
Description: mysql_execute: Row size too large. The maximum row size for the used table type, not counting BLOBs, is 65535.
What does this mean?
A: The mirror pulls all the product and custom fields into one database for more efficient searches. In most stores this is not a problem. However, this imposes a limit to the number of custom product fields that can be used. Most stores do not have more than 10. I don't know what the database limit is, but I would suspect it is over 60. If your store has more custom product fields than 60, this module may not work. If you can, try reducing the number of custom fields.
Q: Can Power Search be used on mobile optimized pages?
A: Yes. We even have a copy and paste how to if your store is using Miva's version of the mobile optimized pages.
Q: How did you do the autocomplete feature I saw in the search screen of your 5x test store?
A: That is done with a javascript program. I have tokens in the power search module (version 5.062 or newer) which will create an array of search terms for JavaScript Object Notation content based on the letters typed in. The code is
<mvt:item name="powrsrch" param="headeroutput|Content-Type|application/json" />
<mvt:item name="powrsrch" param="picklist|8" />
{ results: [
<mvt:foreach iterator="pick" array="picklist">
<mvt:if expr="pos1 EQ 1">
{id: "&mvte:pick:id;", value: "&mvte:pick:term;"}
<mvt:else>
,{id: "&mvte:pick:id;", value: "&mvte:pick:term;"}
</mvt:if>
</mvt:foreach>
] }
I created a new page called XXXXX and the only thing on that page is the above code. Then the javascript application calls and runs that code as the customer types into the search input. The variable the javascript application needs to pass is autoletter. You would change the above code to the format needed by your particular javascript application. Each one is a bit different. By making a token which can be put on a page template, you have great flexibility in the output format and the javascript applications you can use.
Q: How can I use custom product images in Power Search?
A: The Power Search incorporates the Tool Kit function customimage from the Emporium Plus Tool Kit to retrieve the custom product images. The Tool Kit does not need to be installed in your store as the functions have been embedded in Power Search version 5.115 and newer.
Use customimage to retrieve a product's custom images values (if it exists). It saves the value to a variable of your choosing. For example,
<mvt:item name="powrsrch" param="customimage|big|l.all_settings:product:id|fullsize" />
<mvt:if expr="g.big">
<img src="&mvt:global:imageroot;&mvte:global:big;">
</mvt:if>
will check the product's custom image field "fullsize" for the current path and save the value to a variable called "big". You can then mvt the "big" variable to display it. If you leave the 4th parameter blank, the function will return the first custom image in the images array.
Alternatively, you could show the first image of a specific size (if it already exists) without defining the image type.
<mvt:item name="powrsrch" param="customimage|big|l.all_settings:product:id||42|42|" />
<mvt:if expr="g.big AND (NOT ISNULL l.settings:toolkitadditionalimages[1]:generated:image)">
<img src="&mvte:toolkitadditionalimages[1]:generated:image;" border="0">
</mvt:if>
If you want more details and examples of this function you can review its usage on the Tool Kit product page at Emporium Plus.