Copyright © 2001, William Weiland
Contact your customers a few days or weeks after they've purchased products at your store with an automatically generated "stock" email. This module captures pertinent order information and uses it for generating a follow-on email. This gives you an opportunity to guage customer satisfaction with your store. You can also send one or two product specific follow-on emails after the sale. Each product can have different emails and the interval for sending can be different.
If this is an upgrade, see the note at the bottom of the master install document index
Install followon.mvc
1) In admin, click Add Modules link (fig 2)
2) Click the file upload button
3) Browse to find the followon.mvc file on your hard drive and upload (fig 3)
4) Click Add to add it to the domain
5) Then in admin click on the plus to the left of Stores
6) Click the plus to the left of your store name
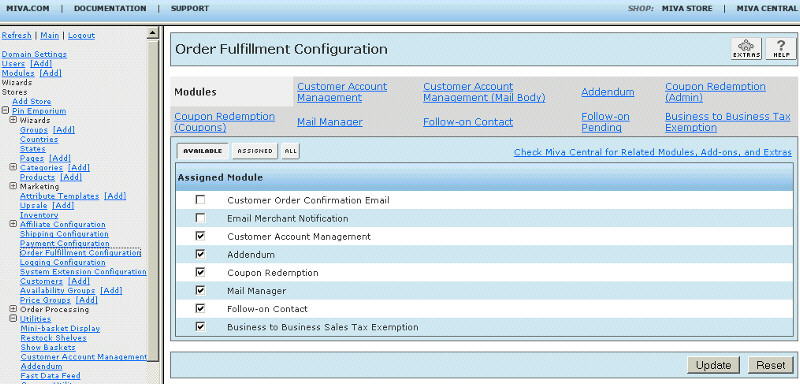
7) Click on Order Fulfillment Configuration link (fig 4)
8) Check the box next to the Follow-on Contact
9) Click Update
10) The CIM Activity Log (cim_log.mvc) may already be in your store as it is used by many of our modules. Check under the Modules link to see if it is already there. If it is there, skip to 19. If not, then go to 11.
Install cim_log.mvc
11) Again, click Add Modules link
12) Click the file upload button
13) Browse to find the cim_log.mvc file on your hard drive and upload
14) Click Add to add it to the domain
15) Click on the Logging Configuration Link
16) Check the box next to the CIM Activity Log
17) Click Update
18) Skip to 24
Update cim_log.mvc
19) Click Modules link
20) Scroll down to CIM Activity Log and click the link
21) Click the file upload button
22) Browse to find the cim_log.mvc file on your hard drive and upload
23) Click Update to update the module
Configure the module
24) Return to the Order Fulfillment Configuration screen and click the link for Follow-on Contact to enter the configuration settings
This section applies if you are upgrading from Merchant 4.x to 5.x. In your Merchant 4.x you need to be running the most current version of follow-on contact as it includes an export feature so that you can create a flat file of your product specific email templates.
1) Export the Merchant 4.x follow-on data to the flat file "followup.txt" from the module's admin screen. It will be in the store's root data directory, e.g. Merchant2/00000001/followup.txt
2) Use the 5.x import module (follimpt.mvc) to import those email templates into your Merchant 5.x store
In the Fulfillment Configuration screen you will enter several items. One of them is which screen you will have the program "flush" pending emails. When a customer browses your store, at the end of a particular screen load, MIVA Merchant will flush the pending emails if the last digit of the seconds (time) is a zero. Thus, about every 10th display of the screen you choose, Merchant will flush the next batch of pending emails. It will only flush five at a time or no more than a 15 second delay. I have found that the delay is probably less than a second to flush emails to the server send mail spool. I also think the Product (PROD) screen is the best location to include the "flush". If your customers rarely visit that screen, you may need to pick a different screen. If your store is made of static html pages and you are not using the regular Merchant screens, this module is not going to work for you.
The initial setup of the module creates the legacy email. It is the same one used in our older 4x version of the module. Beginning with version 5.013 of the module you can use a store morph page template to create the email. If you decide to create the store morph email, first create the email page template. See the how to example. Then in the follow-on contact admin, put FOLLOWON at the very beginning of the "Follow-on Email Body" input. You can erase the rest of the text in that input or you can leave the old default email there. It will be ignored as long as FOLLOWON is the first 8 letters in that input. You'll probably want to have the module in test mode until you get the look and feel of the email like you want it.
You may decide not to send the generic email to all customers. If you put the pound character (#) at the very beginning of the email body input, the generic emails will not be sent. In this scenario you are probably using the module to send the product specific follow-on emails (see next paragraph). If you are using our Coupon Redemption module you can embed a token to produce a unique coupon code for each individual email. You may find this useful for marketing and promoting revisits and new sales. See the example legacy email or example store morph email for coupon generation with a token. The default character set for the legacy html emails is iso-8859-1. If you need a different character set, e.g. utf-8, you can use the charset token like %charset|utf-8%. The default character set for the store morph email is UTF-8. If you want to change that, use the charset token like %charset|iso-8859-1%.
In the individual product edit screen you will see a tab (link) for the Follow-on Contact. You can create one or two follow-on emails for each product in your inventory. When an order contains a product with follow-on emails assigned, a record is added to the follow-on email queue. When the due date arrives to send the email, if the body of the follow-on email is not empty, the email will be sent. Like the generic email, you can add a coupon token to the product specific emails. These emails are usually used to promote another product at a specific time frame or to encourage a repeat or maintenance sale for the original product. You can have two product specific emails in addition to the generic email, for a total of three follow-on emails to increase sales and enhance marketing. The default character set for the html emails is iso-8859-1. If you need a different character set, e.g. utf-8, you can use the charset token like %charset|utf-8%. There is no store morph template for the individual emails as it really isn't needed. Beginning with the module version 5.015, you can change the subject of each product specific email. You can also include a reply-to feature so if the customer replies to the product specific email it can be sent to a specific person. The tokens to do these are
%subject|Follow-up Order %order_id% from %placed%%
%reply-to|abc@yourdomain.com%
Beginning with version 5.017 you can also change the from address block, e.g.
%from|abc@yourdomain.com%
%from_name|YOUR STORE NAME%
To use the from_name token you will need to have "Add Angle Brackets to Email Addresses" turned on in your global settings:domain settings:site configuration if your mail server supports them. The mail server also has to support the name inclusion. If you find the email is not sending with them, then roll back to just the email address and see if that fixes it. If your mail server does not support it, it is likely due to strict application of the "from" address rules.
In version 5.020, we added a variation of the from_name token. If your mail server is not allowing the from address name, try this format. The new servers at mivamerchant.com are using a mail server that requires this format.
%from|abc@yourdomain.com%
%from_namens|YOUR STORE NAME%
You will need Emporium Plus Tool Kit version 5.270 or newer and Follow-on Contact version 5.022 or newer in order to implement this feature. The Tool Kit maintains a registry of customers who have told you they only want order emails from you. First setup the Tool Kit functionality. See the functions "donotemail_e" and "donotemail" in the functions list.
Here is example code you can put in the Follow-on Contact email to allow them to unsubscribe from emails.
If you want to be placed on the Do Not Email registry and only receive emails when you place an order or when there is a product recall, click the email address <a href="http://www.YOURDOMAIN.com/NOEMAIL.html?Action=add&email=%DoNotEmail_E%">%DoNotEmail%</a>
The Follow-on Contact module version 5.022 or newer has code in it that will replace the token %DoNotEmail% and %DoNotEmail_E% with the 'to' address the email is being sent to. If the email recipient clicks the link they will land on the page NOEMAIL and pass the 'add' action and email address to the Tool Kit donotemail_e (or donotemail) function. With the Follow-on Contact module four things need to happen to prevent someone from receiving those emails. a) You need to be using Tool Kit 5.270 or newer, b) You need to be using Follow-on Contact 5.022 or newer, c) The tokens %DoNotEmail% and %DoNotEmail_E% must be in the follow on email template, d) The customer would have to click the link to be placed on the Do Not Email registry.
This registry can be used for any module written to interface with it. So, as example, you use the Restock Shelves module to send emails to customers who have abandoned carts and offer them a coupon to come back and make the purchase. If you have a version of the module that supports it, you can include the token %DoNotEmail% and %DoNotEmail_E% in the email template and it will know to check the registry before sending emails. If you do not include that token, the module will skip the registry check and send them emails even if they opted from the Follow-on Contact emails. This may upset customers who've told you they only want order emails from you. So if you are going to offer a Do Not Email option, you probably should do it with all modules which send non-order emails.
You may want to test this module by sending all of the follow-on emails to you until you are sure you have them the way you want them to look. In the module's admin screen, check the box for test mode. For testing set the number of days to 0 for the generic email and -1 for the product specific emails.
You can check to see when the next 100 emails of each type (generic, 1st product specific, 2nd product specific) are coming due by clicking the tab for the pending follow-on emails under the order fulfillment configuration screen.
Important: Periodically you need to go to the follow on admin screen. Check the box "Purge obsolete individual product followup emails" and click update.
Q: The emails do not appear to be sending. The pending queue still has all of the emails in it.
A: Make sure the CIM Activity Log is assigned under the admin > store > logging configuration menu.
A: Check which screen you have the module set for "Process at screen". That screen needs to be hit by your customers at a reasonable frequency.
Q: I am including links and thumbnail images to the products ordered in the general and product specific emails. How can I make a link that the customer can click to add the product to the basket from these emails?
A: Use a link like this in the product section of your legacy emails
<a href="http://www.yourdomain.com/mm5/merchant.mvc?Action=ADPR&Screen=BASK&Product_Code=%product_code%&Quantity=1"> Reorder</a>
Q: Is there a way for a customer to tell the module not to send them an email?
A: Yes and no. The following applies to Follow-on Contact version 5.013 or newer. If NONE of your payment gateways go offsite, then you can put the following input inside the form on the OPAY page.
<input type="checkbox" name="nofollowon" value="1"> Don't send me emails other than the order confirmation.
As long as they check the box and they go to the invoice after clicking the Continue button on the OPAY page, that variable will block inserting a follow-on email in the queue for that specific customer. If they don't check the box, then they will go into the queue. This method will not work if they go offsite for payments. So if they use Google or Amazon or PayPal (standard or express), the checkbox value will not be passed back to Merchant. Thus they would be put in the queue. The bottom line is, if you use any of the off-site payment systems as one of your payment methods, then you cannot give the customers this option.
Q: Can I use the Emporium Plus Tool Kit module to write conditionals to change the content in the FOLLOWON template email or even cancel the sending of the generic template email based on certain scenarios?
A: Yes. The FOLLOWON page template email works like other page templates so the Tool Kit works in it. There could even be conditions that you have where you would not want to send the email for a particular order. So you could write your store morph conditional and then use the Tool Kit token <mvt:item name="toolkit" param="sassign|kill_flw_email|1" /> If the kill_flw_email variable has a value, the email is canceled. Be sure to assign the toolkit item to the items list of the FOLLOWON page template.
Still have a question?